This blog is meant to be accompanied by a video which will release soon (like this) You can find source code for this project here.
Introduction
I made a Tetris application on AWS by using Terraform for creating a scalable and secure setup. This architecture involves several AWS services like ALB, ASG, CloudFront, Route53, and VPC, all aligned with Terraform’s best practices. It also includes setting up security groups and NAT, key for network management.
Pre-requisites
Downloads
AWS CLI - Install AWS CLI on your local machine.
Terraform - Install Terraform on your local machine.
AWS Account Configuration
AWS IAM - Create an AWS IAM User with Administrator Access and create an access key and secret key.
AWS CLI - Configure AWS CLI with the access key and secret key. Your region is dependent on your AMI. If you change AMI, change region to match it
Diagram
I created a diagram for the infrastructure that will be deployed.
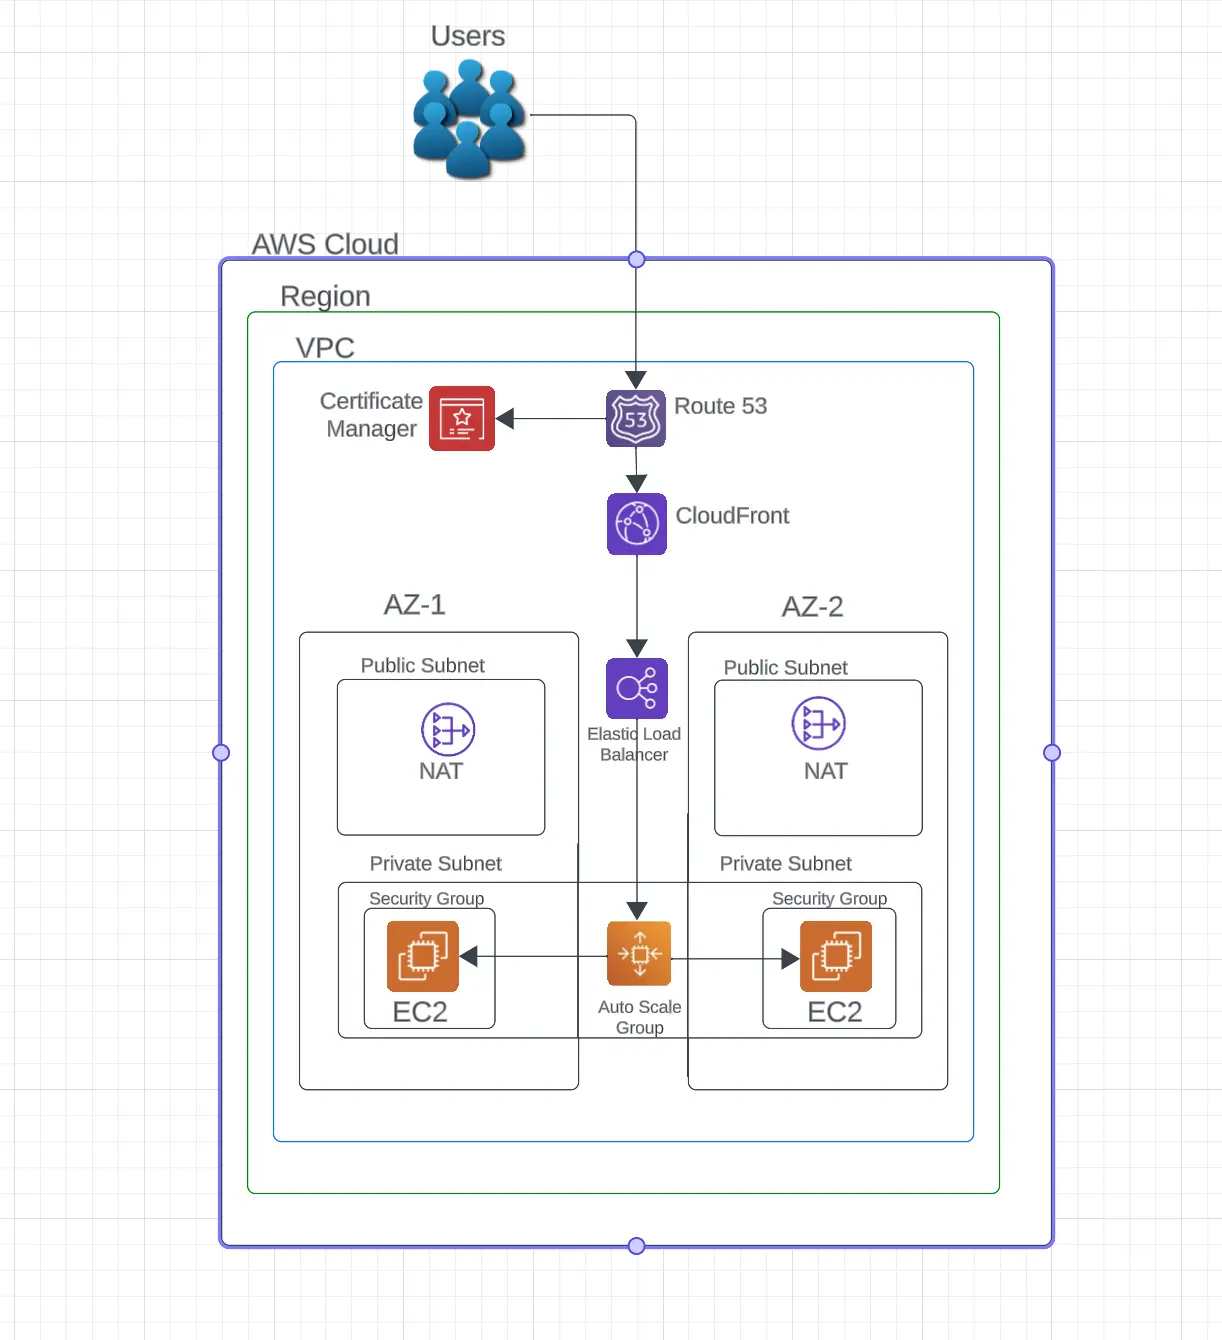
In this VPC you can see a public subnet in both AZ-1 and AZ-2 that contain NAT Gateways, and private subnets that contain the EC2 instances.
Route 53: DNS Management
- Purpose: Handles DNS resolution (translating domain names into IP addresses).
- Importance: Allows users to access the application via a domain name.
Amazon Certificate Manager: Secure Connections
- Purpose: Manages SSL/TLS certificates.
- Importance: Provides encrypted and secure communication (provides lock icon in browser).
CloudFront: Content Delivery
- Purpose: AWS’s CDN (content delivery network) for caching near users.
- Importance: Enhances speed and user experience by reducing the latency.
Elastic Load Balancing: Traffic Distribution
- Purpose: Distributes traffic across all of the EC2 instances in different AZs.
- Importance: Provides fault tolerance while increasing availability.
VPC Configuration: Network Isolation
- Structure: Includes public and private subnets in each AZ.
- Public Subnet: Contains NAT Gateways for internet access.
- Private Subnet: Contains EC2 instances for hosting.
Auto Scaling: Dynamic Resource Management
- Purpose: Adjusts the number of EC2 instances based on the demand.
- Importance: Balances load which in turn optimizes costs.
Additional Elements: Database and Storage (Not Shown)
- DynamoDB: Terraform uses DynamoDB to lock the state file when it’s being modified (prevents concurrent modifications).
- S3: Used for storing Terraform state remotely (enabling team collaboration and disaster recovery).
CloudWatch: Monitoring and Management
- Purpose: Monitors health and performance (triggers alarms and executes actions).
- Importance: Allows for better management and enables auto-scaling.
Terraform Structure
This project is divided into two main directories: root and modules.
- Root: Contains the primary configuration files for our infrastructure.
- Modules: Contains separate modules for each service (ALB, ASG, CloudFront, etc.).
Root Directory
Contains the primary Terraform files: Here, you would define how the modules interact, pass variables between them, and configure backend and provider settings.
- main.tf: Main configuration file.
- variables.tf: Variable declarations.
- terraform.tfvars: Variable values (Should be gitignored).
- providers.tf: Provider configuration (AWS).
- backend.tf: Backend configuration (S3 and DynamoDB).
Modules Directory
Where the modules for each service are defined: Here, you would define the resources for each service and how they interact.
- alb: Application Load Balancer.
- asg: Auto Scaling Group.
- cloudfront: CloudFront.
- key: Key Pair.
- nat: NAT Gateway.
- route53: Route 53.
- security-group: Security Group.
- vpc: VPC.
Inside each module directory, there are usually three files:
- main.tf: Main configuration file.
- variables.tf: Variable declarations.
- output.tf: Output declarations.
.
├── modules
│   ├── alb
│   │   ├── main.tf
│   │   ├── output.tf
│   │   └── variables.tf
│   ├── asg
│   │   ├── config.sh
│   │   ├── main.tf
│   │   └── variables.tf
│   ├── cloudfront
│   │   ├── main.tf
│   │   ├── output.tf
│   │   └── variables.tf
│   ├── key
│   │   ├── client_key
│   │   ├── client_key.pub
│   │   ├── main.tf
│   │   └── output.tf
│   ├── nat
│   │   ├── main.tf
│   │   └── variables.tf
│   ├── route53
│   │   ├── main.tf
│   │   └── variables.tf
│   ├── security-group
│   │   ├── main.tf
│   │   ├── output.tf
│   │   └── variables.tf
│   └── vpc
│       ├── main.tf
│       ├── output.tf
│       └── variables.tf
├── root
│   ├── backend.tf
│   ├── main.tf
│   ├── providers.tf
│   ├── terraform.tfvars
│   └── variables.tf
└── terraform.tfstate

# terraform.tfstate is generated after running terraform apply.
# It contains the state of the infrastructure and is stored in S3.
# It should be gitignored.
Modules
VPC
Overview
The VPC is the starting point and foundation for our AWS infrastructure. It’s an isolated section of AWS where you can create resources in a virtual network that you define. This module is where you define network infrastructure, VPC, subnets, route tables, and NAT Gateways.
Components
Virtual Private Cloud (VPC): A virtual network that you define. It is divided into subnets.
Internet Gateway (IGW): Connects the VPC to the internet, allowing resources in the public subnets to access and be accessed from the internet. We have the IGW attached to the VPC.
Subnets: Segments within the VPC that divide the network.
- Public Subnets: The subnet that is accessible to the internet. It contains NAT Gateways that allow EC2 instances in the private subnets to access the internet. We have two public subnets, one in each AZ.
- Private Subnets: The subnet that is not accessible to the internet. It contains an EC2 instance that hosts the web application. We have two private subnets, one in each AZ.
Route Tables: Defines rules, called routes, that determine where network traffic is directed. The public route table has a default route to the IGW for outbound traffic. We have two public route tables, one for each public subnet.
Route Table Association: Associates the public subnets with the public route table. Each subnet in a VPC must be associated with a route table. You can associate one route table with multiple subnets, but you can only associate one subnet with one route table. We have two route table associations, one for each public subnet.
Availability Zones (AZs): These are the different locations within a region that are meant to be isolated from failures in other AZs. We have two AZs in this project, AZ-1 and AZ-2.
Terraform Code
Before we get to the code, remember that Terraform code is often boilerplate, serving as a guide for defining infrastructure (IaC). This boilerplate code is reusable across projects, allowing you to simply copy and change it. You can find examples in the official Terraform documentation (https://registry.terraform.io/).
variables.tf
# Define variables
variable region {}
variable project_name {}
variable vpc_cidr {}
variable pub_sub_1a_cidr {}
variable pub_sub_2b_cidr {}
variable pri_sub_3a_cidr {}
variable pri_sub_4b_cidr {}
output.tf
# Define outputs
output "region" {
  value = var.region
}

output "project_name" {
  value = var.project_name
}

output "vpc_id" {
  value = aws_vpc.vpc.id
}

output "pub_sub_1a_id" {
  value = aws_subnet.pub_sub_1a.id
}
output "pub_sub_2b_id" {
  value = aws_subnet.pub_sub_2b.id
}
output "pri_sub_3a_id" {
  value = aws_subnet.pri_sub_3a.id
}

output "pri_sub_4b_id" {
  value = aws_subnet.pri_sub_4b.id
}


output "igw_id" {
    value = aws_internet_gateway.internet_gateway
}
main.tf
# Create a Virtual Private Cloud (VPC) resource
resource "aws_vpc" "vpc" {
  cidr_block              = var.vpc_cidr # Set CIDR block from variables.tf
  instance_tenancy        = "default"
  enable_dns_hostnames    = true     # Enable DNS hostnames+support for easier access
  enable_dns_support      = true

  # Set tags for identification
  tags = {
    Name = "${var.project_name}-vpc"
  }
}

# Create IGW (Internet Gateway) and associate it with the VPC for internet access
resource "aws_internet_gateway" "internet_gateway" {
  vpc_id = aws_vpc.vpc.id # Associate it

  tags = {
    Name = "${var.project_name}-igw"
  }
}

# Use data source to get AZs for the region
data "aws_availability_zones" "available_zones" {}

# Create a public subnet in AZ-1
resource "aws_subnet" "pub_sub_1a" {
  vpc_id                  = aws_vpc.vpc.id
  cidr_block              = var.pub_sub_1a_cidr
  availability_zone       = data.aws_availability_zones.available_zones.names[0]
  map_public_ip_on_launch = true # Auto-assign public IP when it launches

  tags = {
    Name = "pub_sub_1a"
  }
}

# Create a second public subnet in AZ-2
resource "aws_subnet" "pub_sub_2b" {
  vpc_id                  = aws_vpc.vpc.id
  cidr_block              = var.pub_sub_2b_cidr
  availability_zone       = data.aws_availability_zones.available_zones.names[1]
  map_public_ip_on_launch = true

  tags = {
    Name = "pub_sub_2b"
  }
}

# Create a public route table
resource "aws_route_table" "public_route_table" {
  vpc_id = aws_vpc.vpc.id

  # IGW default route for outbound traffic
  route {
    cidr_block = "0.0.0.0/0" # all IP's
    gateway_id = aws_internet_gateway.internet_gateway.id
  }


  tags = {
    Name = "Public-rt"
  }
}

# Associate pub_sub_1a with the public route table
resource "aws_route_table_association" "pub-sub-1a_route_table_association" {
  subnet_id      = aws_subnet.pub_sub_1a.id
  route_table_id = aws_route_table.public_route_table.id
}

#  Associate pub_sub_2b with the public route table
resource "aws_route_table_association" "pub-sub-2-b_route_table_association" {
  subnet_id      = aws_subnet.pub_sub_2b.id
  route_table_id = aws_route_table.public_route_table.id
}

# Make a private subnet in AZ-1
resource "aws_subnet" "pri_sub_3a" {
  vpc_id                  = aws_vpc.vpc.id
  cidr_block              = var.pri_sub_3a_cidr
  availability_zone       = data.aws_availability_zones.available_zones.names[0]
  map_public_ip_on_launch = false # No public IP (private)

  tags = {
    Name = "pri-sub-3a"
  }
}

# Define a second private subnet in AZ-2
resource "aws_subnet" "pri_sub_4b" {
  vpc_id                  = aws_vpc.vpc.id
  cidr_block              = var.pri_sub_4b_cidr
  availability_zone       = data.aws_availability_zones.available_zones.names[1]
  map_public_ip_on_launch = false

  tags = {
    Name = "pri-sub-4b"
  }
}
Security Group:
Overview
This is the virtual firewall that controls inbound/outbound traffic for resources in the VPC. We have two security groups, one for the ALB and one for the EC2 instances.
Components
- AWS Security Group for ALB (Application Load Balancer):
- Allows inbound HTTP and HTTPS traffic from any IP address.
- Allows all outbound traffic.
- AWS Security Group for the Client:
- Allows inbound HTTP traffic from the ALB security group.
- Allows all outbound traffic.
Terraform Code
variables.tf
# Define variables
variable vpc_id {}
output.tf
# Define outputs

output "alb_sg_id" {
  value = aws_security_group.alb_sg.id
}

output "client_sg_id" {
  value = aws_security_group.client_sg.id
}
main.tf
# create a security group for ALB
resource "aws_security_group" "alb_sg" {
  name        = "alb security group"
  description = "enable http/https access on port 80/443"
  vpc_id      = var.vpc_id

  # Ingress rule to allow HTTP (port 80) from anywhere
  ingress {
    description = "http access"
    from_port   = 80
    to_port     = 80
    protocol    = "tcp"
    cidr_blocks = ["0.0.0.0/0"] # allows access from anywhere
  }

  # Ingress rule to allow HTTPS (port 443) from anywhere
  ingress {
    description = "https access"
    from_port   = 443
    to_port     = 443
    protocol    = "tcp"
    cidr_blocks = ["0.0.0.0/0"]
  }

  # Egress rule to allow all traffic
  egress {
    from_port   = 0
    to_port     = 0
    protocol    = -1 # -1 means all protocols
    cidr_blocks = ["0.0.0.0/0"]
  }

  tags = {
    Name = "alb_sg"
  }
}

# create security group for client instances
resource "aws_security_group" "client_sg" {
  name        = "client_sg"
  description = "enable http/https access on port 80 for elb sg"
  vpc_id      = var.vpc_id

  # Ingress rule to allow HTTP (port 80) from alb_sg
  ingress {
    description     = "http access"
    from_port       = 80
    to_port         = 80
    protocol        = "tcp"
    security_groups = [aws_security_group.alb_sg.id] # allows traffic solely from alb_sg
  }

  # Egress rule to allow all traffic
  egress {
    from_port   = 0
    to_port     = 0
    protocol    = -1
    cidr_blocks = ["0.0.0.0/0"]
  }

  tags = {
    Name = "Client_sg"
  }
}
Key Pair:
Overview
Usually this key pair would allow you to SSH into the EC2 instances, but because they are inside a private subnet, we set up AWS Systems Manager (SSM) for access instead. They key pair does however allow the ASG to launch and scale the EC2 instances.
Components
- Key Pair: A key pair is a set of public and private keys that you use to connect/authenticate with an EC2 instance. The public key is stored in the
client_key.pubfile and is used by the ASG to launch and scale the EC2 instances.
Run ssh-keygen in the key directory to generate the key pair
Terraform Code
output.tf
# Define outputs
output "key_name" {
  value = aws_key_pair.client_key.key_name
}
main.tf
# Create AWS key pair resource for the client
resource "aws_key_pair" "client_key" {
    key_name   = "client_key"
    public_key = file("../modules/key/client_key.pub")  # Provide path for .pub file
}
NAT Gateway:
Overview
The NAT Gateway allows instances in the private subnets to access the internet without exposing them directly to the internet. This is crucial for security.
Components
Elastic IPs (EIPs): An Elastic IP is a static IP address that you can attach to a NAT Gateway allowing it to have a consistent IP address. We have two EIPs, one for each NAT Gateway in the public subnets.
NAT Gateway: A NAT Gateway allows instances in the private subnets to access the internet without exposing them to the internet. We have two NAT Gateways, one in each public subnet.
Private Route Tables: The private route table directs traffic to the NAT Gateway for outbound internet access without allowing direct inbound traffic. We have two private route tables, one for each private subnet.
Route Table Association: Associates the private subnets with the private route table. Each subnet in a VPC must be associated with a route table. You can associate one route table with multiple subnets, but you can only associate one subnet with one route table.
Terraform Code
variables.tf
variable pub_sub_1a_id {}
variable pub_sub_2b_id {}
variable pri_sub_3a_id {}
variable pri_sub_4b_id {}
variable igw_id {}
variable vpc_id {}
main.tf
# allocate an EIP for NAT Gateway in pub-sub-1-a
resource "aws_eip" "eip-nat-a" {
  vpc = true # since EIP is for use with a VPC

  tags = {
    Name = "eip-nat-a"
  }
}

# allocate an EIP for NAT Gateway in pub-sub-2-b
resource "aws_eip" "eip-nat-b" {
  vpc = true

  tags = {
    Name = "eip-nat-b"
  }
}

# make a NAT Gateway in pub-sub-1a
resource "aws_nat_gateway" "nat-a" {
  allocation_id = aws_eip.eip-nat-a.id
  subnet_id     = var.pub_sub_1a_id

  tags = {
    Name = "nat-a"
  }

  # depends on IGW to for proper ordering
  depends_on = [var.igw_id]
}

# make a NAT Gateway in pub-sub-2b
resource "aws_nat_gateway" "nat-b" {
  allocation_id = aws_eip.eip-nat-b.id
  subnet_id     = var.pub_sub_2b_id

  tags = {
    Name = "nat-b"
  }


  depends_on = [var.igw_id]
}

# Create pri-rt-a with default route aws_nat_gateway.nat-a.id
resource "aws_route_table" "pri-rt-a" {
  vpc_id = var.vpc_id

  # route outbound traffic to aws_nat_gateway.nat-a.id
  route {
    cidr_block     = "0.0.0.0/0"
    nat_gateway_id = aws_nat_gateway.nat-a.id
  }

  tags = {
    Name = "Pri-rt-a"
  }
}

# Associate pri-sub-3-a with pri-rt-a
resource "aws_route_table_association" "pri-sub-3a-with-Pri-rt-a" {
  subnet_id      = var.pri_sub_3a_id
  route_table_id = aws_route_table.pri-rt-a.id
}

# Associate pri-sub-4b with pri-rt-b
resource "aws_route_table_association" "pri-sub-4b-with-Pri-rt-b" {
  subnet_id      = var.pri_sub_4b_id
  route_table_id = aws_route_table.pri-rt-b.id
}

# Create pri-rt-b with default route aws_nat_gateway.nat-b.id
resource "aws_route_table" "pri-rt-b" {
  vpc_id = var.vpc_id

  route {
    cidr_block     = "0.0.0.0/0"
    nat_gateway_id = aws_nat_gateway.nat-b.id
  }

  tags = {
    Name = "pri-rt-b"
  }
}
ALB (Application Load Balancer):
Overview
The ALB distributes incoming application traffic across multiple targets (like EC2 instances) in different AZs. This helps achieve fault tolerance and increases application availability.
Components
Application Load Balancer (ALB): The ALB routes HTTP/S traffic to targets (like EC2 instances) within a VPC. It can handle the varying load of the application traffic whether in a single AZ or across multiple AZs.
ALB Listener: The listener checks for connection requests on port 80 in this case and forwards them to a target group which then routes those requests to the EC2 instances.
ALB Target Group: The target group routes requests to the EC2 instances. It can route requests to a single target or multiple targets in different AZs.
Terraform Code
variables.tf
variable project_name {}
variable alb_sg_id {}
variable pub_sub_1a_id {}
variable pub_sub_2b_id {}
variable vpc_id {}
output.tf
output "tg_arn" {
  value = aws_lb_target_group.alb_target_group.arn
}

output "alb_dns_name" {
  value = aws_lb.application_load_balancer.dns_name
}
main.tf
# Create the alb
resource "aws_lb" "application_load_balancer" {
  name               = "${var.project_name}-alb"
  internal           = false                     # since ALB is internet-facing
  load_balancer_type = "application"            # application type since HHTP/S traffic
  security_groups    = [var.alb_sg_id]          # associate with alb_sg
  subnets            = [var.pub_sub_1a_id, var.pub_sub_2b_id] # associate with pub-sub-1a and pub-sub-2b

  enable_deletion_protection = false

  tags = {
    Name = "${var.project_name}-alb"
  }
}

# Create target group
resource "aws_lb_target_group" "alb_target_group" {
  name        = "${var.project_name}-tg"
  target_type = "instance"              # since targets are EC2 instances
  port        = 80                      # port for http traffic
  protocol    = "HTTP"
  vpc_id      = var.vpc_id             # associate with vpc

  # health check settings
  health_check {
    enabled             = true
    interval            = 300        # time between checks (seconds)
    path                = "/"
    timeout             = 60         # time to wait for a response (seconds)
    matcher             = 200        # expected HTTP code for healthy target
    healthy_threshold   = 2          # 2 consecutive successful health checks = healthy
    unhealthy_threshold = 5          # 5 consecutive failed health checks = unhealthy
  }

  lifecycle {
    create_before_destroy = true # create new target group before destroying old one
  }
}

# Create listener
resource "aws_lb_listener" "alb_http_listener" {
  load_balancer_arn = aws_lb.application_load_balancer.arn # associate with ALB
  port              = 80                                  # port for HTTP traffic
  protocol          = "HTTP"

  # forward requests to target group
  default_action {
    type             = "forward"
    target_group_arn = aws_lb_target_group.alb_target_group.arn # associate with target group
  }
}
ASG (Auto Scaling Group):
Overview
The ASG automatically adjusts the number of EC2 instances to handle the load efficiently. It’s configured to have a minimum of 2 and a maximum of 6 instances.
Components
Launch Template: The launch template defines the configuration for the EC2 instances. It includes the AMI ID, instance type, key pair, security group, and user data script. We use a user data script to install Apache and deploy the web application.
IAM Instance Profile: The IAM instance profile defines the permissions for the EC2 instances (including the IAM role and the SSM role).
Auto Scaling Group (ASG): The ASG automatically adjusts the number of EC2 instances to handle the load efficiently. It’s configured to have a minimum of 2 and a maximum of 6 instances.
Auto Scaling Policies and Alarms: The ASG has two policies and alarms for scaling up and down based on CPU utilization. The scale up policy is triggered when the CPU utilization is at or above 70% and the scale down policy is triggered when the CPU utilization is at or below 5%.
IAM Role: The IAM role defines the permissions for the EC2 instances. It includes the SSM role. We use the SSM role to allow access to the EC2 instances through AWS Systems Manager (SSM)
IAM Role Policy Attachment: The IAM role policy attachment attaches the SSM policy to the IAM role.
Terraform Code
variables.tf
# Define variables
variable "project_name"{}
variable "ami" {
    default = "ami-053b0d53c279acc90" # Ubuntu 20.04 AMI in us-east-1
}
variable "cpu" {
    default = "t2.micro" # t2.micro instance type
}
variable "key_name" {}
variable "client_sg_id" {}
variable "max_size" {
    default = 6
}
variable "min_size" {
    default = 2
}
variable "desired_cap" {
    default = 3
}
variable "asg_health_check_type" {
    default = "ELB"
}
variable "pri_sub_3a_id" {}
variable "pri_sub_4b_id" {}
variable "tg_arn" {}
main.tf
# Create a launch template for EC2 instances
resource "aws_launch_template" "lt_name" {
  name          = "${var.project_name}-tpl" me
  image_id      = var.ami                  # AMI ID for the EC2 instances
  instance_type = var.cpu                 # Instance type for the EC2 instances
  key_name      = var.key_name             # key pair name for the EC2 instances
  user_data     = filebase64("../modules/asg/config.sh") # User data script for the EC2 instances

  # Specify the IAM Instance Profile for the EC2 instances
  iam_instance_profile {
    name = aws_iam_instance_profile.ssm_instance_profile.name
  }

  # SG IDs to associate with the EC2 instances
  vpc_security_group_ids = [var.client_sg_id]


  tags = {
    Name = "${var.project_name}-tpl"
  }
}

# Create the IAM Instance Profile for EC2 instances
resource "aws_iam_instance_profile" "ssm_instance_profile" {
  name = "${var.project_name}-instance-profile"
  role = aws_iam_role.ssm_role.name             # associate SSM role with instance profile
}

# Create the Auto Scaling Group (ASG)
resource "aws_autoscaling_group" "asg_name" {
  name                      = "${var.project_name}-asg"
  max_size                  = var.max_size              #6 instances
  min_size                  = var.min_size             #2 instances
  desired_capacity          = var.desired_cap          #3 instances
  health_check_grace_period = 300                # Wait 300 seconds before checking health
  health_check_type         = var.asg_health_check_type # ELB health check
  vpc_zone_identifier       = [var.pri_sub_3a_id, var.pri_sub_4b_id] # Subnets for ASG instances
  target_group_arns         = [var.tg_arn]              # Target group for ASG instances

  # enable metrics collection
  enabled_metrics = [
    "GroupMinSize",
    "GroupMaxSize",
    "GroupDesiredCapacity",
    "GroupInServiceInstances",
    "GroupTotalInstances"
  ]

  metrics_granularity = "1Minute"

  # Reference the launch template
  launch_template {
    id      = aws_launch_template.lt_name.id
    version = aws_launch_template.lt_name.latest_version
  }
}

# Auto Scaling policy for scaling up
resource "aws_autoscaling_policy" "scale_up" {
  name                   = "${var.project_name}-asg-scale-up"
  autoscaling_group_name = aws_autoscaling_group.asg_name.name
  adjustment_type        = "ChangeInCapacity"
  scaling_adjustment     = "1"                # Increase by 1
  cooldown               = "300"
  policy_type            = "SimpleScaling"
}

# CloudWatch metric alarm for scaling up
resource "aws_cloudwatch_metric_alarm" "scale_up_alarm" {
  alarm_name          = "${var.project_name}-asg-scale-up-alarm"
  alarm_description   = "asg-scale-up-cpu-alarm"
  comparison_operator = "GreaterThanOrEqualToThreshold"
  evaluation_periods  = "2"
  metric_name         = "CPUUtilization"
  namespace           = "AWS/EC2"
  period              = "120"
  statistic           = "Average"
  threshold           = "70" # Triggers at 70% CPU utilization
  dimensions = {
    "AutoScalingGroupName" = aws_autoscaling_group.asg_name.name
  }
  actions_enabled = true
  alarm_actions   = [aws_autoscaling_policy.scale_up.arn]
}

# Auto Scaling policy for scaling down
resource "aws_autoscaling_policy" "scale_down" {
  name                   = "${var.project_name}-asg-scale-down"
  autoscaling_group_name = aws_autoscaling_group.asg_name.name
  adjustment_type        = "ChangeInCapacity"
  scaling_adjustment     = "-1" # Decrease instances by 1
  cooldown               = "300"
  policy_type            = "SimpleScaling"
}

# CloudWatch metric alarm for scaling down
resource "aws_cloudwatch_metric_alarm" "scale_down_alarm" {
  alarm_name          = "${var.project_name}-asg-scale-down-alarm"
  alarm_description   = "asg-scale-down-cpu-alarm"
  comparison_operator = "LessThanOrEqualToThreshold"
  evaluation_periods  = "2"
  metric_name         = "CPUUtilization"
  namespace           = "AWS/EC2"
  period              = "120"
  statistic           = "Average"
  threshold           = "5" # Trigger at 5% CPU utilization
  dimensions = {
    "AutoScalingGroupName" = aws_autoscaling_group.asg_name.name
  }
  actions_enabled = true
  alarm_actions   = [aws_autoscaling_policy.scale_down.arn]
}

# IAM role for EC2 instances
resource "aws_iam_role" "ssm_role" {
  name = "${var.project_name}-ssm-role"

  # Use an IAM policy document to define the permissions for the IAM role
  assume_role_policy = jsonencode({
    Version = "2012-10-17",
    Statement = [
      {
        Action = "sts:AssumeRole",
        Effect = "Allow",
        Principal = {
          Service = "ec2.amazonaws.com"
        },
      },
    ]
  })
}

# Attach the policy to the IAM role
resource "aws_iam_role_policy_attachment" "ssm_policy_attachment" {
  role       = aws_iam_role.ssm_role.name
  policy_arn = "arn:aws:iam::aws:policy/AmazonSSMManagedInstanceCore" # Standard SSM policy
}
config.sh
#!/bin/bash

#!/bin/bash is called a shebang and it tells the system which interpreter to use.
# In this case, it is using Bash shell (/bin/bash).


# URL of the Tetris game from GitHub
URL='https://github.com/davidsvida/tetrisjs/archive/refs/heads/main.zip'
# Name of the extracted directory
ART_NAME='tetrisjs-main'
# Temporary directory for downloading and extracting the application
TEMPDIR="/tmp/webfiles"
# Packages to install (Apache web server, wget for downloading files, unzip for extraction)
PACKAGE="apache2 wget unzip"
# Service name for Apache
SVC="apache2"

echo "Running setup on Ubuntu"
echo "Installing packages..."
sudo apt update  # Update the package list
sudo apt install -y $PACKAGE  # Install packages


echo "Starting and enabling HTTPD service..."
sudo systemctl start $SVC   # Start Apache
sudo systemctl enable $SVC  # Enable Apache to start on boot


echo "Starting artifact deployment..."
mkdir -p $TEMPDIR  # Create the temporary directory
cd $TEMPDIR       # Change to the temporary directory


wget -q $URL -O "$ART_NAME.zip"  # Download the zip file
unzip -q "$ART_NAME.zip"         # Unzip the downloaded file

# Clean /var/www/html (web root) and copy the new files
echo "Deploying new files..."
sudo rm -rf /var/www/html/*                     # Remove all in the web root
sudo cp -r $ART_NAME/* /var/www/html/           # Copy the new files to the web root
sudo chown -R www-data:www-data /var/www/html/  # Change ownership to the web server user
sudo find /var/www/html -type d -exec chmod 755 {} \;  # Set appropriate DIRECTORY permissions
sudo find /var/www/html -type f -exec chmod 644 {} \;  # Set appropriate FILE permissions

echo "Restarting HTTPD service..."
sudo systemctl restart $SVC  # Restart the Apache service to apply changes

echo "Removing temporary files..."
rm -rf $TEMPDIR  # Remove the temporary directory
echo "Setup complete."
CloudFront:
Overview
CloudFront is a content delivery network (CDN) that distributes content to users from Edge Locations which in turn speeds up the delivery of that content. Here we use it to route traffic to the ALB.
Components
AWS ACM Certificate (ACM): An ACM certificate is a digital certificate. We have one certificate for the domain name
davidinsider.com.CloudFront Distribution: A CloudFront distribution is a collection of Edge Locations that deliver content to users. We have one distribution for the domain name
daivdinsider.com.
Terraform Code
variables.tf
variable "certificate_domain_name"{}
variable "alb_domain_name" {}
variable "additional_domain_name" {}
variable "project_name" {}
output.tf
output "cloudfront_domain_name" {
  value = aws_cloudfront_distribution.my_distribution.domain_name
}

output "cloudfront_id" {
  value = aws_cloudfront_distribution.my_distribution.id
}

output "cloudfront_arn" {
  value = aws_cloudfront_distribution.my_distribution.arn
}


output "cloudfront_status" {
  value = aws_cloudfront_distribution.my_distribution.status
}

output "cloudfront_hosted_zone_id" {
  value = aws_cloudfront_distribution.my_distribution.hosted_zone_id
}
main.tf
# data block that retrieves information about the ACM certificate
data "aws_acm_certificate" "issued" {
  domain   = var.certificate_domain_name
  statuses = ["ISSUED"]
}

# Create a CloudFront distribution resource
resource "aws_cloudfront_distribution" "my_distribution" {
  enabled             = true
  aliases             = [var.additional_domain_name]

  # Define the origin of the content (an ALB in this case)
  origin {
    domain_name = var.alb_domain_name
    origin_id   = var.alb_domain_name

    # Configuration for the origin
    custom_origin_config {
      http_port              = 80             # HTTP
      https_port             = 443            # HTTPS
      origin_protocol_policy = "http-only"    # Use only HTTP
      origin_ssl_protocols   = ["TLSv1.2"]    # TLS protocols used for HTTPS
    }
  }

  # Default cache behavior for the distribution
  default_cache_behavior {
    allowed_methods        = ["GET", "HEAD", "OPTIONS", "PUT", "POST", "PATCH", "DELETE"]
    cached_methods         = ["GET", "HEAD", "OPTIONS"]
    target_origin_id       = var.alb_domain_name
    viewer_protocol_policy = "redirect-to-https"
    forwarded_values {
      headers      = []        # Forward no headers to the origin
      query_string = true       # Forward query strings
      cookies {
        forward = "all"        # Forward cookies
      }
    }
  }

  # Restrictions for the distribution, none in this case
  restrictions {
    geo_restriction {
      restriction_type = "none"
    }
  }


  tags = {
    Name = var.project_name
  }

  # Configuration for the SSL/TLS certificate and viewer protocol
  viewer_certificate {
    acm_certificate_arn      = data.aws_acm_certificate.issued.arn
    ssl_support_method       = "sni-only"
    minimum_protocol_version = "TLSv1.2_2018"
  }
}
Route53:
Overview
Route53 is a DNS (Domain Name System) service that translates domain names to IP addresses. It’s used to route traffic to the ALB.
Components
Route53 Hosted Zone: A hosted zone is a container for DNS records. We have one hosted zone for the domain name
davidinsider.comRoute53 Record Resource: The resource creates a DNS record in the Route53 hosted zone. We use it to create a DNS record for the CloudFront distribution.
Terraform Code
variables.tf
variable hosted_zone_name{
    default = "davidinsider.com"
}

variable cloudfront_hosted_zone_id {}

variable cloudfront_domain_name {}
main.tf
# data block that retrieves information about davidinsider.com hosted zone
data "aws_route53_zone" "public-zone" {
  name         = var.hosted_zone_name
  private_zone = false
}

# resource block to create a DNS record in davidinsider.com hosted zone
resource "aws_route53_record" "cloudfront_record" {
  zone_id = data.aws_route53_zone.public-zone.zone_id
  name    = "terraform.${data.aws_route53_zone.public-zone.name}"  # DNS record name (terraform.davidinsider.com)
  type    = "A"  # alias record

  # alias block for routing to cloudfront distribution
  alias {
    name                   = var.cloudfront_domain_name
    zone_id                = var.cloudfront_hosted_zone_id
    evaluate_target_health = false
  }
}
Root:
backend.tf
terraform {
  backend "s3" {
    bucket = "tetrisstatestorage"
    key    = "tetrisdemo.tfstate"
    region = "us-east-1"
    dynamodb_table = "newtfTable"
  }
}
main.tf
#creating a VPC
module "vpc" {
  source = "../modules/vpc"
  region = var.region
  project_name = var.project_name
  vpc_cidr = var.vpc_cidr
  pub_sub_1a_cidr = var.pub_sub_1a_cidr
  pub_sub_2b_cidr = var.pub_sub_2b_cidr
  pri_sub_3a_cidr = var.pri_sub_3a_cidr
  pri_sub_4b_cidr = var.pri_sub_4b_cidr
}

#creating NAT gateways
module "nat" {
  source = "../modules/nat"
  pub_sub_1a_id = module.vpc.pub_sub_1a_id
  igw_id = module.vpc.igw_id
  pub_sub_2b_id = module.vpc.pub_sub_2b_id
  vpc_id = module.vpc.vpc_id
  pri_sub_3a_id = module.vpc.pri_sub_3a_id
  pri_sub_4b_id = module.vpc.pri_sub_4b_id
}

#creating Security Groups (SG's)
module "security-group" {
  source = "../modules/security-group"
  vpc_id = module.vpc.vpc_id
}

#creating SSH Key for instances
module "key" {
  source = "../modules/key"
}

#creating the ALB
module "alb" {
  source = "../modules/alb"
  project_name = module.vpc.project_name
  alb_sg_id = module.security-group.alb_sg_id
  pub_sub_1a_id = module.vpc.pub_sub_1a_id
  pub_sub_2b_id = module.vpc.pub_sub_2b_id
  vpc_id = module.vpc.vpc_id
}

#creating the ASG
module "asg" {
  source = "../modules/asg"
  project_name = module.vpc.project_name
  key_name = module.key.key_name
  client_sg_id = module.security-group.client_sg_id
  pri_sub_3a_id = module.vpc.pri_sub_3a_id
  pri_sub_4b_id = module.vpc.pri_sub_4b_id
  tg_arn = module.alb.tg_arn
}

#creating a CloudFront distribution
module "cloudfront" {
  source = "../modules/cloudfront"
  certificate_domain_name = var.certificate_domain_name
  alb_domain_name = module.alb.alb_dns_name
  additional_domain_name = var.additional_domain_name
  project_name = module.vpc.project_name
}


# creating a Route53 hosted zone
module "route53" {
  source = "../modules/route53"
  cloudfront_domain_name = module.cloudfront.cloudfront_domain_name
  cloudfront_hosted_zone_id = module.cloudfront.cloudfront_hosted_zone_id
}
providers.tf
terraform {
  required_providers {
    aws = {
      source  = "hashicorp/aws"
      version = "4.67.0"
    }
  }
}

provider "aws" {
  region = var.region
}
terraform.tfvars
region = "us-east-1"
project_name = "DavidTF"
# The '10.0.0.0/16' specifies a range from 10.0.0.0 to 10.0.255.255.
# This allows for 2^16 IP addresses providing a large address space for the VPC.
vpc_cidr = "10.0.0.0/16"
# '10.0.1.0/24' specifies a range from 10.0.1.0 to 10.0.1.255.
# This allows for 2^8 IP addresses for smaller/isolated networks within the VPC.
pub_sub_1a_cidr = "10.0.1.0/24"
pub_sub_2b_cidr =  "10.0.2.0/24"
pri_sub_3a_cidr = "10.0.3.0/24"
pri_sub_4b_cidr = "10.0.4.0/24"
certificate_domain_name = "davidinsider.com"
additional_domain_name = "terraform.davidinsider.com"
variables.tf
variable region {}
variable project_name {}
variable vpc_cidr {}
variable pub_sub_1a_cidr {}
variable pub_sub_2b_cidr {}
variable pri_sub_3a_cidr {}
variable pri_sub_4b_cidr {}
variable certificate_domain_name {}
variable additional_domain_name {}
Deployment
Terraform
Overview
Terraform is an infrastructure as code (IaC) tool that allows you to efficiently manage your infrastructure (it is much faster than the console…). It uses a declarative language called HashiCorp Configuration Language (HCL) to define your infrastructure.
Deployment Steps
- Set Up Backend On AWS:
In backend.tf, we set up the backend to store the state file in an S3 bucket and to use DynamoDB for locking. In order for this to actually work, we need to create the S3 bucket and DynamoDB table first. This can be done simply through the AWS console but remember to set the partition key to LockID so that AWS can properly lock the state file.

- Gitignore:
*.terraform
modules/key/client_key
*.tfvars
modules/key/client_key.pub
*.tfstate
Files added to gitignore are either not necessary to store in the repo, automatically generated, or contain sensitive information.
- .tfstate files
terraform.tfstate is the state file that contains the current state of your infrastructure. It is automatically generated when you run terraform apply and is used to determine what changes need to be made to your infrastructure. (In our case, it is stored in an S3 bucket and is locked by DynamoDB.)
- .tfvars files
Although you can store your variables in a .tfvars file, it is not recommended. In our case, we are storing our variables in a .tfvars file because no sensitive information is being stored and are adding them to gitignore for good practice.
- .terraform.lock.hcl
This file contains the exact versions of the providers used in your project (AWS). This file is automatically generated when you run terraform init and is used to make sure the same versions of the providers are used.
- .terraform directory
This directory contains the plugins and modules used in your project. It also contains the state file and is automatically created when you run terraform init. It is used to make sure the same plugins and modules are used.
- Key files
This file is pretty self-explanatory. Do not store your keys in your repo.
- Initialize, Plan, and Apply
terraform init
terraform plan
terraform apply
4. Destroy
terraform destroy
Conclusion
I enjoyed documenting this project and I also enjoyed playing around with AWS (especially whenever I get to use Terraform). Whether you’re experienced or new to cloud, AWS and Terraform offer an quick and efficient path to set up infrastructure, even for classic games like Tetris.