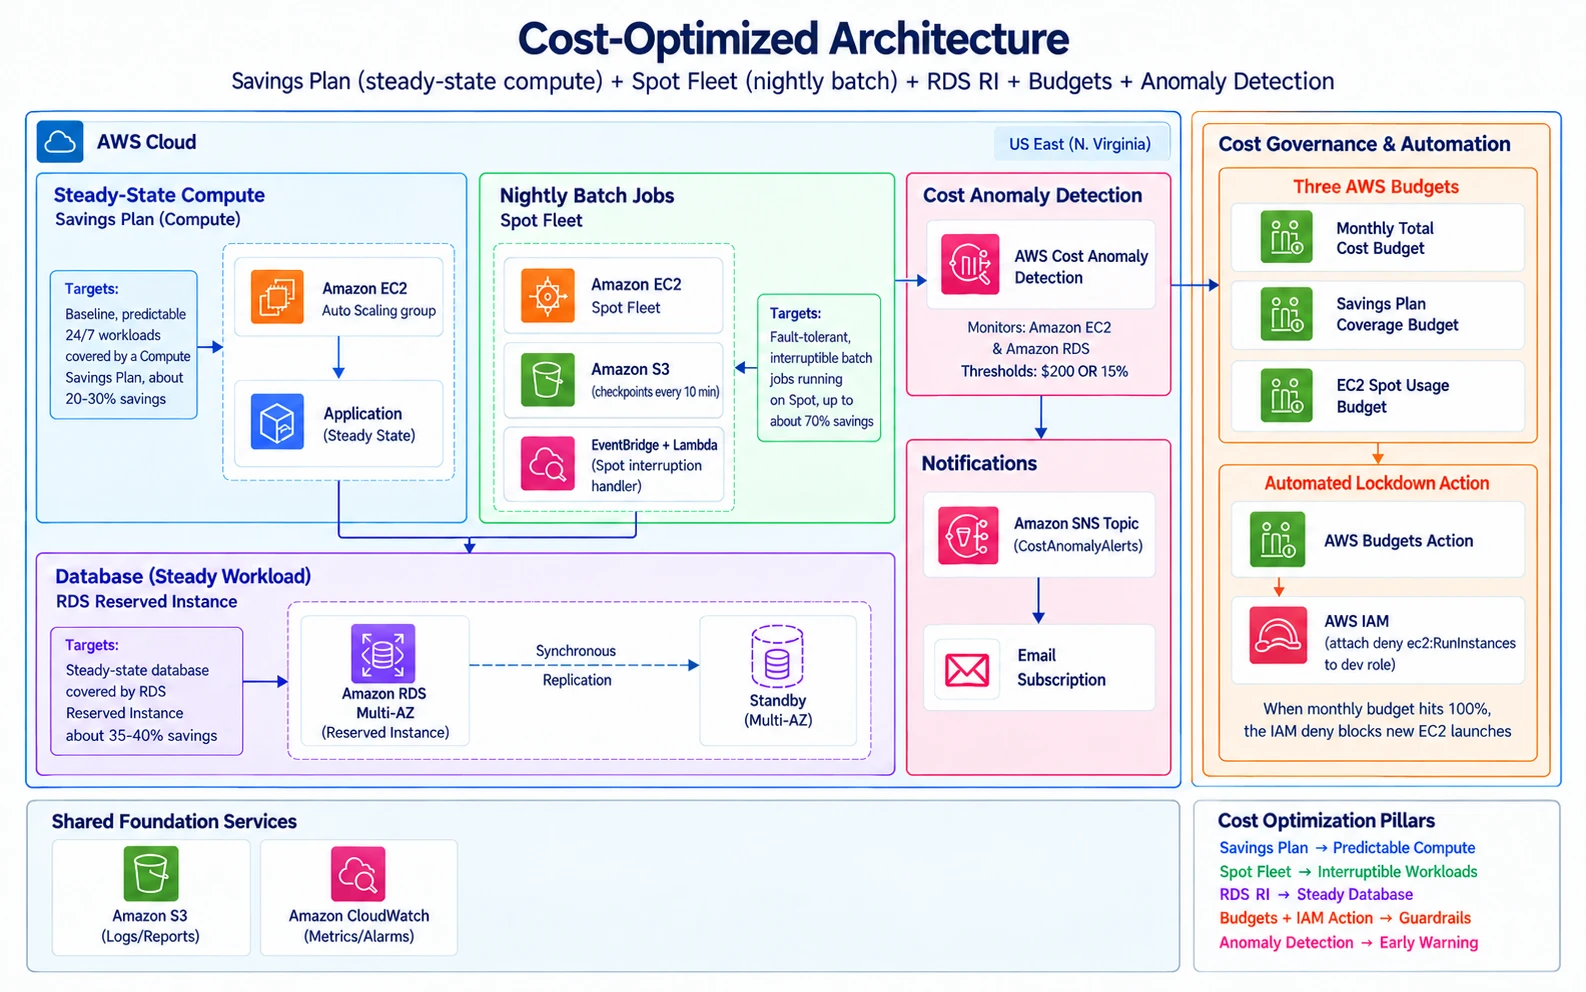
One setting won’t fix an AWS bill. Steady compute, batch jobs, always-on databases, overspend, and sudden spikes all need different controls.
I combined five of them into one design:
Compute Savings Plan
+ Spot-based batch capacity
+ RDS Reserved Instance
+ AWS Budgets
+ Cost Anomaly Detection
The goal was to cut predictable costs and add guardrails. Those guardrails make overspend easier to spot. One of them even blocks new spend automatically.
Note: Savings percentages, AWS pricing, Savings Plans behavior, Reserved Instance terms, and console screens can change. The cost figures below are my example estimates. They are not current pricing guarantees.
1. The problems I wanted to solve
Cloud costs usually creep up through small decisions:
steady workloads remain on On-Demand pricing
batch workers run on more expensive capacity than necessary
database capacity stays committed 24/7 without a pricing commitment
budget emails arrive but nobody acts quickly
unexpected usage spikes go unnoticed for days
I handled each one separately.
Here is the target design:
Predictable compute
    |
    +--> Compute Savings Plan

Nightly batch jobs
    |
    +--> Spot capacity
           |
           +--> multiple instance families
           +--> S3 checkpoints
           +--> interruption handling

Always-on RDS
    |
    +--> RDS Reserved Instance

Account spend
    |
    +--> AWS Budgets
           |
           +--> email
           +--> SNS
           +--> automated IAM action

Unexpected spend
    |
    +--> Cost Anomaly Detection
Architecture overview for Savings Plans, Spot workloads, RDS commitments, budgets, and anomaly detection
I didn’t just want a cheaper month. I wanted controls that keep working after the first round of cleanup.
2. Starting with steady compute
I started with the easiest workload to forecast. That’s steady compute.
My first stop was:
Cost Explorer
→ Savings Plans
→ Recommendations
AWS looks at past usage and suggests an hourly commitment.
I went with a 1-year, No Upfront Compute Savings Plan instead of an EC2 Instance Savings Plan.
The reason is flexibility. A Compute Savings Plan applies across more eligible compute. It isn’t tied as tightly to one EC2 family.
Don’t guess before buying. Use the recommendation data.
My rule:
Commitment decisions should come from usage data.
3. Buying the Savings Plan
I used the recommended hourly commitment and picked:
Plan type: Compute Savings Plan
Term:      1 year
Payment:   No Upfront
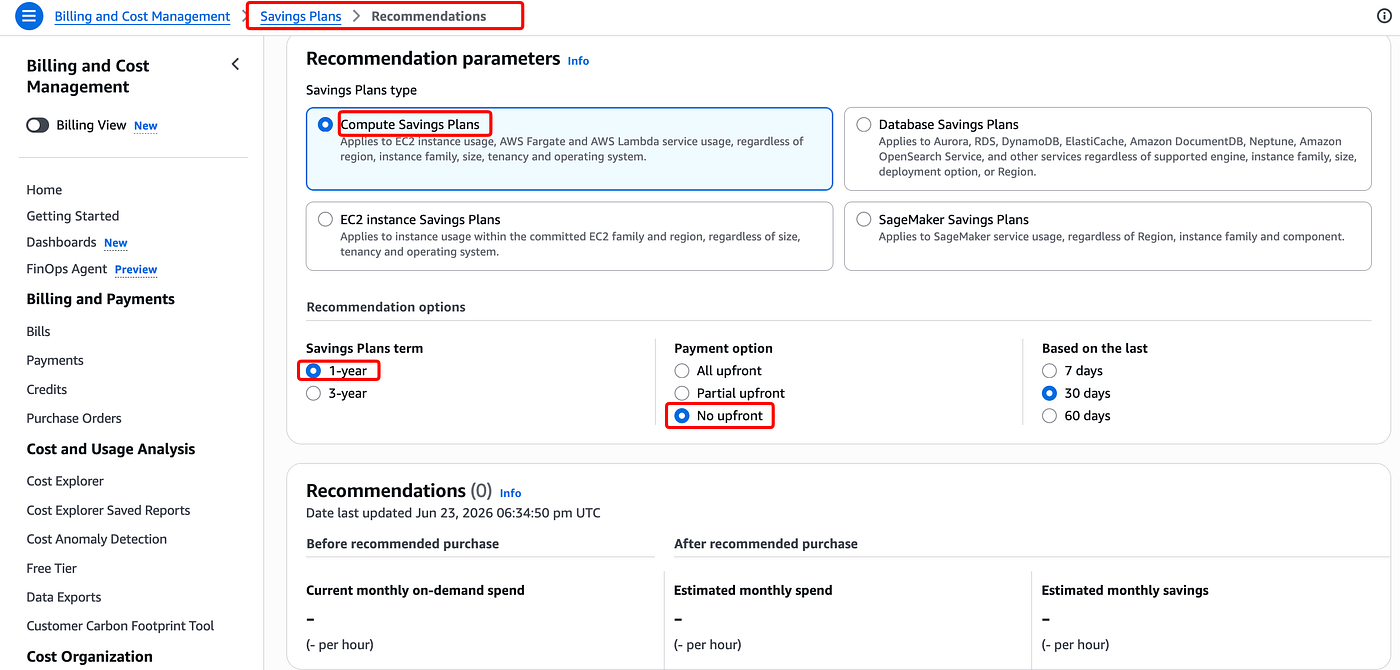
Savings Plans recommendation settings: Compute, 1-year, No upfront
There are three payment options:
No Upfront
Partial Upfront
Full Upfront
I chose No Upfront. It avoids a big payment now and still cuts eligible On-Demand spend.
When I priced it, No Upfront saved roughly 20–30%. Bigger upfront payments gave deeper discounts.
Those numbers were for that time. Your savings depend on current pricing, plan type, term, region, and usage.
4. Watching utilization and coverage
Once the plan started applying, I watched two reports:
Utilization
Coverage
They answer different questions.
Utilization shows how much of the commitment you actually used.
Low utilization means you committed to more than your workloads use.
Coverage shows how much eligible compute is getting Savings Plans pricing.
Low coverage means a lot of eligible compute is still on On-Demand.
I aimed for high utilization and used 80% as a rough target.
The exact number matters less than what each report tells you:
low utilization
→ commitment may be too large

low coverage
→ additional eligible spend remains uncovered
Check both before raising a commitment.
5. Moving batch work to Spot
Next I went after the nightly batch jobs.
They’re a good fit for Spot because they are:
interruptible
not latency-sensitive
able to run outside peak periods
not tied to one specific instance type
The catch is resilience.
Spot isn’t just a cheaper instance. The job has to survive AWS taking the capacity back.
6. A flexible launch template
I used several compute-optimized instance types that do the same job:
c7g.4xlarge
c6i.4xlarge
c6a.4xlarge
c5.4xlarge
I didn’t want to depend on one Spot capacity pool.
If the job runs on several similar types, AWS has more pools to pull from.
That lowers the risk of locking into one family or generation.
For Spot, spreading across instance types is one of the most important choices you make.
7. A Mixed Instances Policy
I created an Auto Scaling Group with the launch template and a Mixed Instances Policy.
My settings:
OnDemandBaseCapacity:
  0

OnDemandPercentageAboveBaseCapacity:
  0

SpotAllocationStrategy:
  capacity-optimized
That makes the batch workload 100% Spot.
capacity-optimized tells AWS to pick from deeper Spot pools instead of just the cheapest.
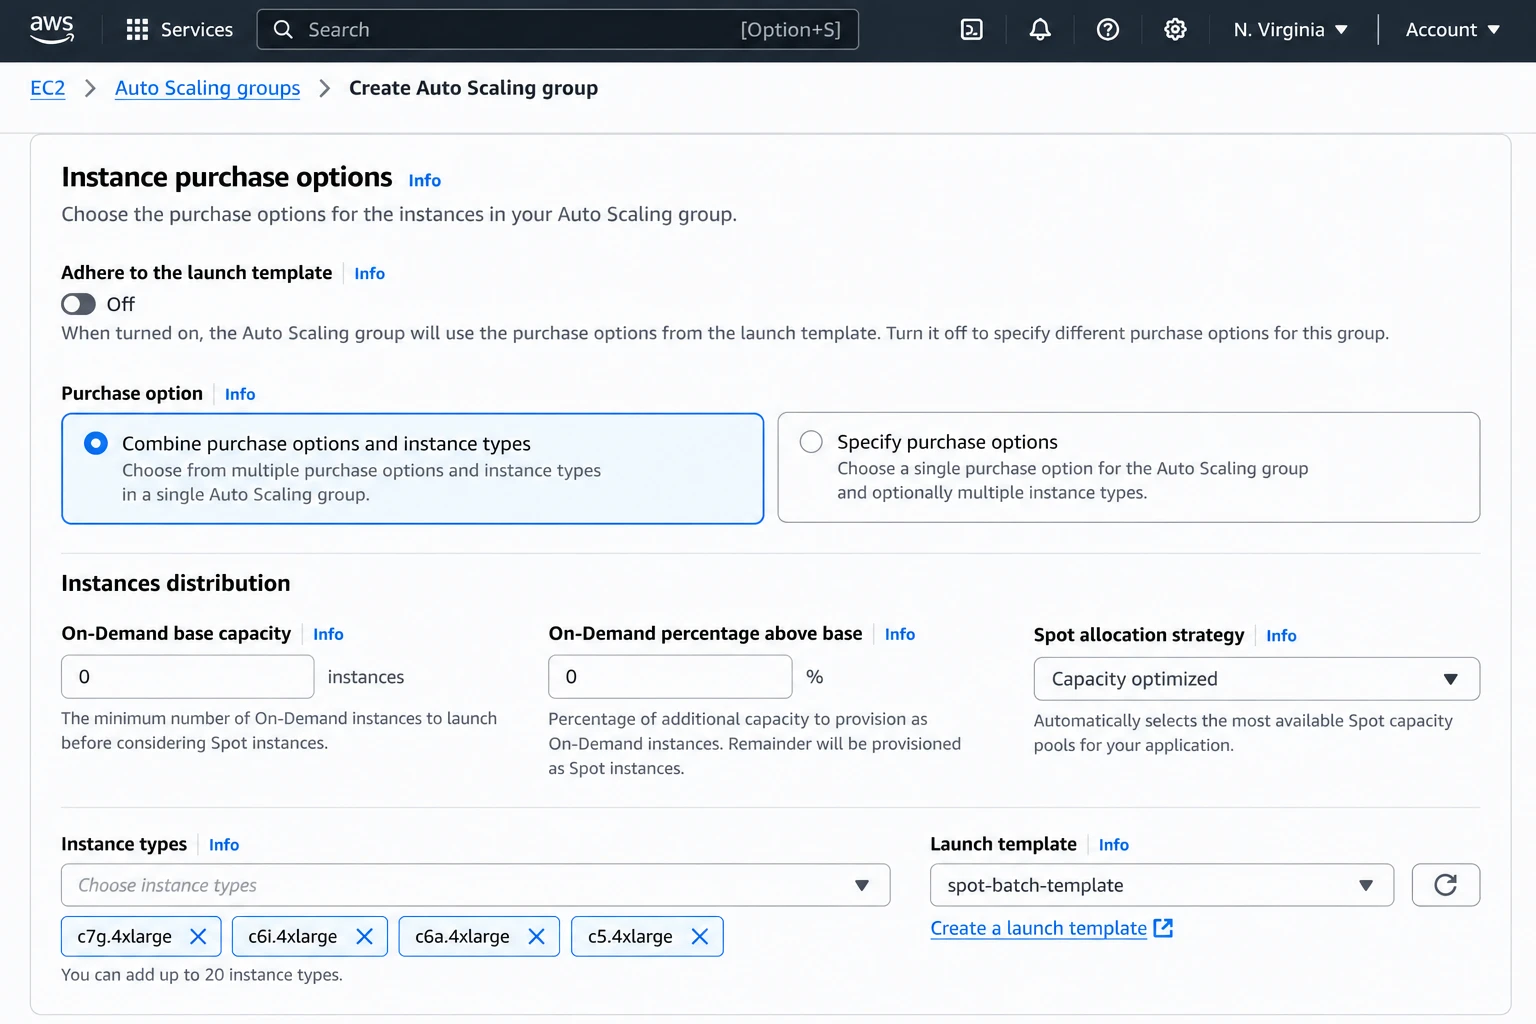
Mixed Instances Policy for the Spot-based Auto Scaling Group
For real workloads, 100% Spot only makes sense if the job can handle interruptions or has a fallback.
8. Checkpointing the batch job
The most important Spot work wasn’t in the Auto Scaling Group.
It was in the application.
The batch job writes progress checkpoints to S3 every:
10 minutes
If AWS takes the instance, the new worker loads the latest checkpoint. It doesn’t start over.
Here is the difference:
Without checkpointing:
Spot interruption
→ job restarts from the beginning

With checkpointing:
Spot interruption
→ replacement instance starts
→ last S3 checkpoint is loaded
→ job resumes near the interruption point
This caps lost work at about one checkpoint interval.
Pick your interval based on the cost of writes, recovery time, and how much rework you can live with.
9. Handling Spot interruption notices
I added:
EventBridge
→ Lambda
to react to Spot interruption events.
AWS sends a warning shortly before it reclaims an instance.
The Lambda uses that window to:
record the interruption
request a final checkpoint
prepare the workload for termination
This adds to the regular checkpoints. It doesn’t replace them.
The job should still restart cleanly if the last-second checkpoint doesn’t finish.
10. Committing the database separately
Then I moved to RDS.
The database runs all the time and uses:
db.r6g.xlarge
Aurora PostgreSQL
Multi-AZ
1-year term
No Upfront
I bought an RDS Reserved Instance for that setup.
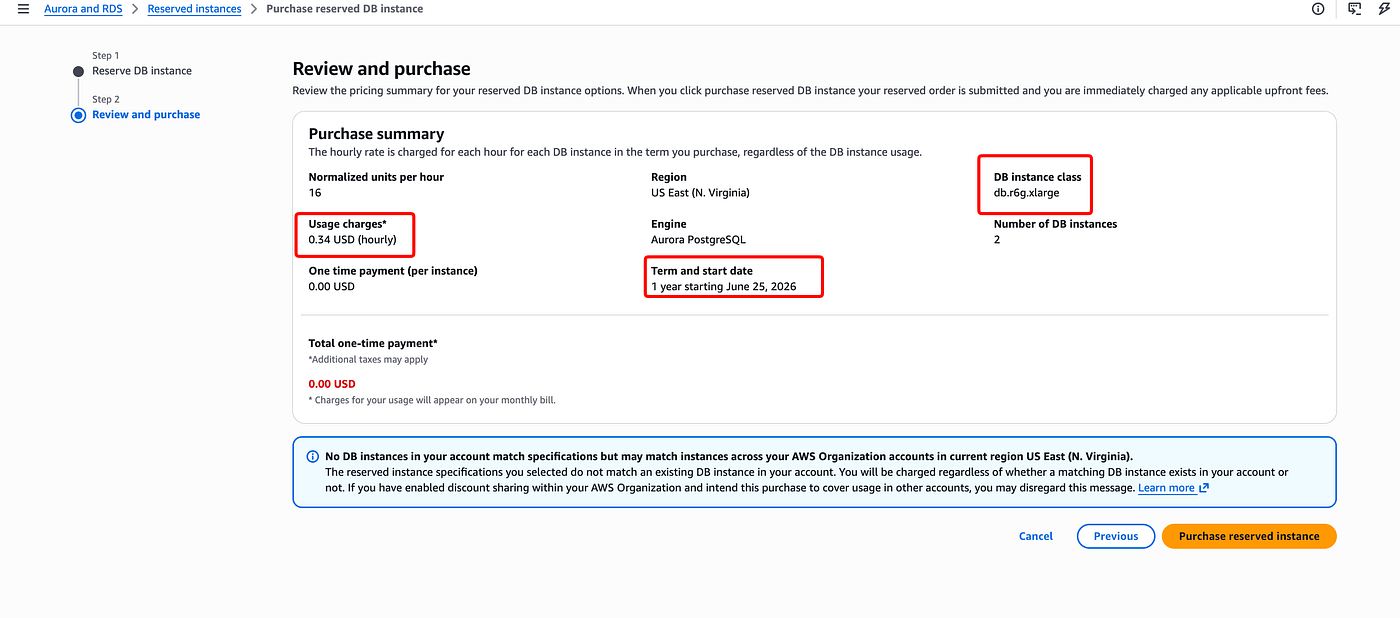
RDS Reserved Instance purchase review screen
RDS used Reserved Instances here, not Savings Plans.
For this setup the savings came out around 35–40%.
Again, that’s an example and it changes over time.
Before committing, check:
database engine
instance class
deployment type
region
expected runtime
current RDS RI pricing
A commitment only helps when the workload is stable enough to justify it.
11. The flexibility trade-off
Compute and database commitments work differently.
A Compute Savings Plan is fairly flexible.
An RDS Reserved Instance is tied closely to the database setup.
So you have to think past today’s bill. Will the database shape still fit for the whole term?
Don’t lock a database into a commitment right before a migration or a big resize.
12. Three different budgets
Cost cuts handle the spend you expect.
Budgets catch it when reality drifts from the plan.
I created three.
Budget 1: Monthly total cost
Threshold:
Monthly budget:
$20,000
Notifications:
75%:
email warning

100%:
email warning

100%:
SNS notification
The 75% alert gives time to dig in before hitting the limit.
The SNS alert feeds the automated guardrail later.
Budget 2: Savings Plans coverage
This one alerts when Savings Plans coverage drops below:
70%
It flags growing On-Demand spend that the current commitment no longer covers.
Budget 3: EC2 Spot usage
The third budget tracks Spot usage, not dollars.
I did that on purpose because Spot prices move around.
Tracking usage shows whether the batch job is really running on Spot.
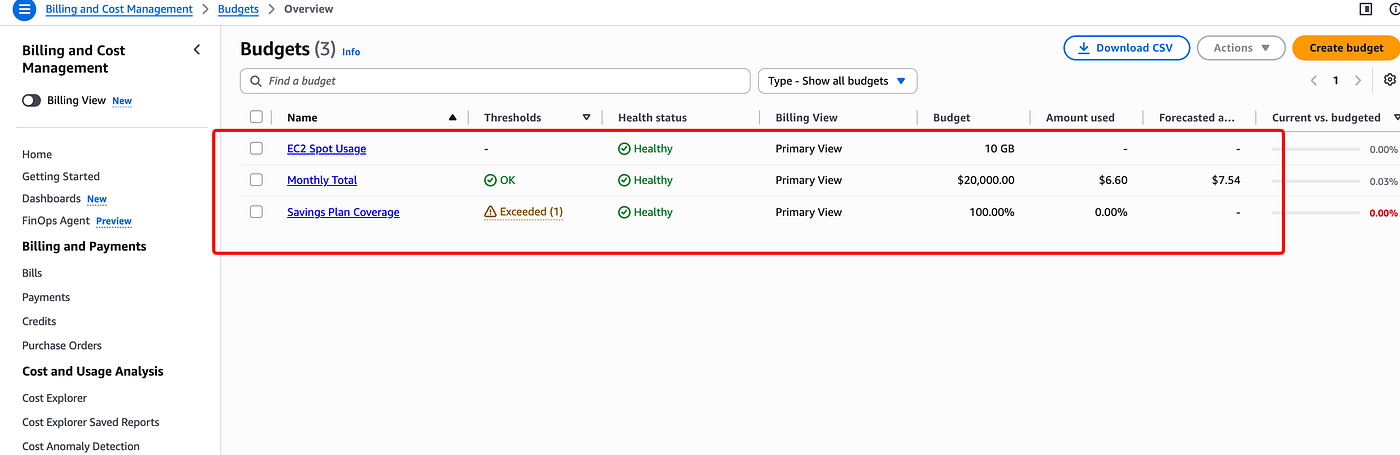
AWS Budgets console with monthly, Savings Plans coverage, and Spot usage budgets
If you care about both usage and dollars, pair this with a wider EC2 cost view.
13. Turning a budget alert into a guardrail
This was the most useful control in the whole setup. A Budget Action.
When monthly spend hits 100%, it attaches an IAM policy to the dev role. The policy denies:
ec2:RunInstances
Here’s the flow:
Budget reaches threshold
        |
        v
Budget Action
        |
        v
IAM deny attached to Dev role
        |
        v
New EC2 launches from that role are blocked
Running instances keep running. It only targets the dev role, not the whole environment.
Test this in a non-production account first.
Budget Actions change permissions. Know the blast radius before you trust it.
14. Know which identity the action hits
An IAM deny on one dev role only affects that role.
It does not stop anyone launching through:
another IAM role
an administrator role
a different principal
So a Budget Action is precise, not universal.
Before treating it as an account-wide guardrail, map every identity your developers actually use. Test each path.
A policy only limits the principal it’s attached to.
15. Adding Cost Anomaly Detection
Budgets fire on thresholds.
Anomaly Detection looks for spend that breaks from the normal pattern.
I created a monitor named EC2-RDS-Anomaly-Monitor for:
EC2
RDS
and alerted on things like:
anomalous spend greater than $200
or
more than 15% above the historical baseline
The alert goes to SNS and email.
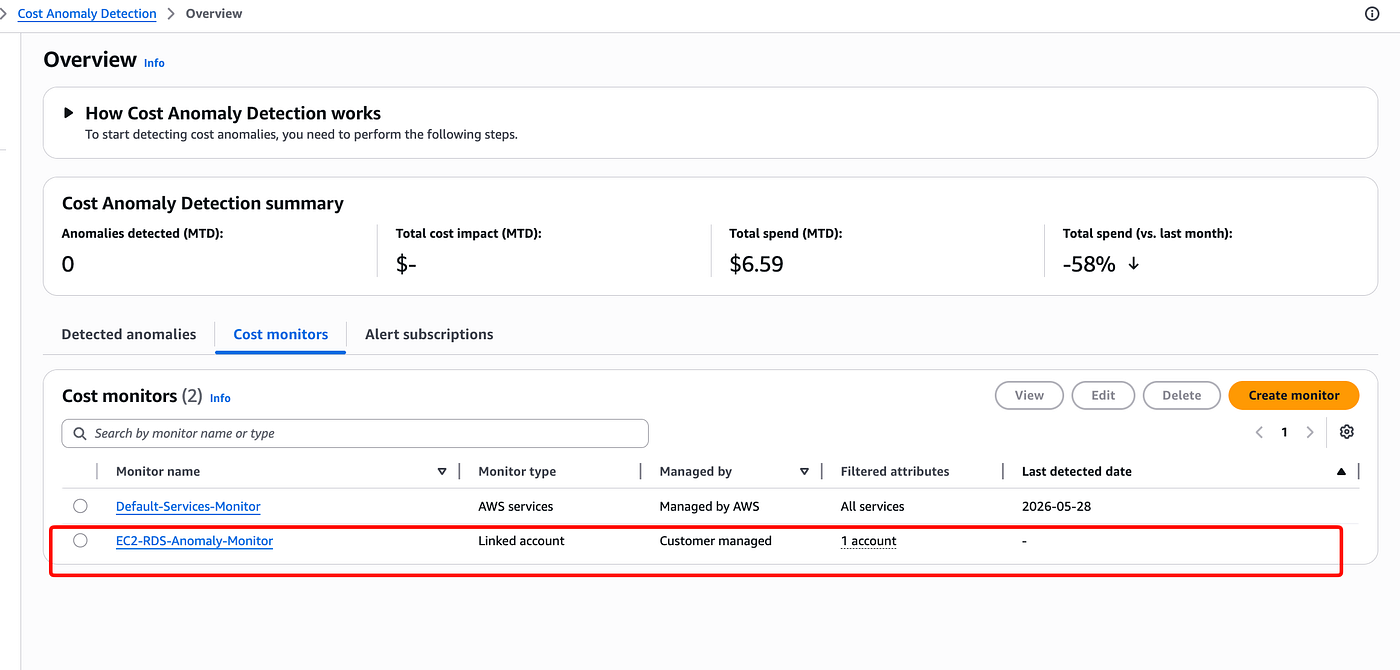
Cost Anomaly Detection monitors, including EC2-RDS-Anomaly-Monitor
It’s meant to catch:
runaway Lambda usage
unexpected scaling
accidental data transfer
resources left running
sudden EC2 or RDS cost increases
The way I think about it:
Budgets:
"Have we crossed a limit?"

Anomaly Detection:
"Is today's spend behavior abnormal?"
Using both catches different problems.
16. Estimating the total impact
I modeled an environment with a baseline bill of:
$20,000 per month
Then I applied my assumptions:
Savings Plans for steady compute
Spot for batch workloads
RDS Reserved Instance for database spend
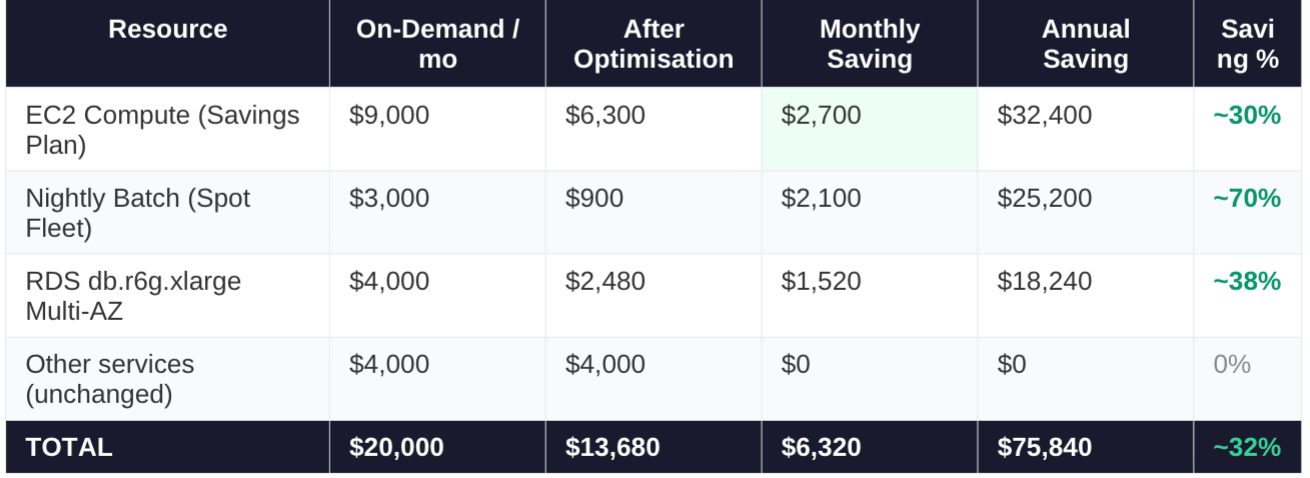
Illustrative savings estimate
My estimate came out to about:
$6,320 saved per month
$75,840 saved per year
for that modeled workload.
This is not a measurement from a real environment.
Real savings depend on:
instance mix
usage patterns
Spot pricing
Savings Plan utilization
Reserved Instance utilization
region
current AWS pricing
Use the AWS Pricing Calculator and AWS recommendations before making a real commitment.
17. Don’t buy commitments just to test this
This warning matters.
Savings Plans and RDS Reserved Instances are financial commitments.
You can’t delete a Savings Plan afterward like a test resource.
If you’re only testing, stop at the Recommendations page. Don’t complete the purchase.
That still shows you understand:
what plan would be chosen
why it would be chosen
what usage supports the recommendation
without taking on a real commitment.
Same goes for the RDS reservation.
18. Cleaning up the Spot Auto Scaling Group
I removed the Auto Scaling Group first:
EC2
→ Auto Scaling Groups
→ select the lab ASG
→ Delete
That terminates the Spot instances and stops replacements.
Then I checked:
EC2
→ Instances
→ filter for Spot instances
to make sure nothing was left.
19. Deleting the launch template
With the ASG gone, I deleted the launch template:
EC2
→ Launch Templates
→ select template
→ Actions
→ Delete
I named mine spot-batch-template.
20. Removing the interruption handler
I deleted the Spot interruption Lambda:
Lambda
→ Functions
→ Spot interruption handler
→ Delete
Then the EventBridge rule:
EventBridge
→ Rules
→ select interruption rule
→ Delete
I also checked for IAM roles or policies I had only created for this.
21. Deleting the budgets and Budget Action
I removed all three budgets in the Budgets console.
Then I checked IAM.
If the Budget Action attached a deny policy to the dev role, detach and delete it if you don’t need it.
Deleting the budget doesn’t always undo the IAM changes.
22. Removing the anomaly monitor
I deleted the Cost Anomaly Detection monitor.
If the SNS topic only exists for this, delete that too.
The path:
Cost Management
→ Cost Anomaly Detection
→ Monitors
→ select monitor
→ Delete
and then:
SNS
→ Topics
→ select lab topic
→ Delete
23. Deleting the checkpoint bucket
The checkpoint bucket may hold objects and versions.
Before deleting it:
remove current objects
remove object versions if versioning was enabled
then delete the bucket
Make sure no running job still needs those checkpoints.
24. Checking spend after cleanup
I checked Cost Explorer the next day.
I wanted to see the temporary charges drop back to normal.
If Spot charges keep showing up, look at:
EC2
→ Instances
→ Spot instances
for leftovers.
The real long-term cost risk is the commitments. The budgets and the anomaly monitor aren’t the concern.
25. What I learned
Commitments need data
Don’t size a Savings Plan on gut feel.
Use the usage history from the Recommendations page at minimum.
Commit too much and utilization drops.
Commit too little and eligible spend stays On-Demand.
The right size comes from how the workload actually behaves.
Spot resilience is app work
Making a Spot Auto Scaling Group is easy.
The real work is:
checkpoint design
resume logic
interruption handling
idempotent processing
recovery testing
Skip that and a cheaper fleet can cause a much more expensive failure.
Budget Actions are scoped
A Budget Action only limits the identity it targets.
If people can go around that identity, it doesn’t protect much.
Test the whole access model.
Coverage shows what to fix next
Once the Savings Plan has run long enough to report, go back to the Coverage report.
Uncovered eligible spend is the next thing to look at.
Optimization never really ends
This isn’t a one-time sprint. It’s an ongoing habit.
Workloads change.
Commitments expire.
Regions and instance families change.
New services show up.
My regular checklist:
review utilization
review coverage
inspect anomaly alerts
re-run recommendations before renewal
revisit commitment size
validate budget thresholds
26. Final design
Here’s the full stack:
                    AWS Cost Governance
                           |
        +------------------+------------------+
        |                  |                  |
   Predictable         Flexible          Always-on
    compute             batch             database
        |                  |                  |
 Savings Plan        Spot capacity        RDS RI
                           |
                    checkpoint to S3
                           |
                 EventBridge interruption
                           |
                         Lambda

                           +
                           |
                           v

                    AWS Budgets
                           |
                    Email + SNS
                           |
                    Budget Action
                           |
                  IAM launch restriction

                           +
                           |
                           v

                Cost Anomaly Detection
                           |
                        SNS/email
Wrapping up
I built cost control in layers.
Savings Plans cover steady compute.
Spot covers jobs that can handle interruptions.
RDS Reserved Instances cover a stable database.
Budgets set clear spending limits.
A Budget Action turns one of those limits into a real IAM block instead of just an email.
Anomaly Detection catches strange spend that monthly thresholds might miss.
The bigger lesson is that saving money depends on architecture as much as pricing. Spot only helps if the job can resume safely. Commitments only pay off when usage history backs them up. Guardrails only work if they hit the identities that actually spend money.
So the goal isn’t just cheaper infrastructure. It’s designing pricing, resilience, access, and monitoring together.