
Building an Active Directory Environment with Windows Server and Windows 10
I built a small Windows domain from scratch with VirtualBox, Windows Server 2019, and a Windows 10 client. The server became the domain controller. It also handled DNS, DHCP, and routing for the internal network. After that I created Active Directory users and built the Windows 10 client. Then I joined the client to the domain and signed in as a domain user.
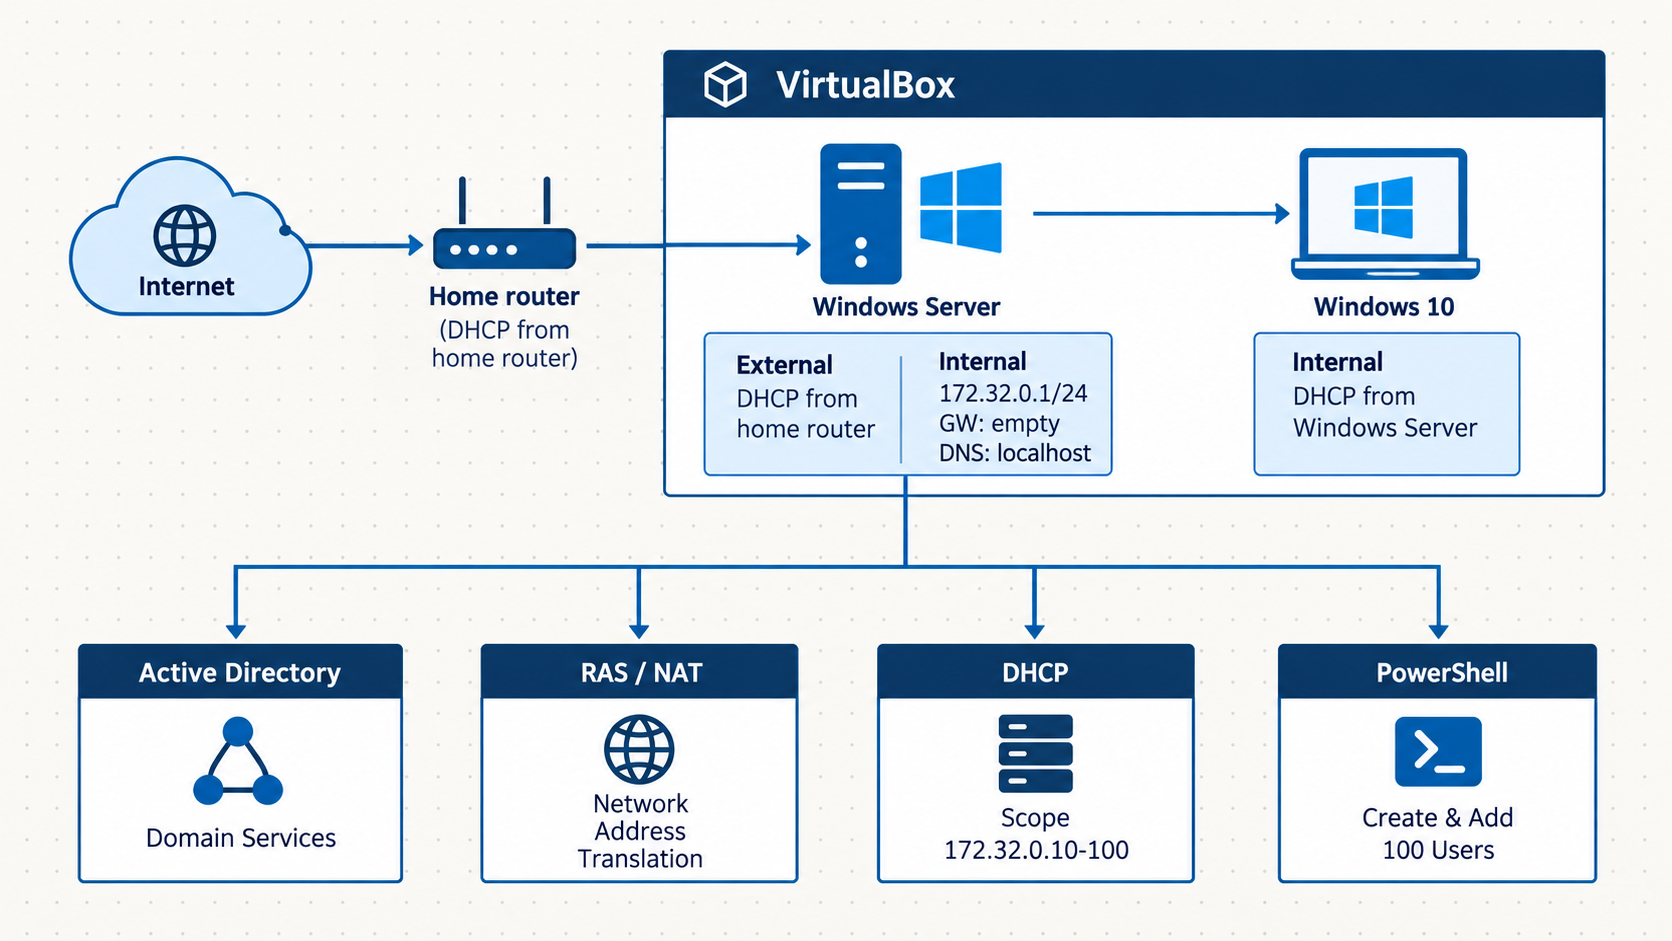
Active Directory network architecture
What I built
The finished environment has:
- A Windows Server 2019 VM running as the domain controller.
- Active Directory Domain Services and DNS.
- Two network adapters on the server. One faces outside and one faces the internal network.
- Routing and NAT so the Windows client can reach the internet through the server.
- DHCP so internal clients get their network settings automatically.
- A batch of Active Directory users created from a PowerShell script
and
names.txt. - A Windows 10 VM joined to the domain.
1. Install VirtualBox and get the Windows ISOs
First I installed VirtualBox and its Extension Pack. If you already have VirtualBox you can skip to the ISO downloads.
My host runs Kali Linux, so I used these commands:
sudo apt update && sudo apt full-upgrade -y
I imported the VirtualBox repository key:
wget -q https://www.virtualbox.org/download/oracle_vbox_2016.asc -O- \
| gpg --dearmor \
| sudo tee /usr/share/keyrings/virtualbox-archive-keyring.gpg
I added the VirtualBox repository:
echo "deb [arch=amd64 signed-by=/usr/share/keyrings/virtualbox-archive-keyring.gpg] http://download.virtualbox.org/virtualbox/debian buster contrib" \
| sudo tee /etc/apt/sources.list.d/virtualbox.list
Then I updated the package list and installed everything:
sudo apt update
sudo apt install dkms -y
sudo apt install virtualbox virtualbox-ext-pack -y
Next I downloaded the Windows Server 2019 ISO from Microsoft’s Evaluation Center. I picked the ISO option so I could attach it straight to the VM.
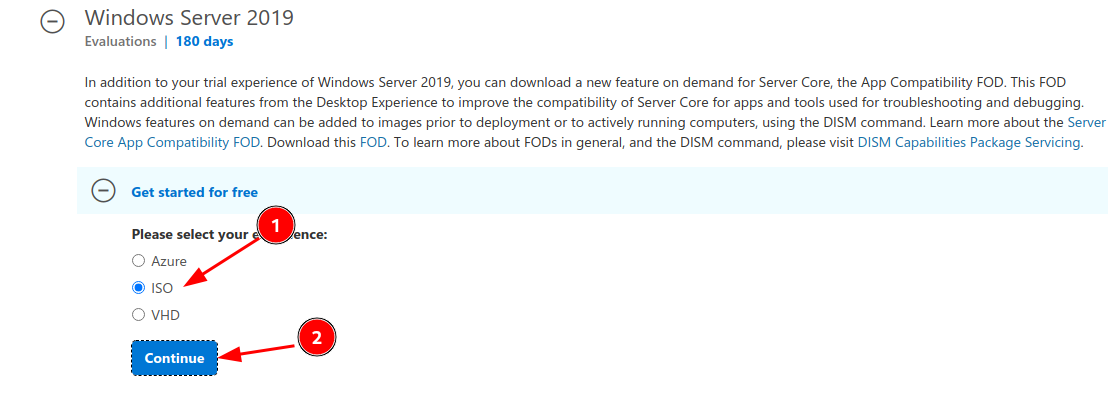
Step 1
I filled out Microsoft’s download form and moved to the download page.
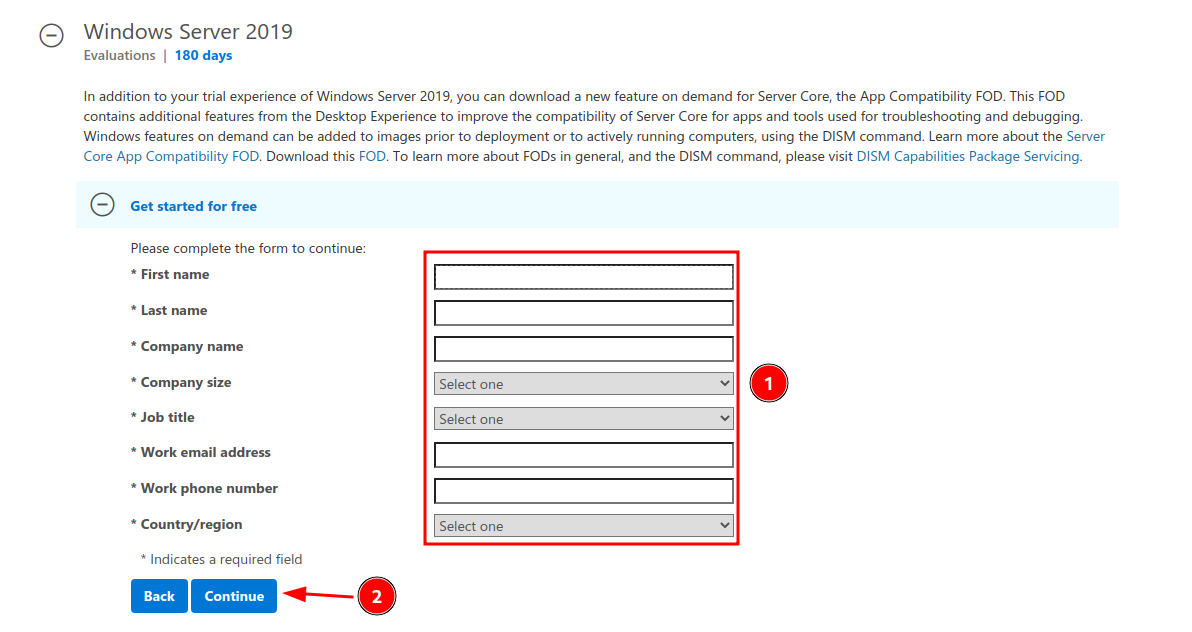
Step 2
I also downloaded the Windows 10 installation media. The client needs fewer resources than the server. Still, the host needs enough RAM to run both at once.
2. Create the Windows Server VM
I opened VirtualBox and created a new VM for the server.
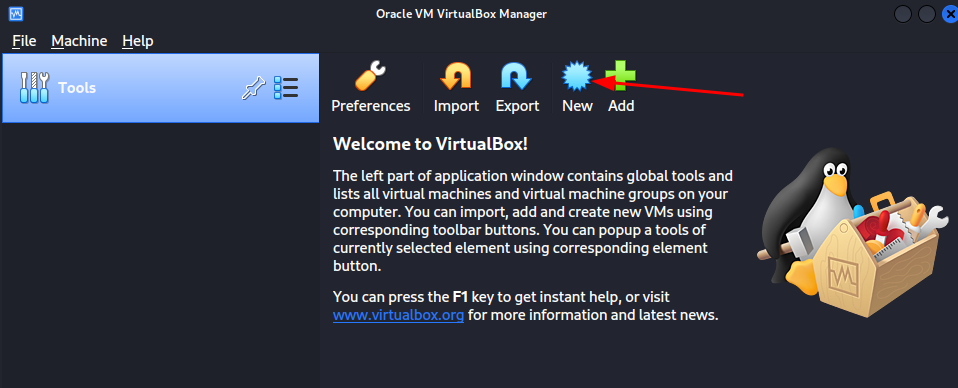
Step 3
I gave it a clear name. I set the type to Microsoft Windows and picked a 64-bit Windows version. The exact wording changes a little between VirtualBox versions.
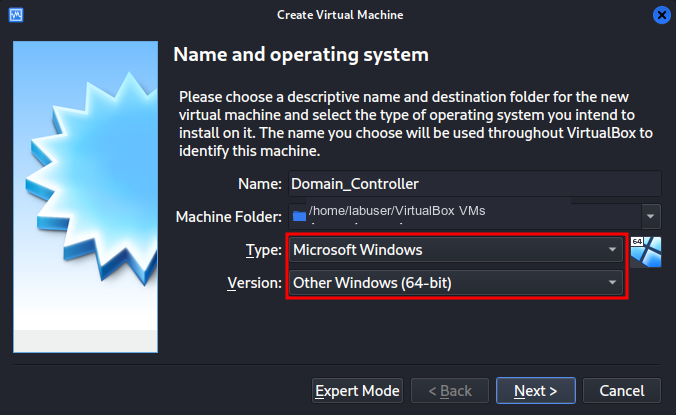
Step 4
I gave the server at least 2 GB of RAM. More makes it easier to work with if your host can spare it.
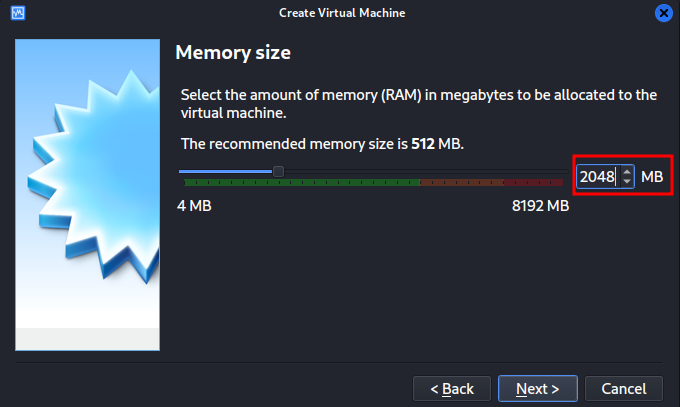
Step 5
I created a new virtual hard disk.
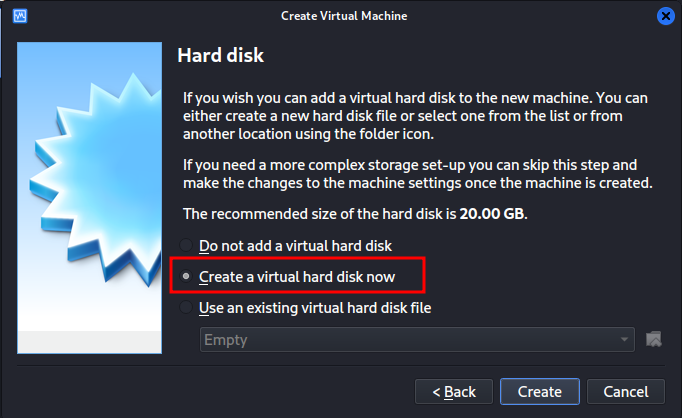
Step 6
I used the VDI format.
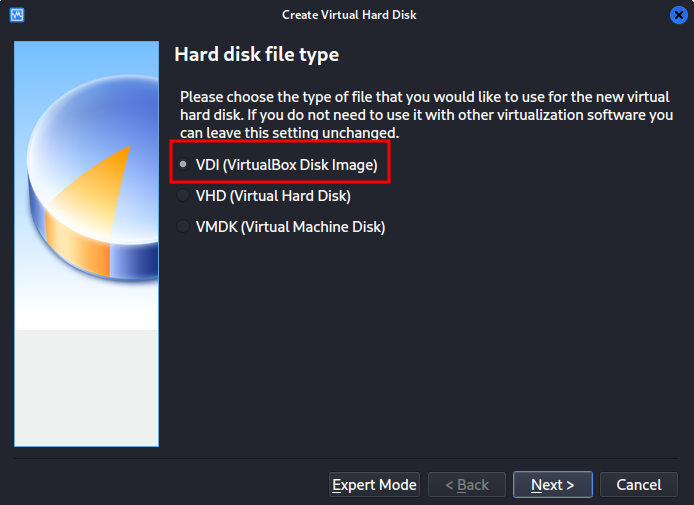
Step 7
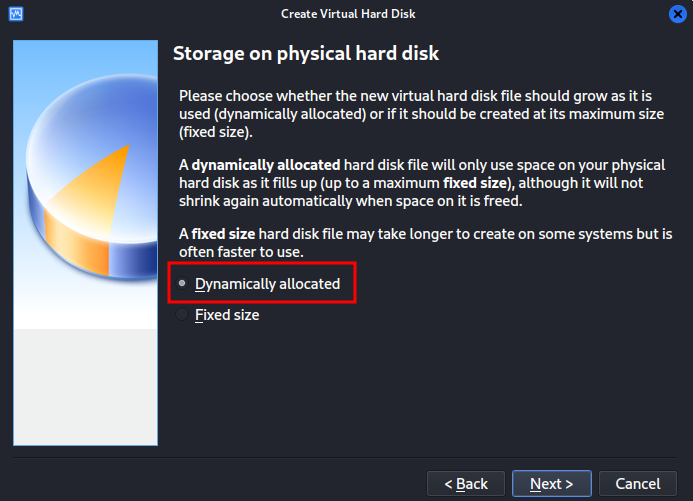
I chose a dynamically allocated disk. The file grows as Windows uses space. It does not reserve the full size up front.
Step 8
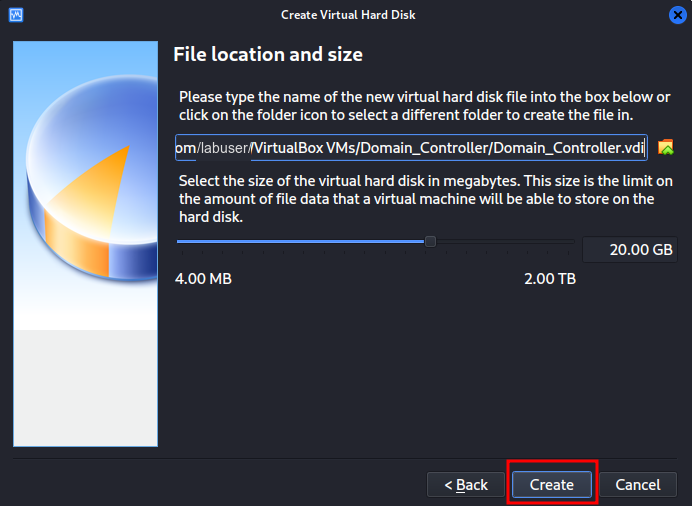
I set the disk size and finished the VM. I left enough room for Windows Server, Active Directory, and the roles I added later.
Step 9
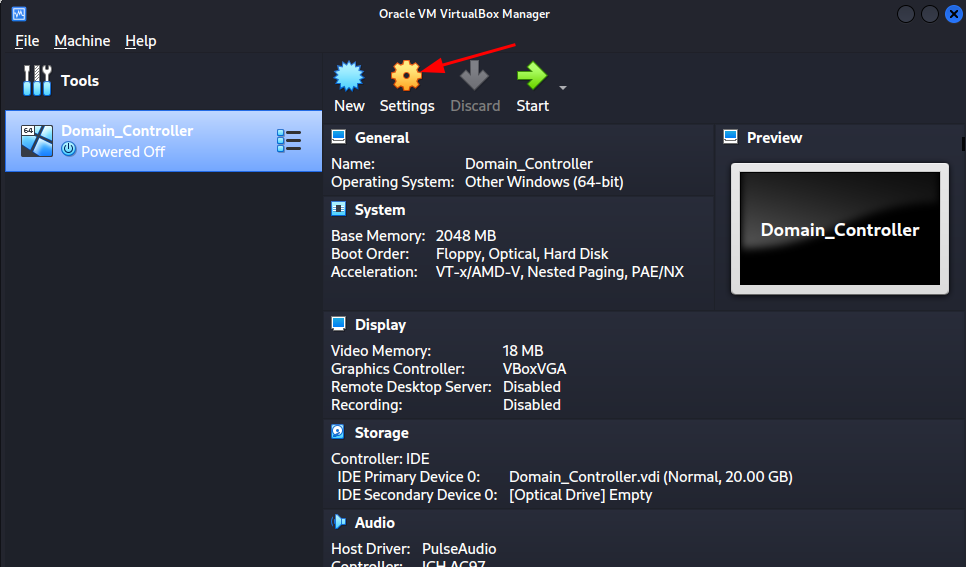
Before booting, I opened Settings to finish the hardware and network setup.
Step 10
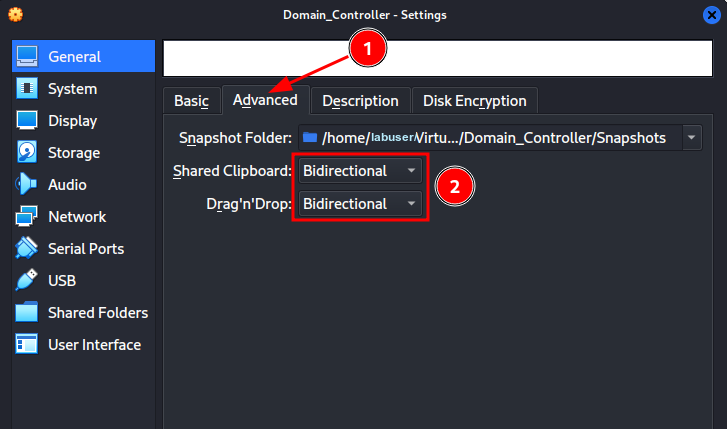
Under General > Advanced I set Shared Clipboard and Drag’n’Drop to Bidirectional. This just makes it easier to move text and files between the host and the VM.
Step 11
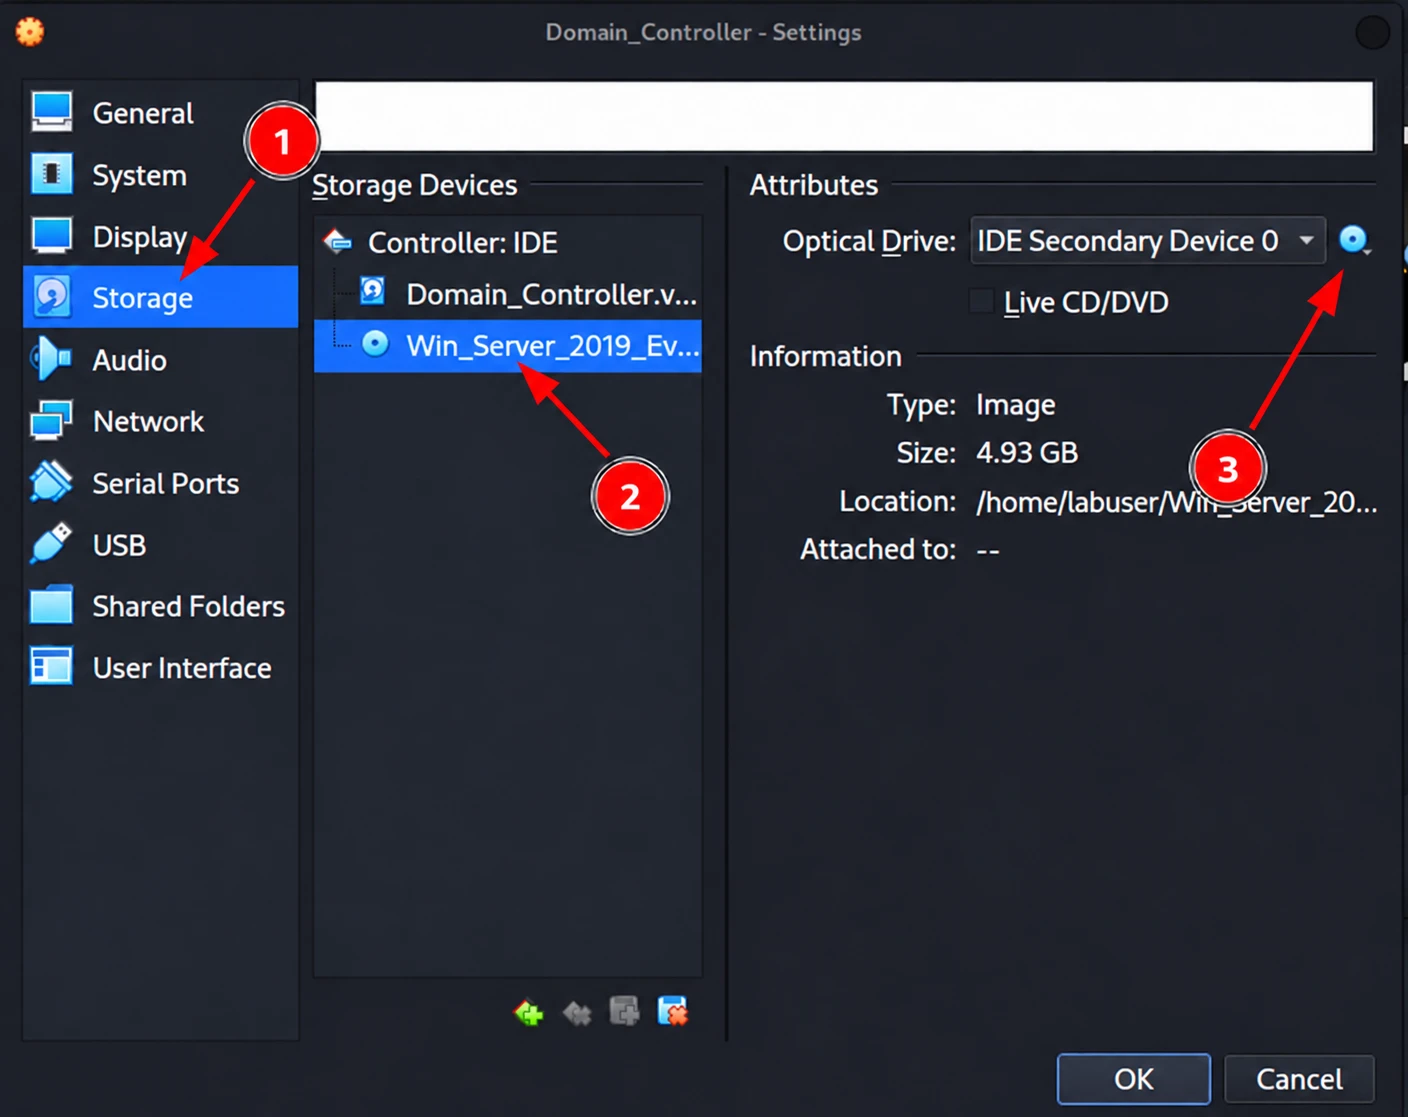
In Storage I selected the empty optical drive and attached the Windows Server ISO. That lets the VM boot from the installer.
Step 12
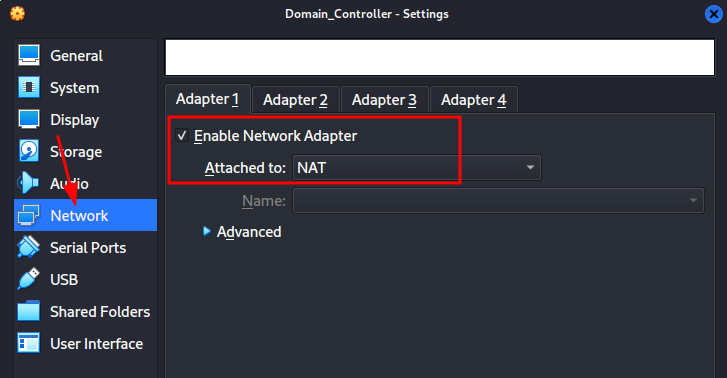
Under Network I set Adapter 1 to NAT. This gives the server outside access through VirtualBox.
Step 13
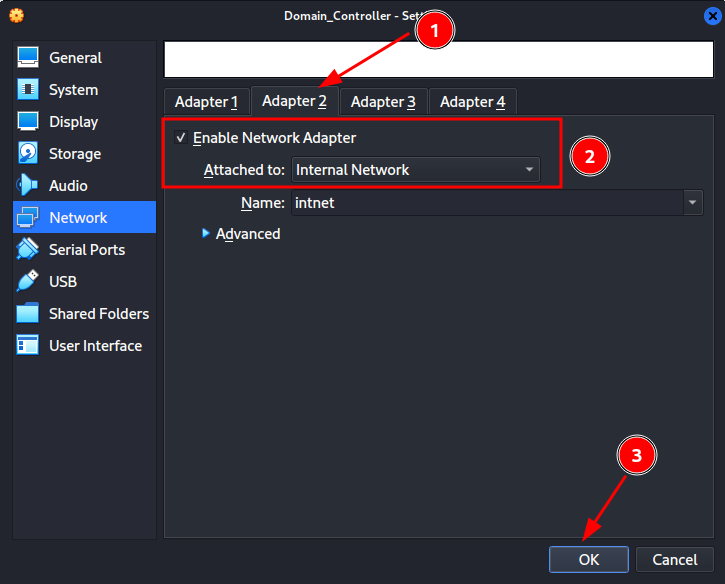
I enabled Adapter 2 and attached it to an Internal Network. The domain controller and the client talk over this adapter. Keeping the internal network separate also lets the server act as the client’s gateway.
Step 14
3. Install Windows Server 2019
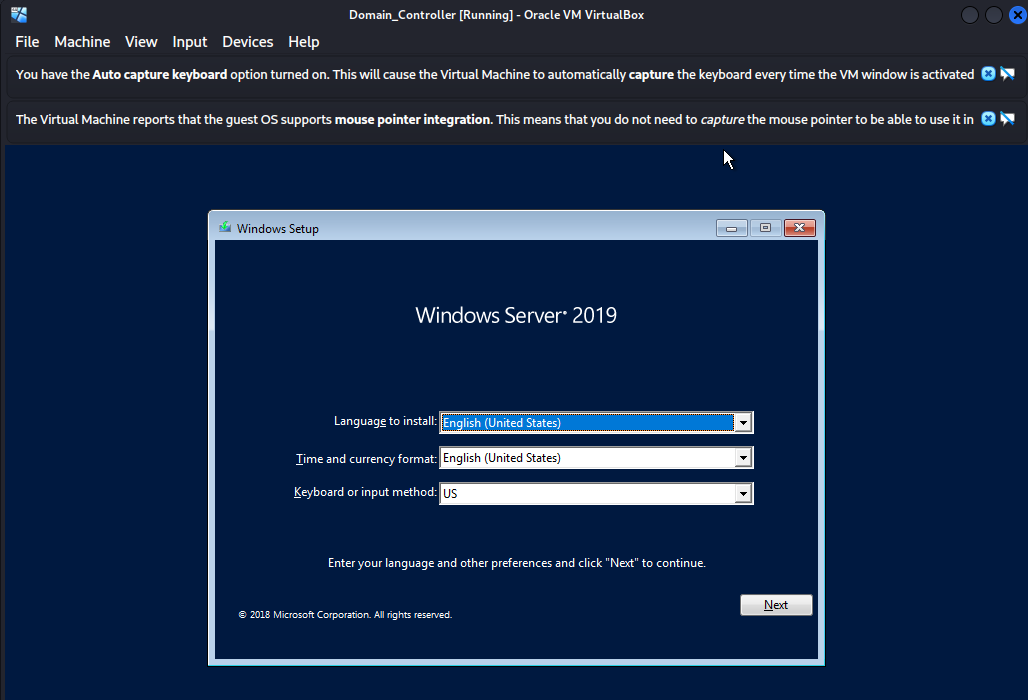
I started the VM and the installer loaded from the ISO. I picked my language, time format, and keyboard layout. Then I clicked Install now.
Step 15
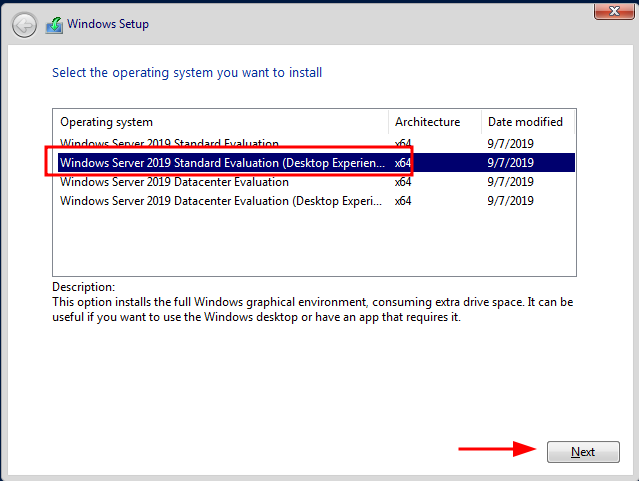
I selected Windows Server 2019 Standard Evaluation (Desktop Experience). Desktop Experience matters here because it installs the GUI I used for everything else.
Step 16
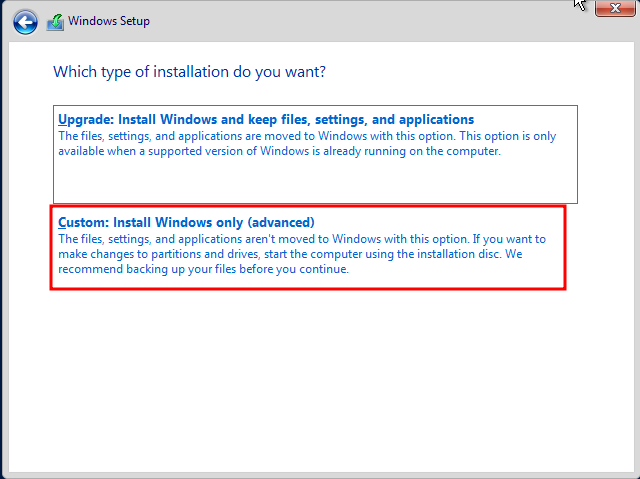
I accepted the license and chose Custom: Install Windows only. This is a new VM, so it is a clean install and not an upgrade.
Step 17
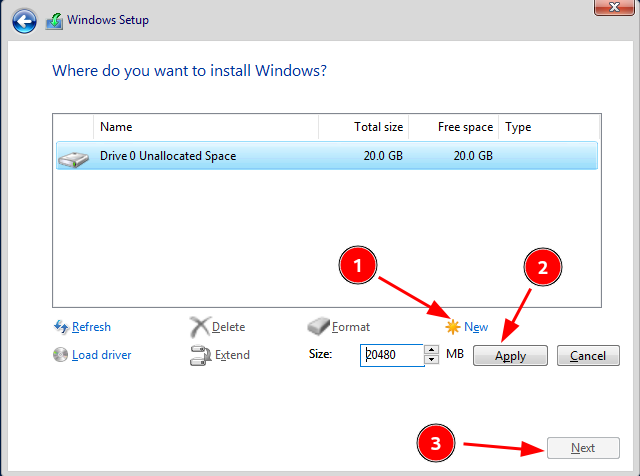
I created the Windows partition on the full virtual disk and continued.
Step 18
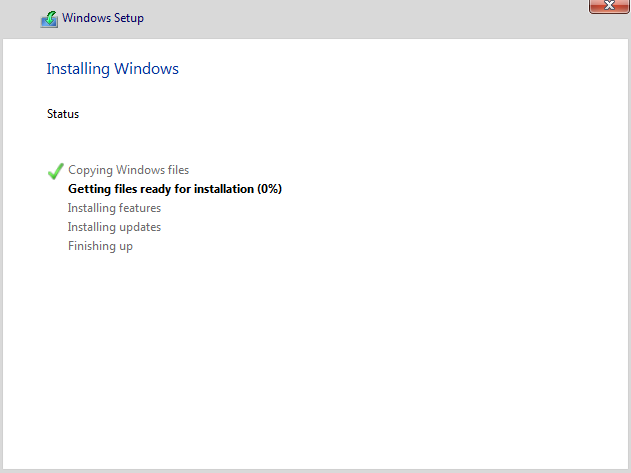
Windows copied its files and finished the install. The VM restarted a few times along the way.
Step 19
4. Set up the server and its network
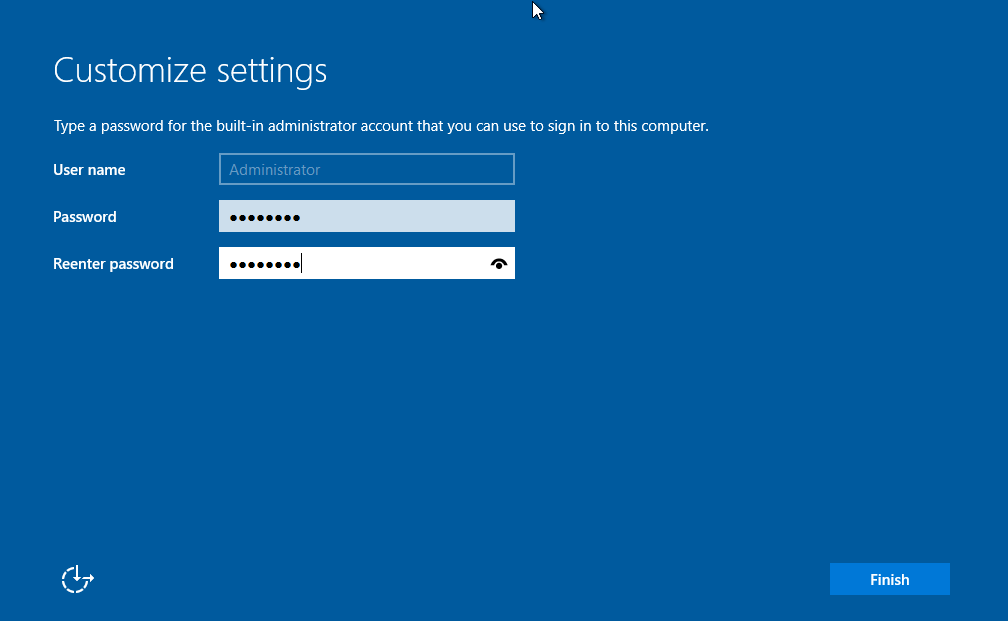
After the install, Windows asked for a password for the built-in Administrator account. I picked one that met the requirements and kept it handy.
Step 20
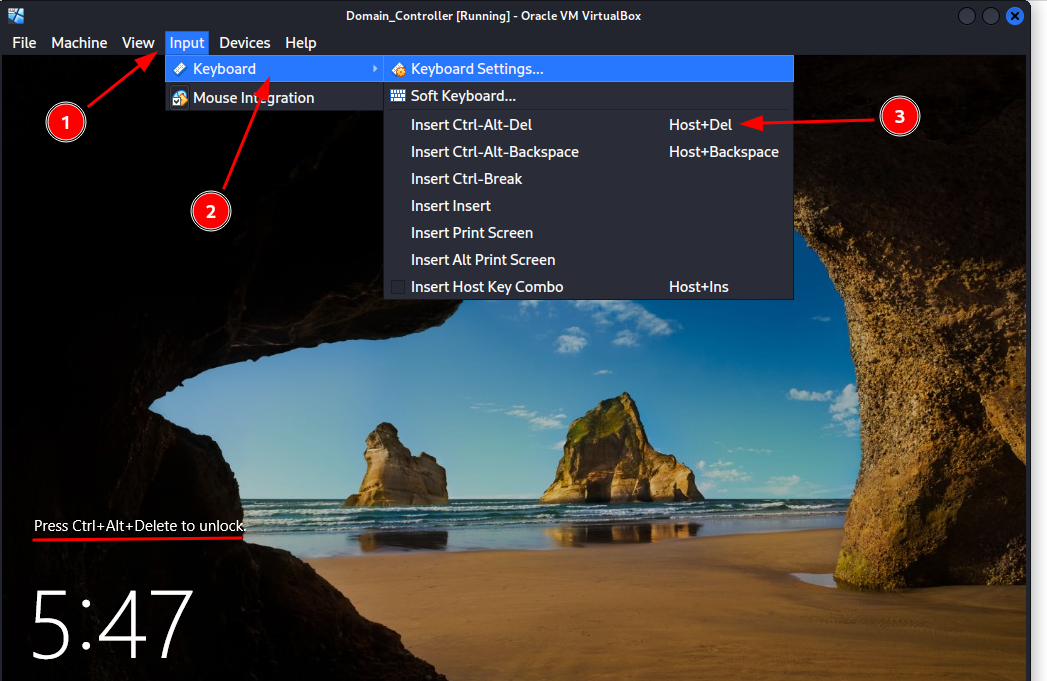
At the lock screen I sent Ctrl+Alt+Delete through Input > Keyboard > Insert Ctrl-Alt-Del.
Step 21
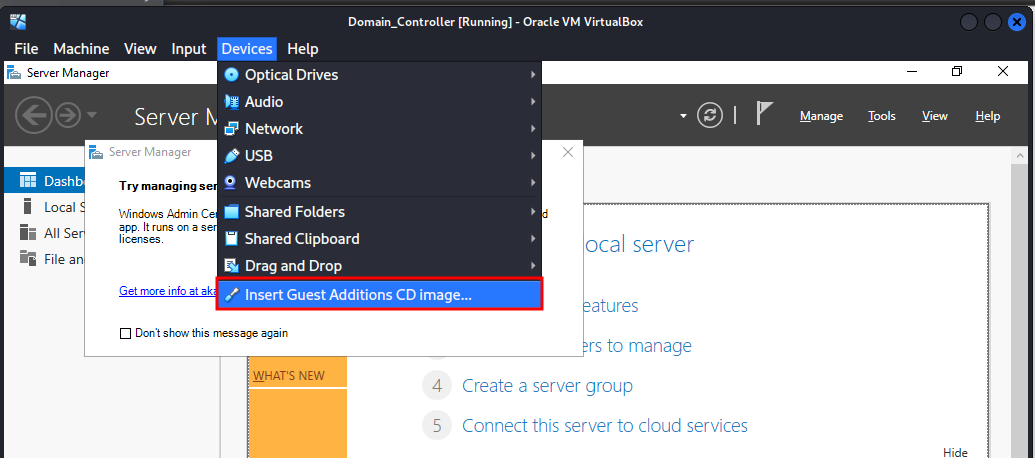
After signing in I allowed network discovery. Then I installed VirtualBox Guest Additions from the Devices menu. Guest Additions fixes display scaling and makes the shared clipboard work properly.
Step 22
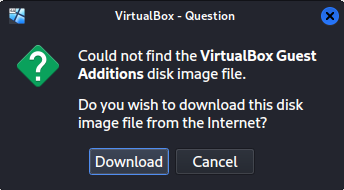
VirtualBox asked to download the Guest Additions image first. I let it.
Step 23
I confirmed the prompt and kept going.
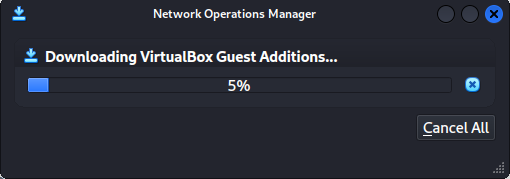
Step 24
Once the image mounted, I opened This PC and ran the 64-bit Windows installer.
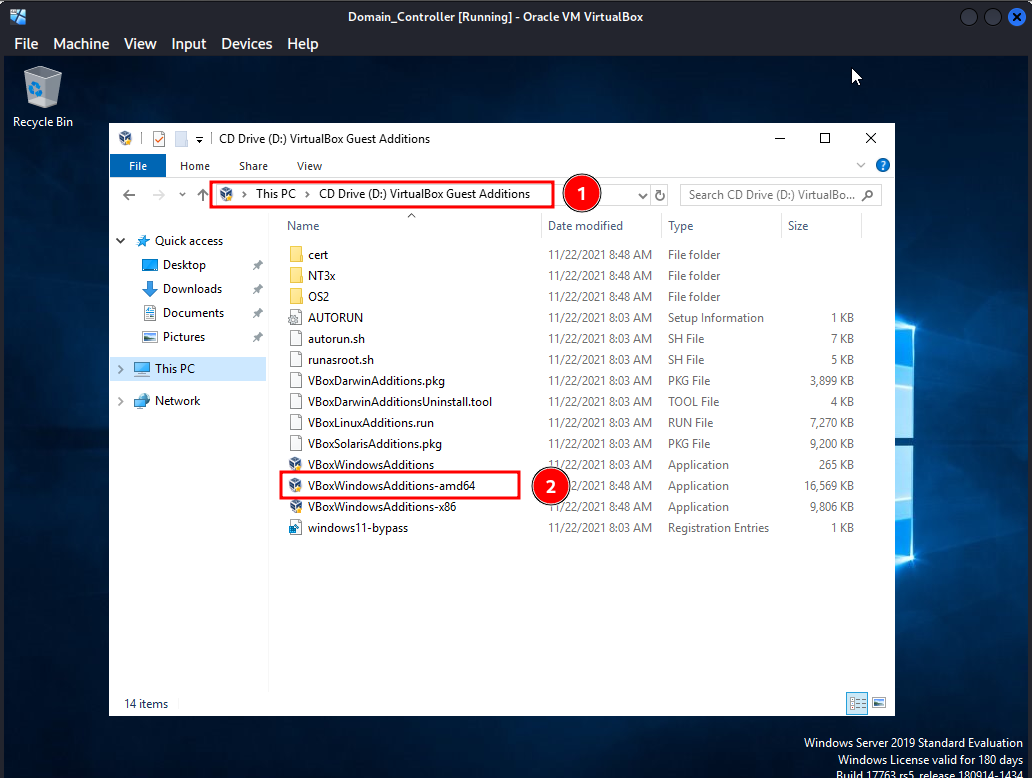
Step 25
I restarted the VM when it finished. Then I opened the network settings from the taskbar. Now I needed to figure out which adapter was which.
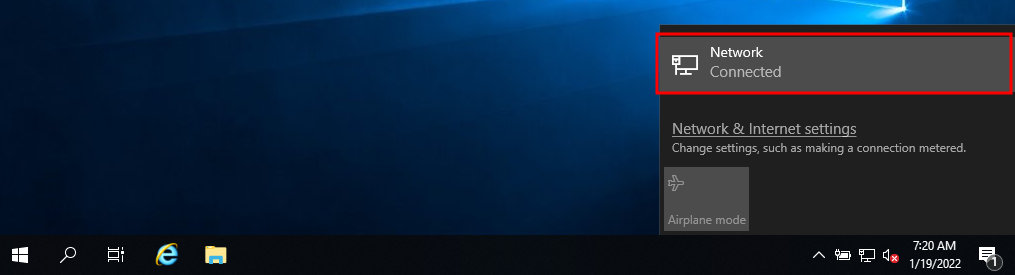
Step 26
I opened Change adapter options to see the interfaces.
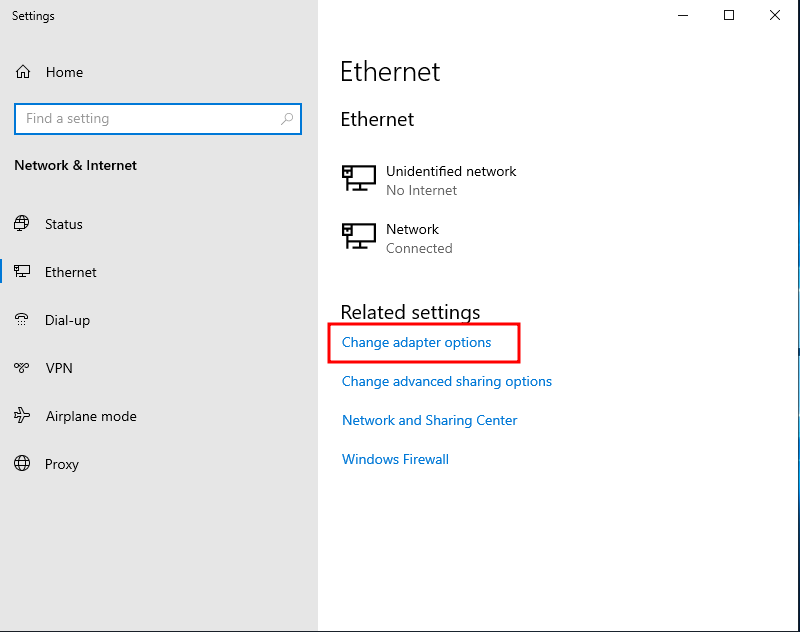
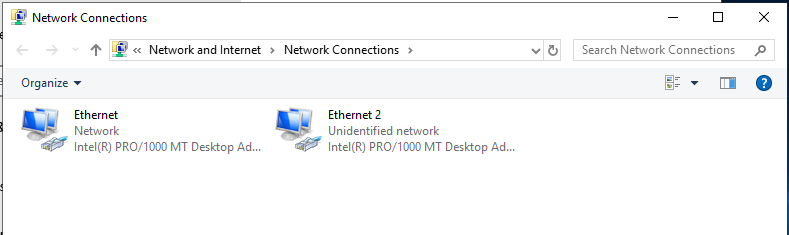
Step 27
There were two Ethernet adapters. One maps to VirtualBox NAT. The other maps to the internal network. I wanted to be sure which was which before setting any addresses.
Step 28
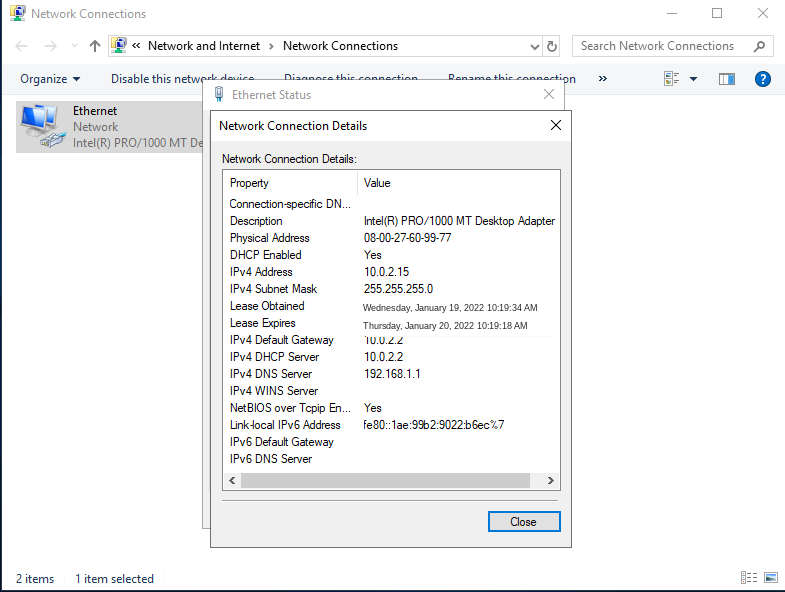
I checked the first adapter’s details. The NAT adapter already had an address from VirtualBox. That is the one that gives the server outside access.
Step 29
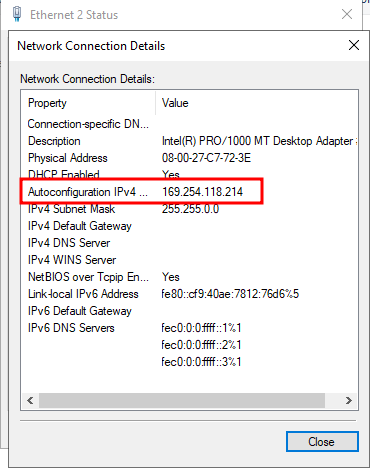
I checked the second adapter too. It only had a 169.254 address. Nothing on the internal network was handing out addresses yet.
Step 30
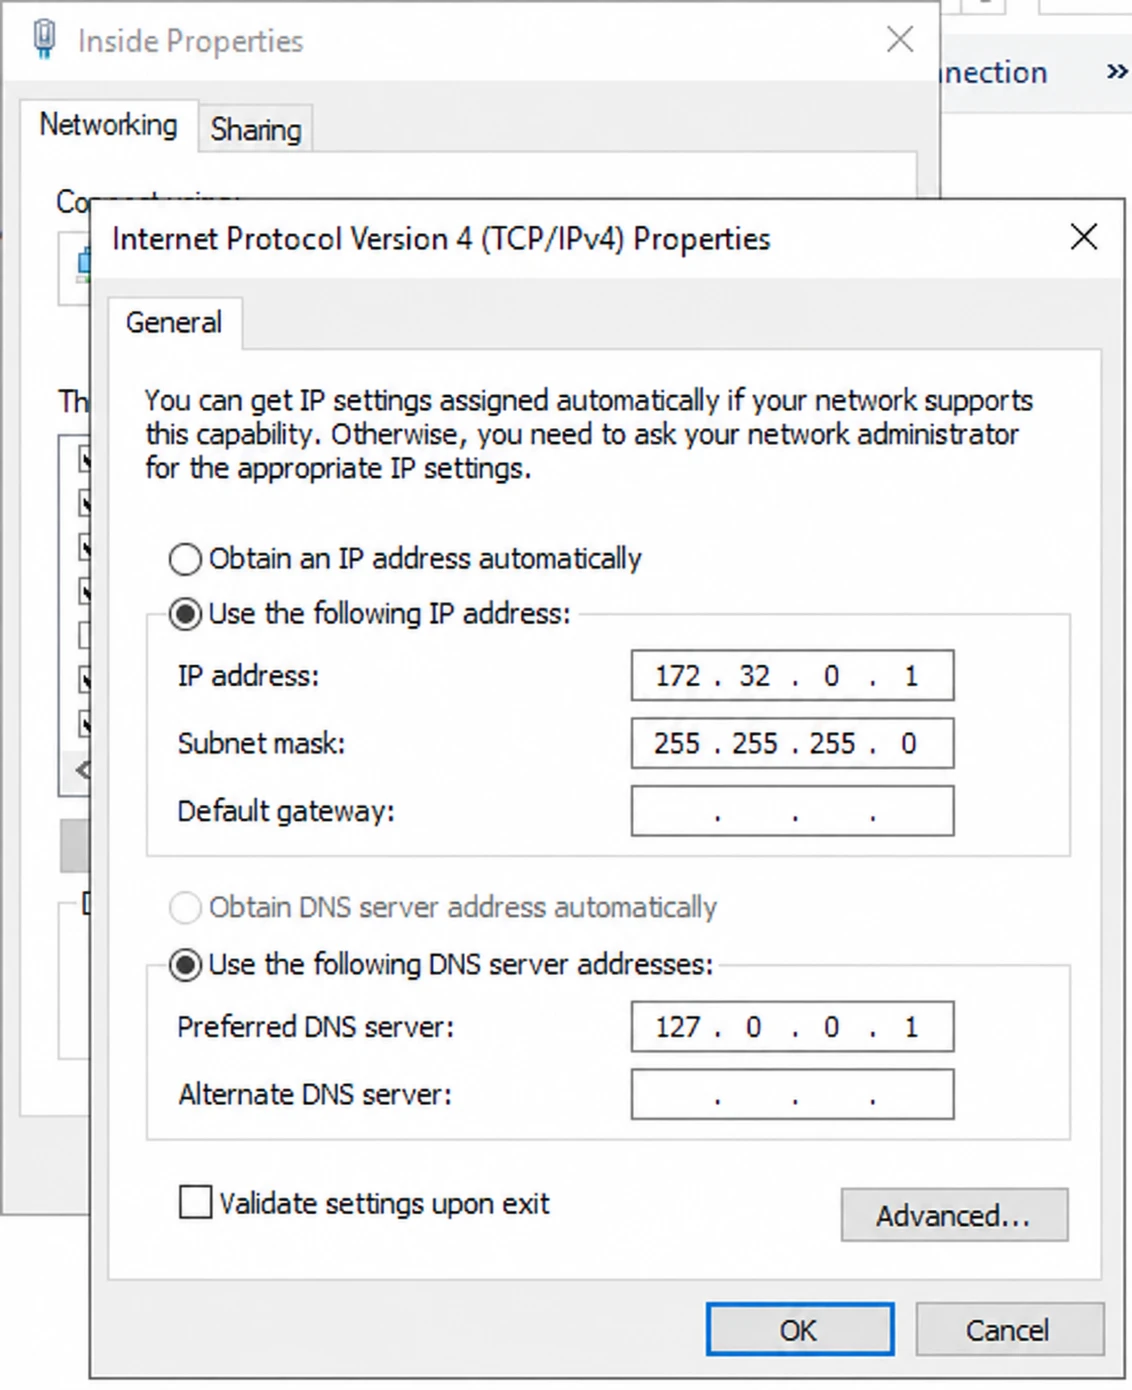
The internal adapter needed a static address. This server is the gateway, DNS server, and domain controller for the whole network. I opened the internal adapter’s IPv4 properties and set the server to 172.32.0.1.
For DNS I pointed the server at itself. Active Directory depends on the DNS service running on this machine.
Step 31
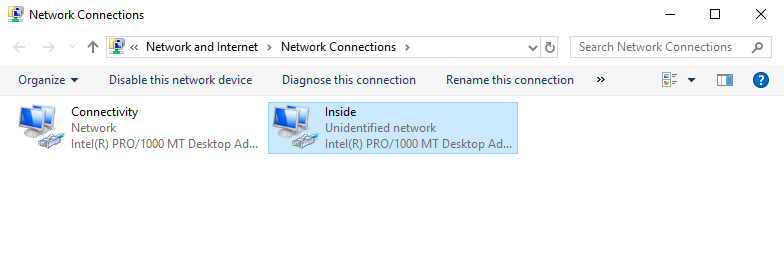
I renamed the adapters to Connectivity and Inside. That made the routing setup later much easier to follow.
Step 32
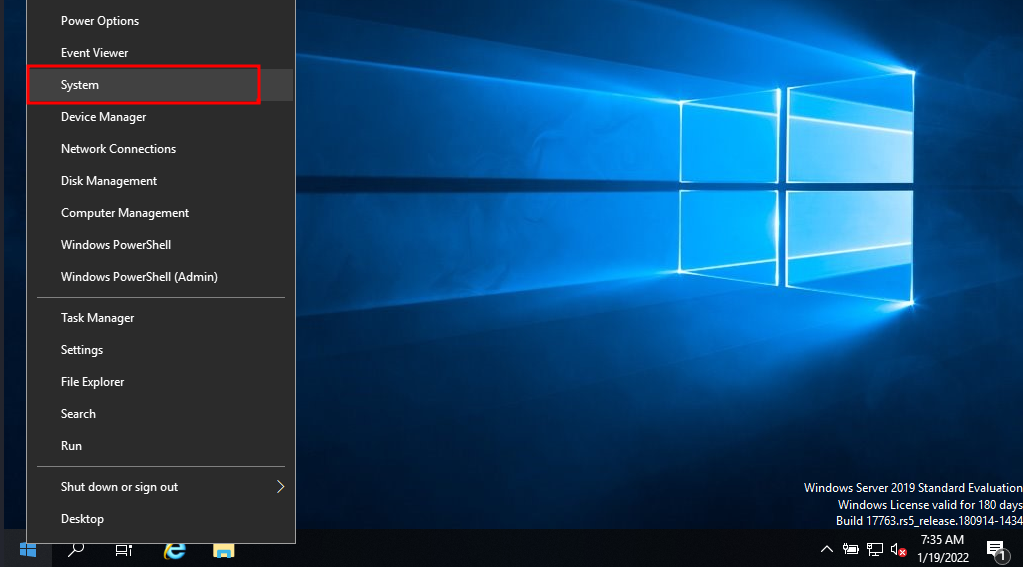
I also renamed the computer to controller and restarted it.
Step 33
5. Install Active Directory Domain Services
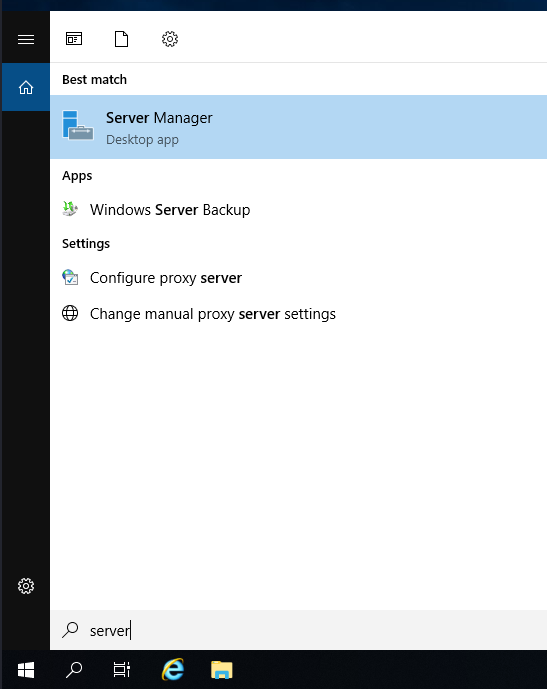
After the restart I opened Server Manager. This is where I added the roles the domain needs.
Step 34
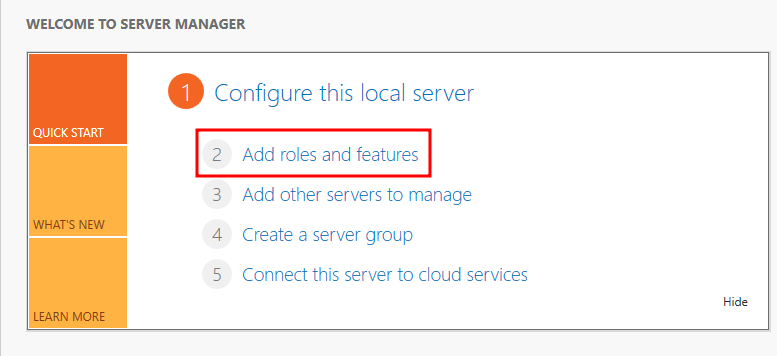
I clicked Add roles and features.
Step 35
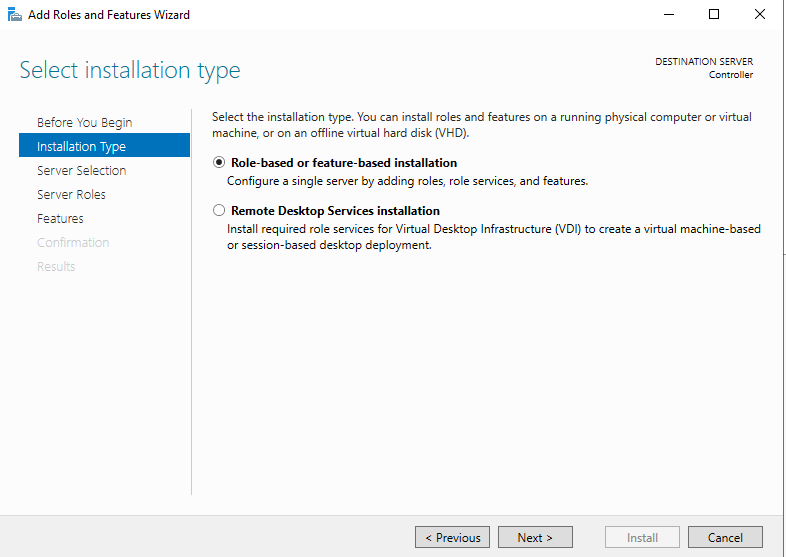
I went past the intro and chose Role-based or feature-based installation.
Step 36
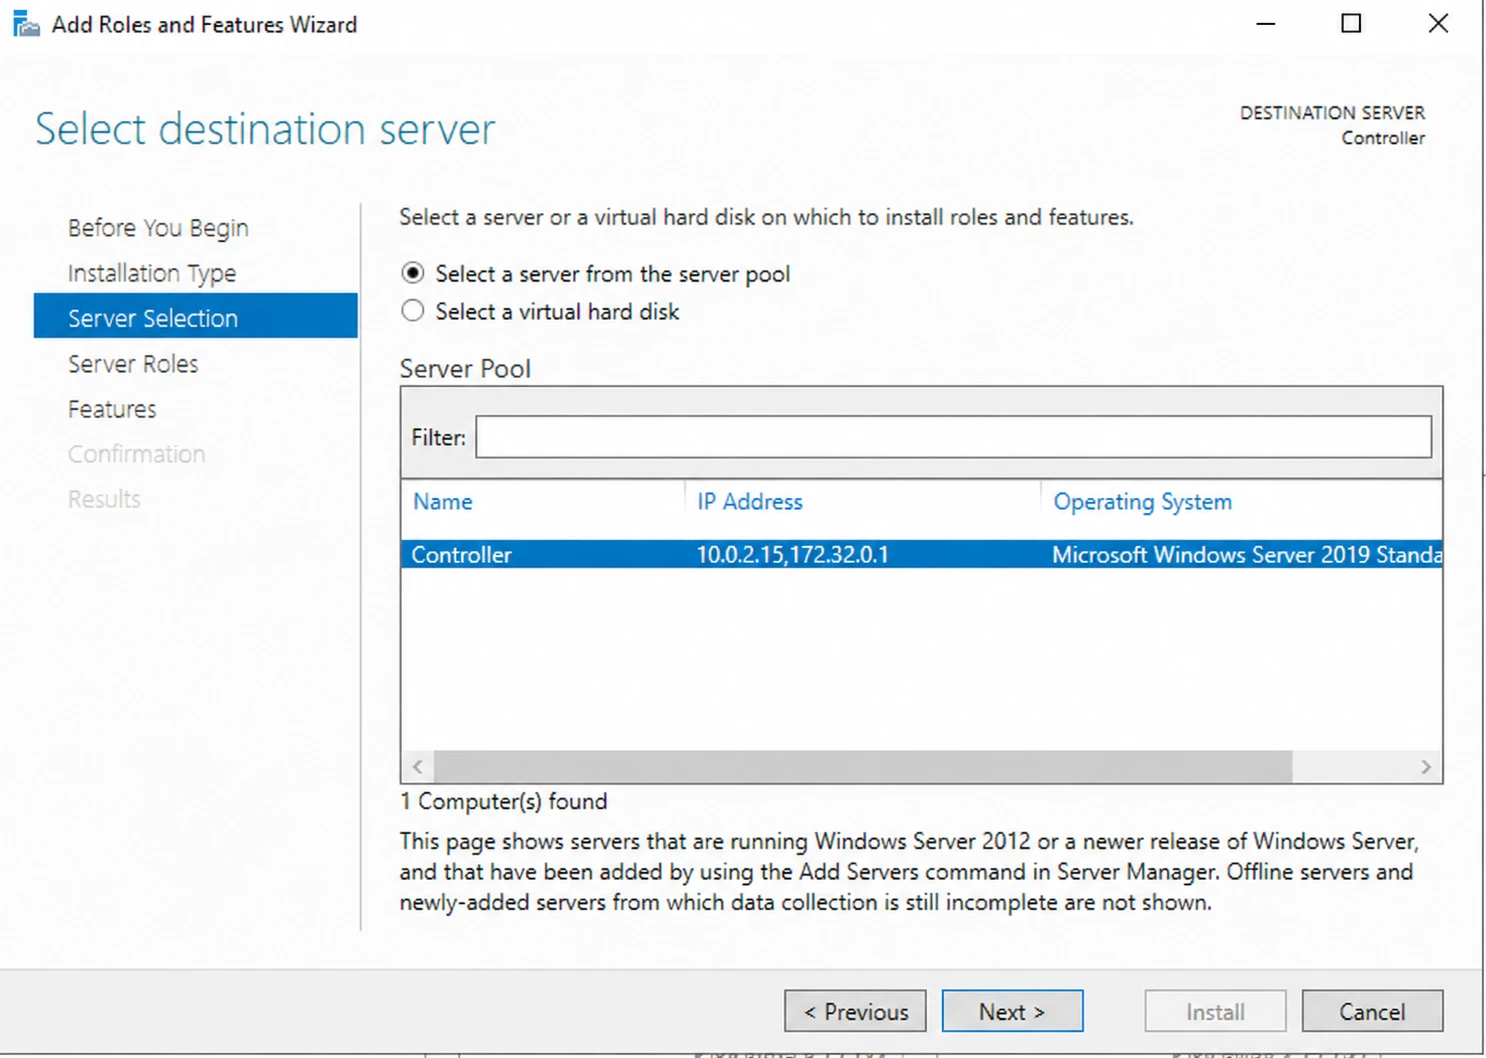
I picked the local server from the pool. It was the only one, so it was already selected.
Step 37
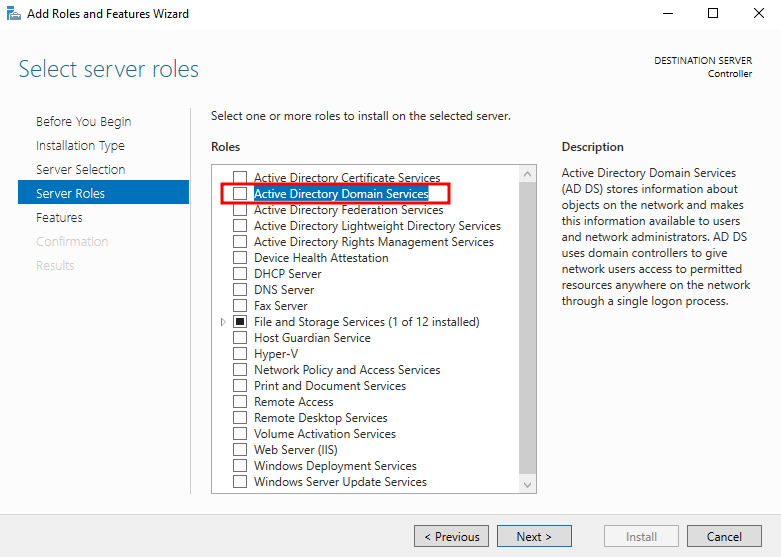
I selected Active Directory Domain Services.
Step 38
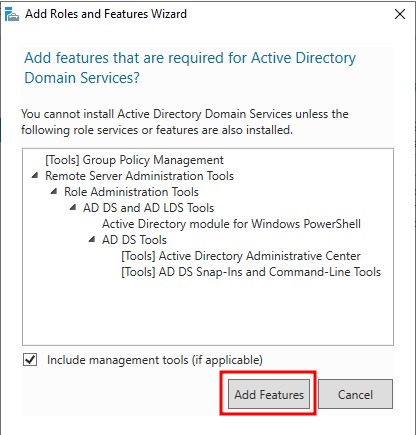
I accepted the extra management tools Windows offered. Then I finished the wizard and started the install.
Step 39
I waited for AD DS to finish. The role adds the Active Directory components, but the server is not a domain controller yet.
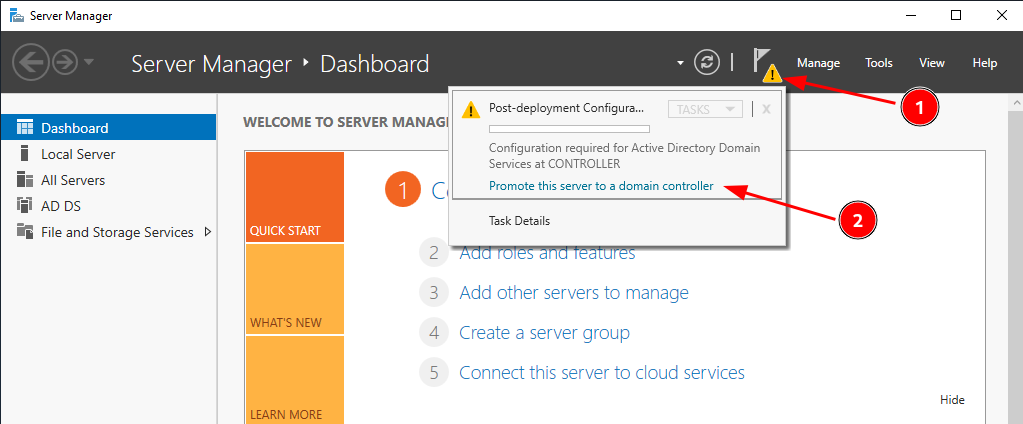
Server Manager then showed a post-deployment notice. I clicked Promote this server to a domain controller.
Step 40
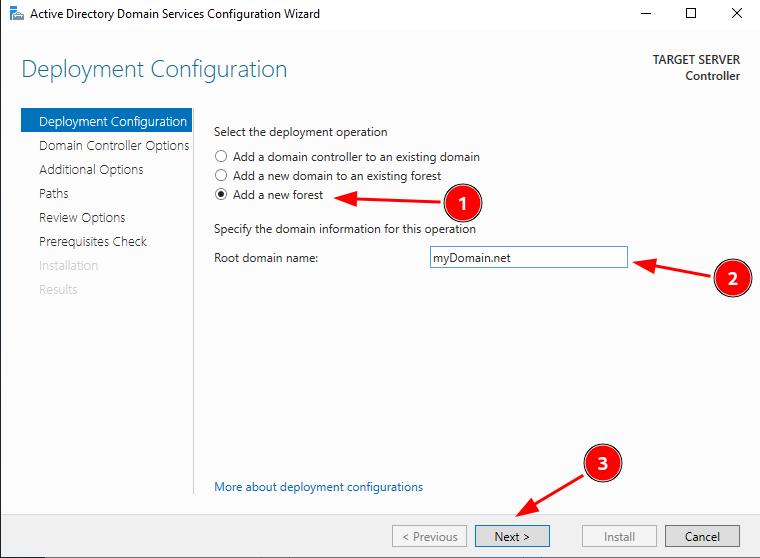
There was no existing domain, so I chose Add a new forest. I named the root domain myDomain.net.
Step 41
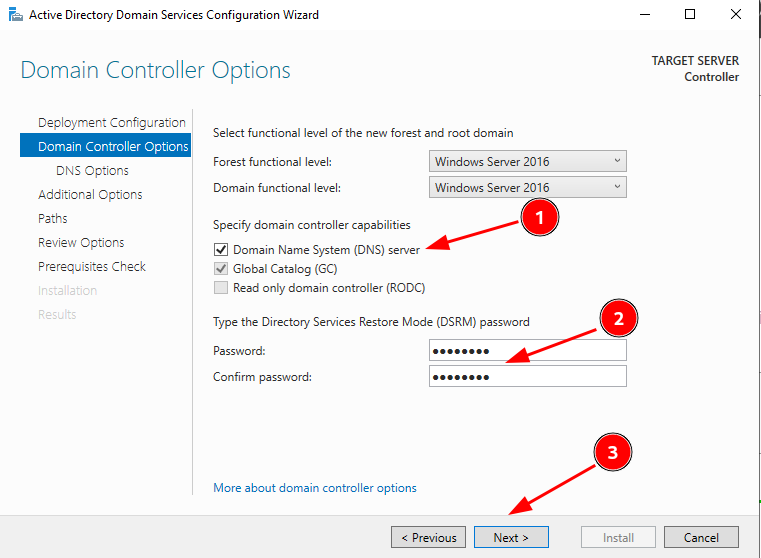
I kept DNS Server enabled and set a Directory Services Restore Mode password. That password is only for Active Directory recovery. It is separate from normal user logins.
Step 42
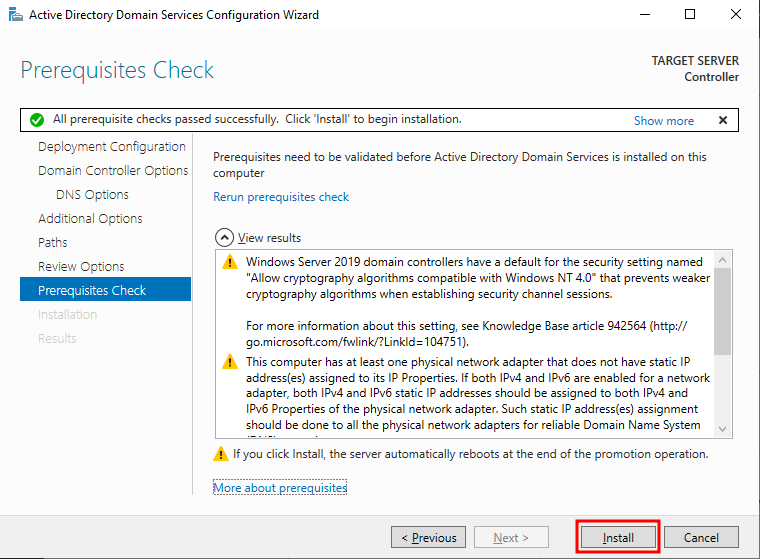
I clicked through DNS Options, Additional Options, Paths, and Review Options. The defaults worked fine. I ran the prerequisite check and started the install once Windows allowed it.
Step 43
The server restarted on its own after the promotion.
Step 44
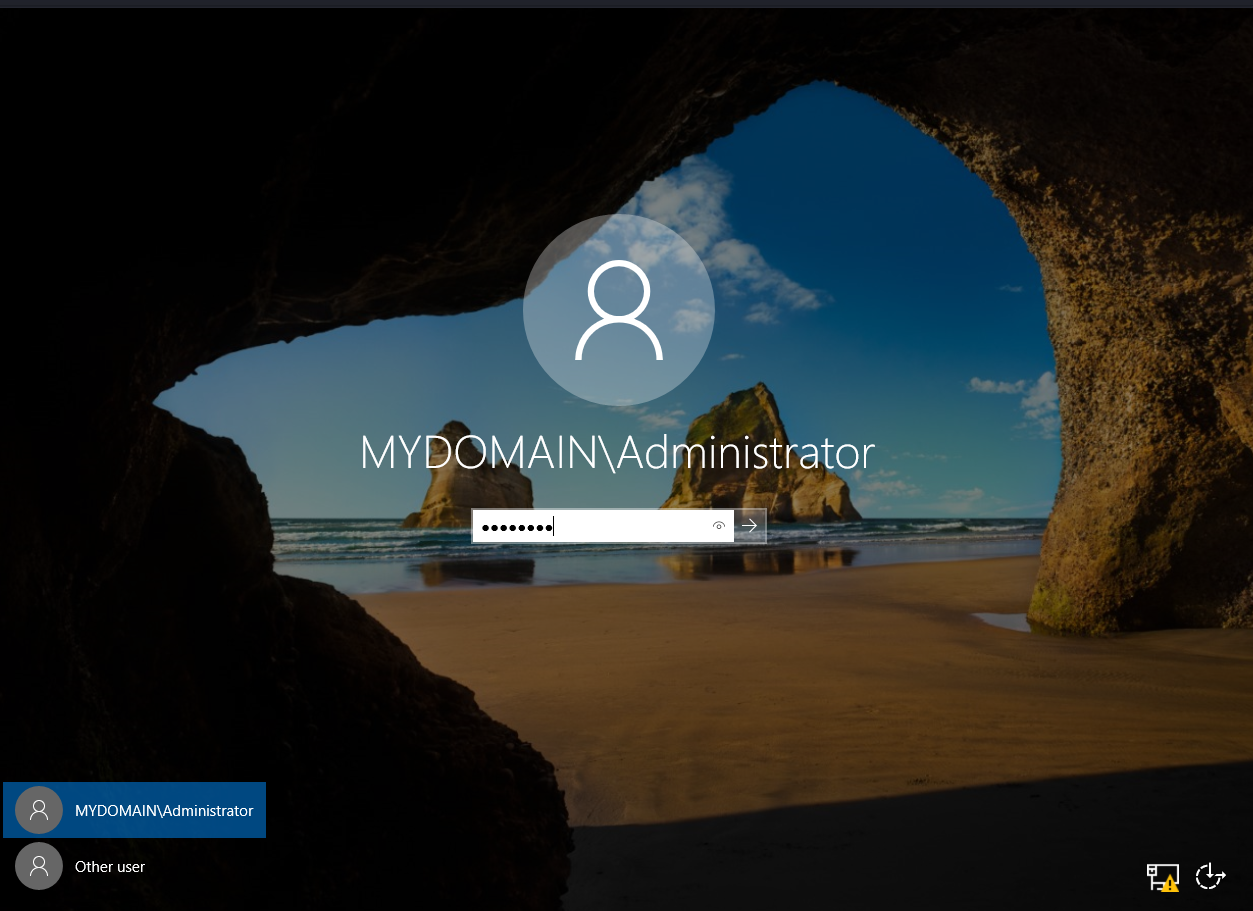
After the restart the sign-in screen showed the domain. The server was now a domain controller. The Administrator account now belonged to the new domain.
Step 45
6. Create an OU and a test user
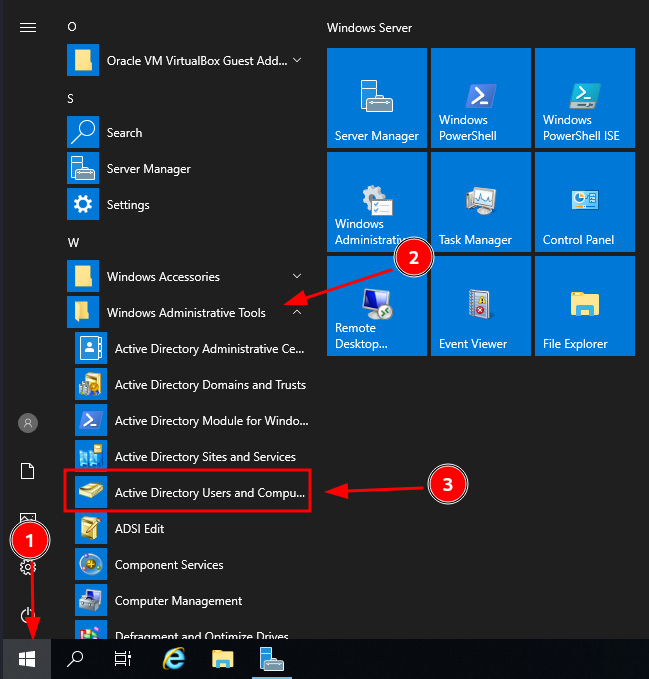
I opened Active Directory Users and Computers from Administrative Tools.
Step 46
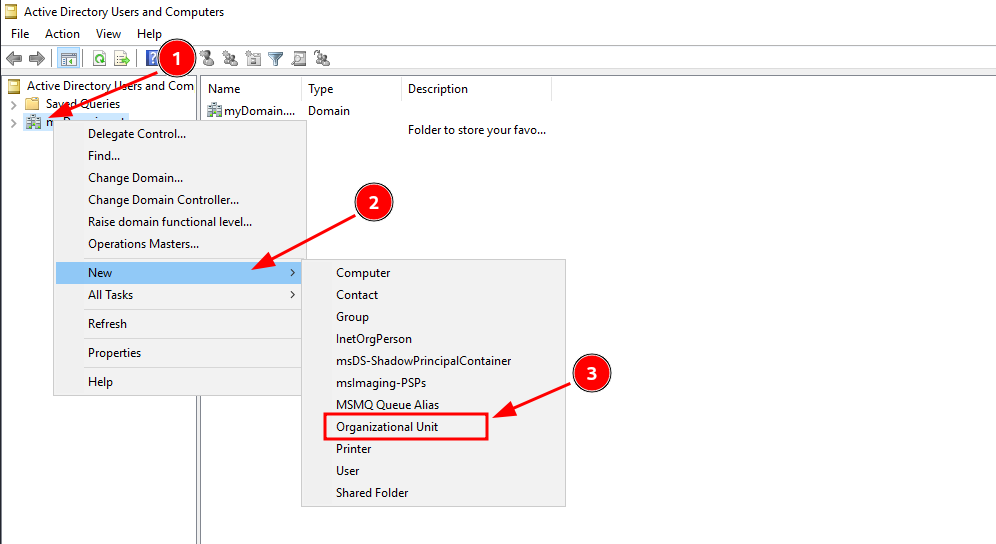
I right-clicked the domain and chose New > Organizational Unit. An OU gave me one place to keep my accounts. Otherwise they end up in the default containers.
Step 47
I named the OU and created it.
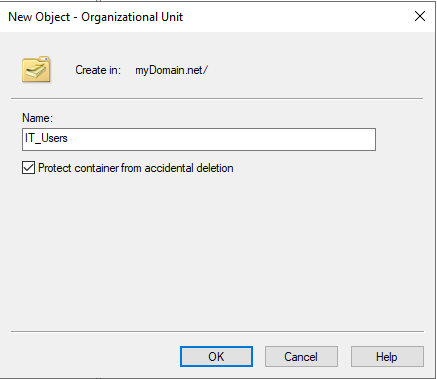
Step 48
I right-clicked the new OU and chose New > User.
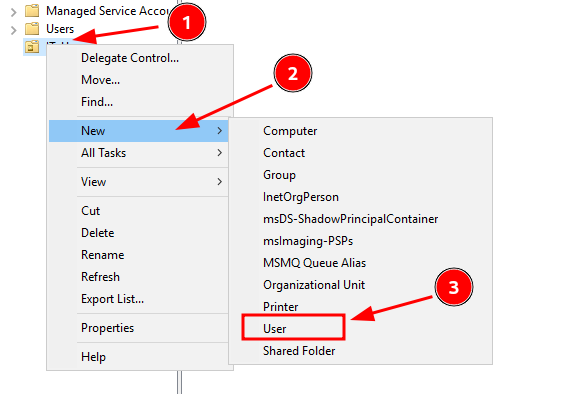
Step 49
I entered a first name, last name, and logon name. I made this first user by hand. Later I imported a larger batch with PowerShell.
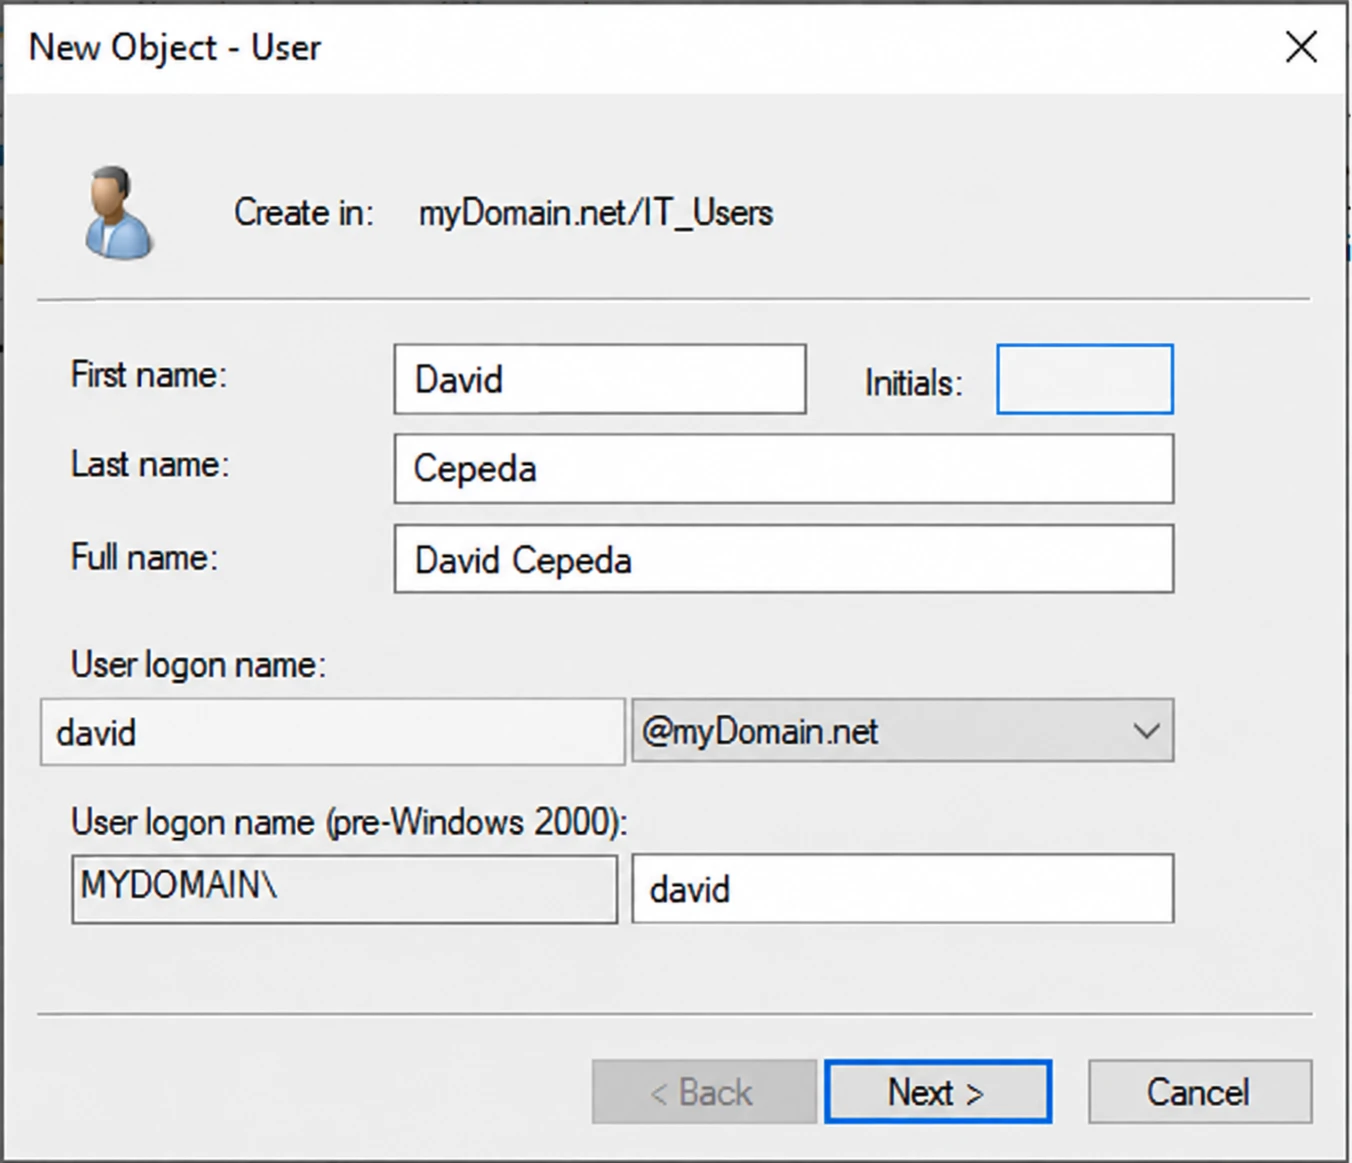
Step 50
I set a password and picked the password options. A real company would follow its own policy here, like forcing a change at first sign-in. I kept it simple so I could test over and over.
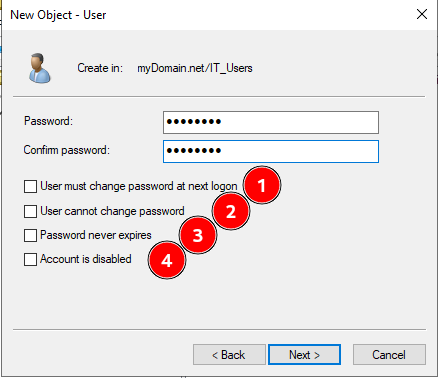
Step 51
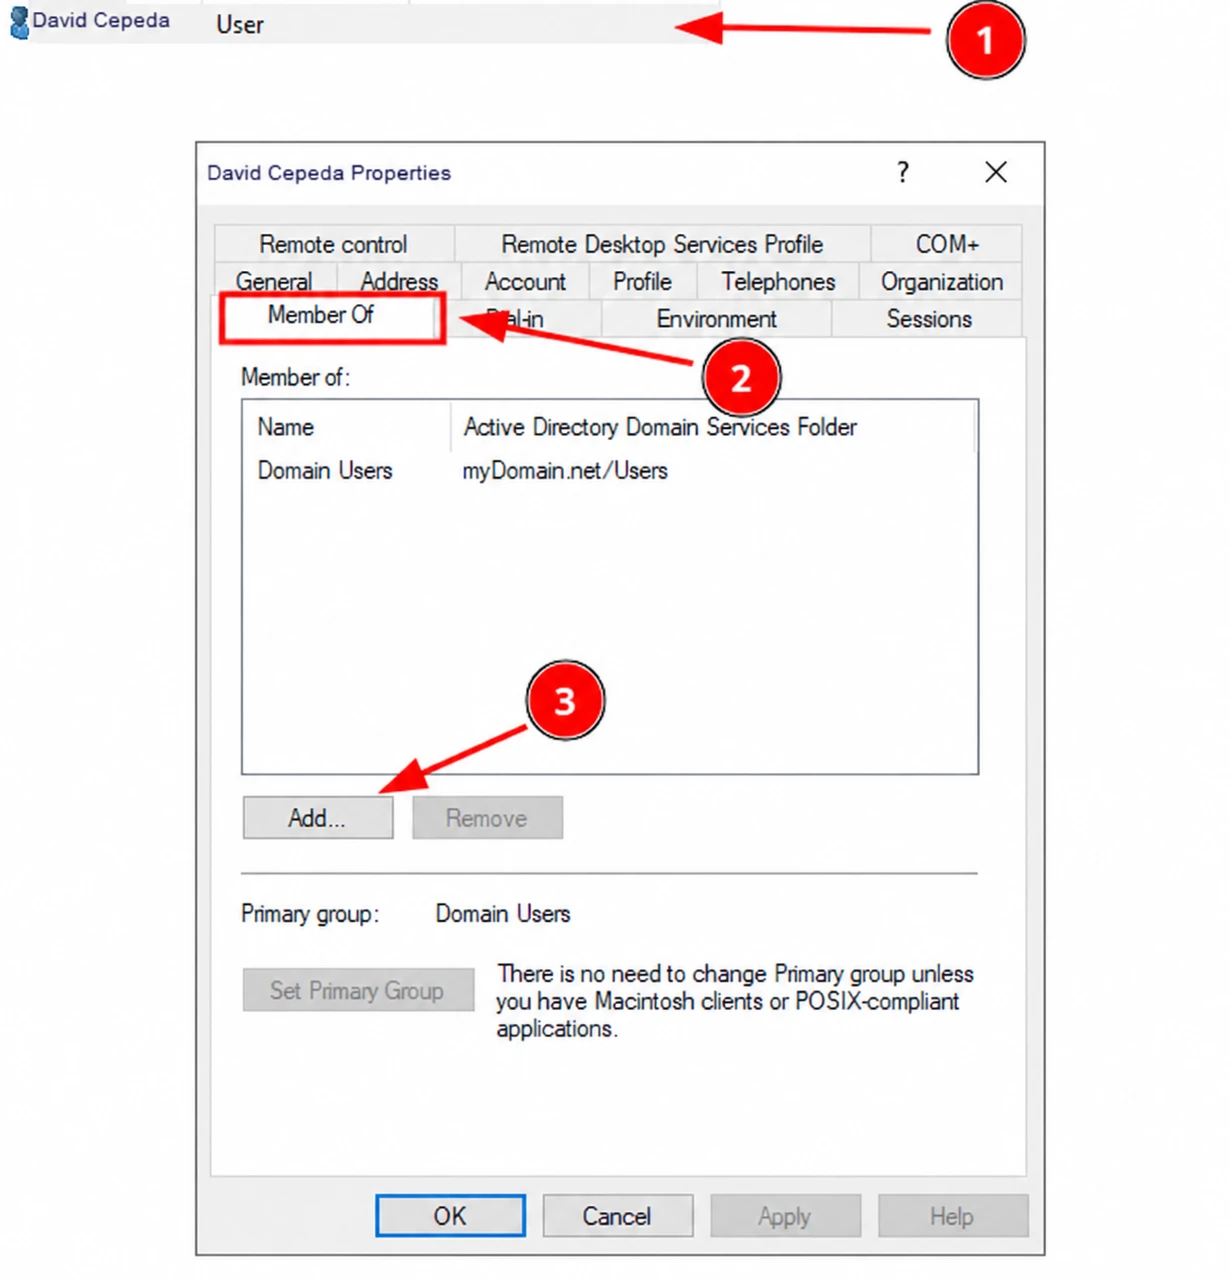
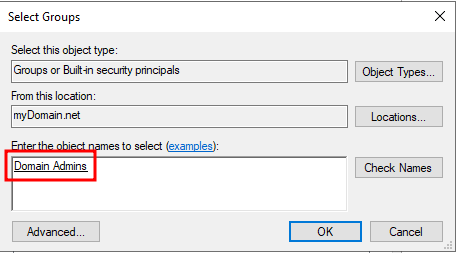
I opened the user’s properties and added it to Domain Admins. I wanted this test account to have admin rights. Domain Admins has broad control over the domain, so be careful with it anywhere real.
Step 52
I confirmed the group and applied it.
Step 53
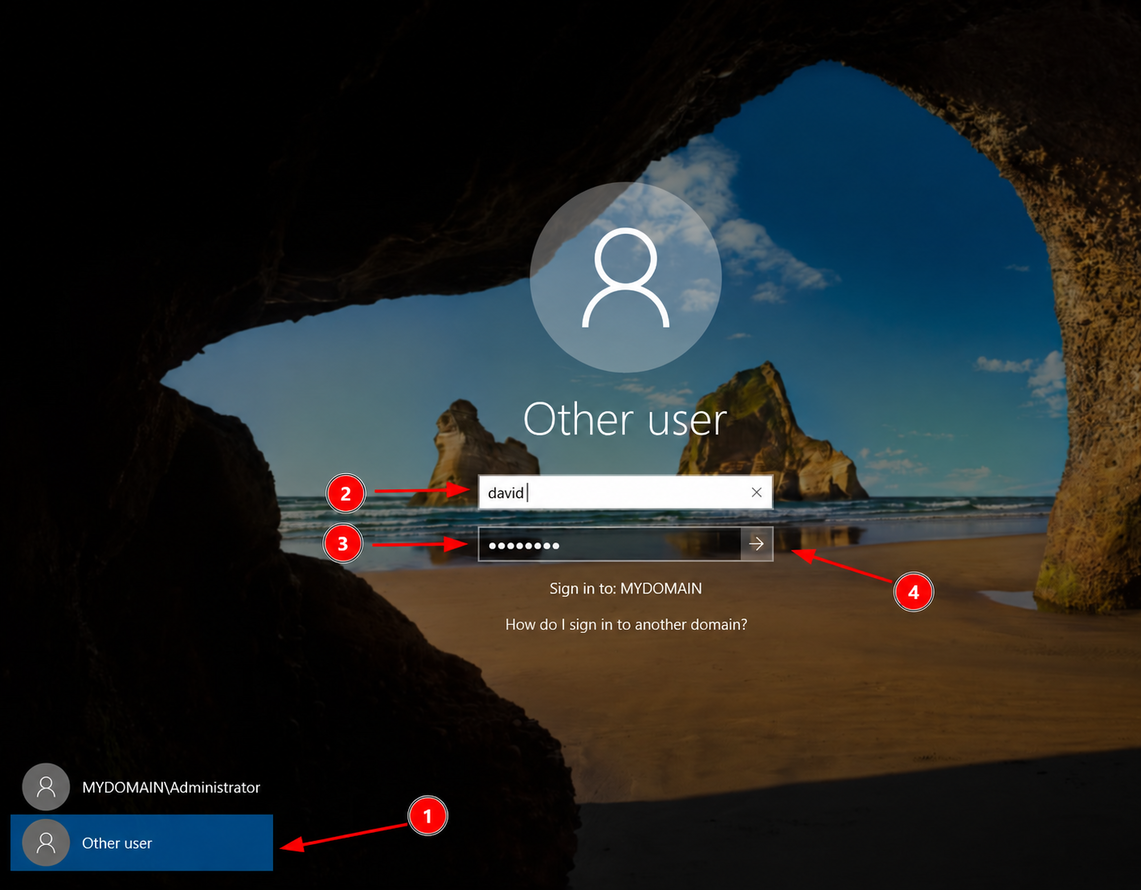
I signed out, chose Other user, and signed in with the new account. It worked. The account existed and could authenticate against the domain controller.
Step 54
7. Set up Remote Access and NAT
The Windows 10 client only lives on the internal network. For it to reach the internet, the server has to route traffic between its two adapters.
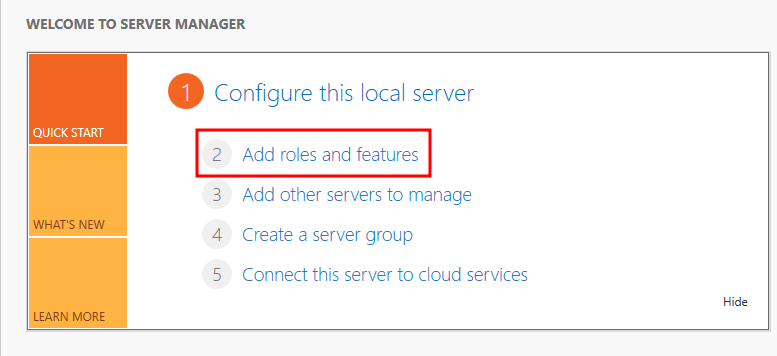
I went back to Add Roles and Features in Server Manager.
Step 55
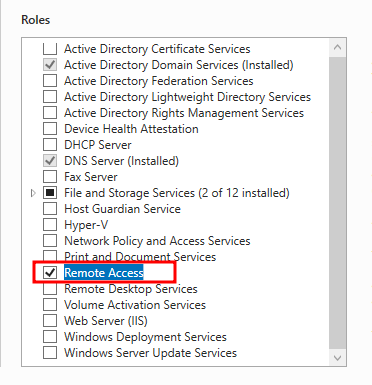
I selected the Remote Access role.
Step 56
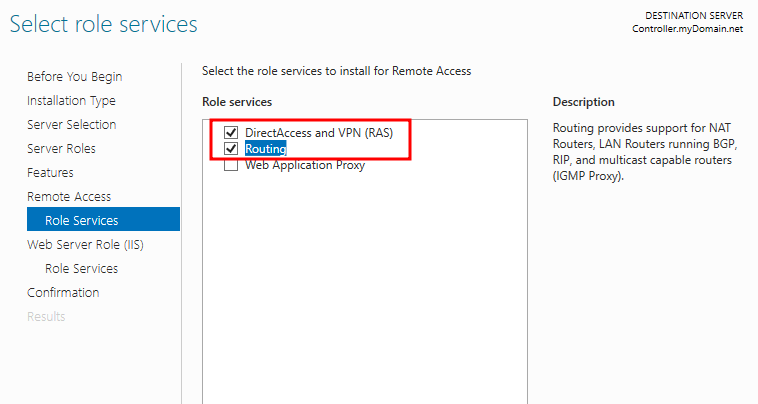
Under role services I enabled Routing and the Remote Access pieces it needs. Then I finished the wizard.
Step 57
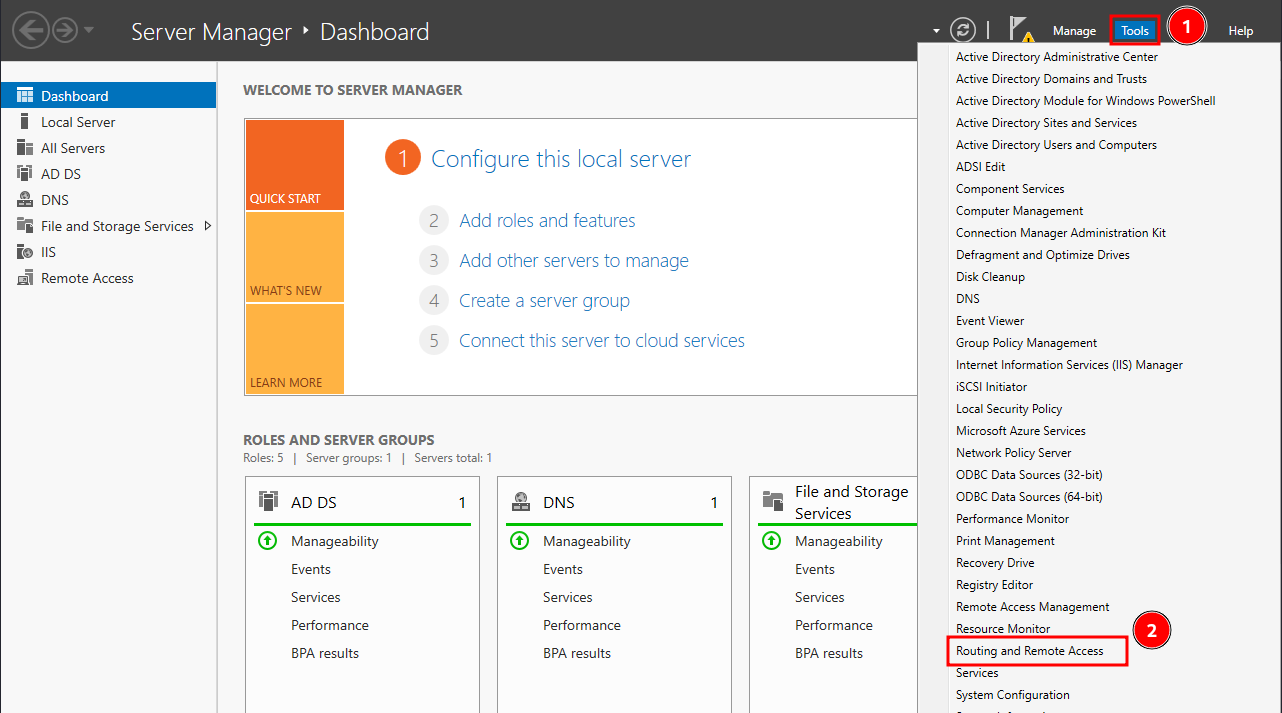
After the install I opened Tools > Routing and Remote Access.
Step 58
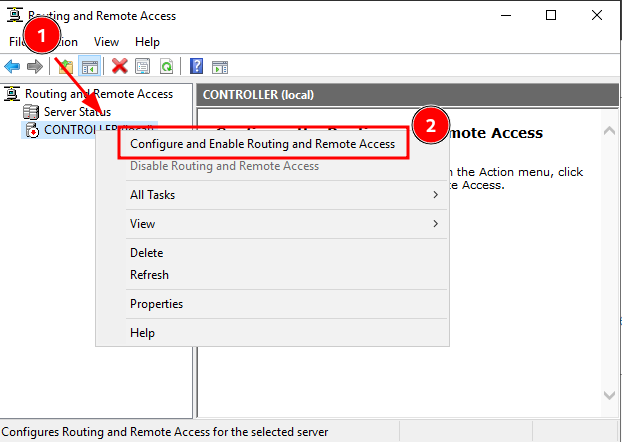
I right-clicked the server and chose Configure and Enable Routing and Remote Access.
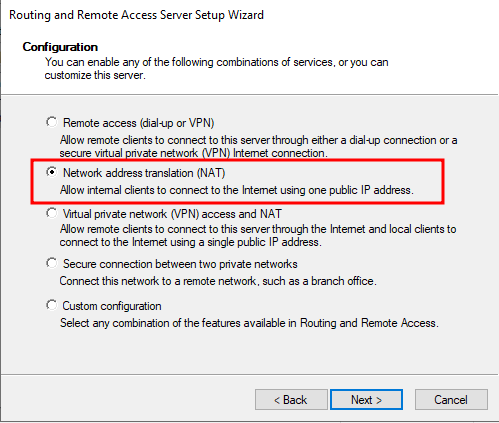
Step 59
I picked NAT. NAT lets internal devices send traffic out through the server’s external adapter. Their internal addresses stay private.
Step 60
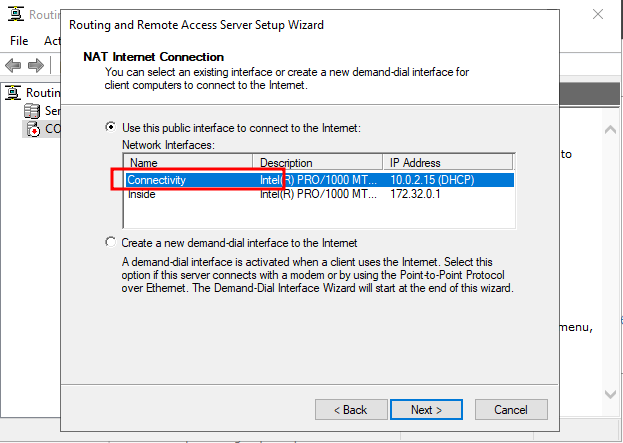
I selected the adapter that goes out through VirtualBox NAT. This is where the adapter names paid off. It was easy to avoid picking the internal one by mistake. Then I finished the wizard.
Step 61
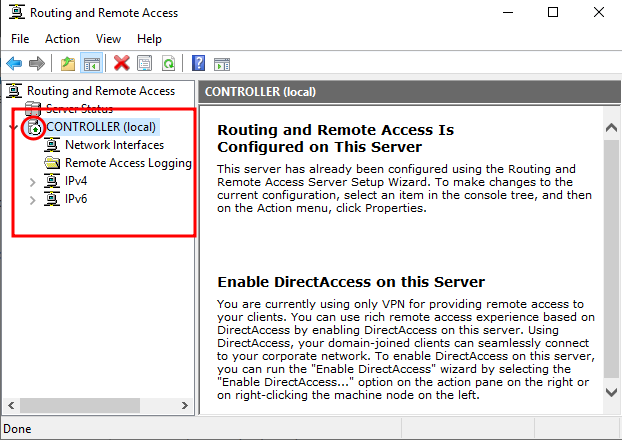
Routing and Remote Access showed the server as active. The routing config appeared under the server in the console.
Step 62
8. Install and configure DHCP
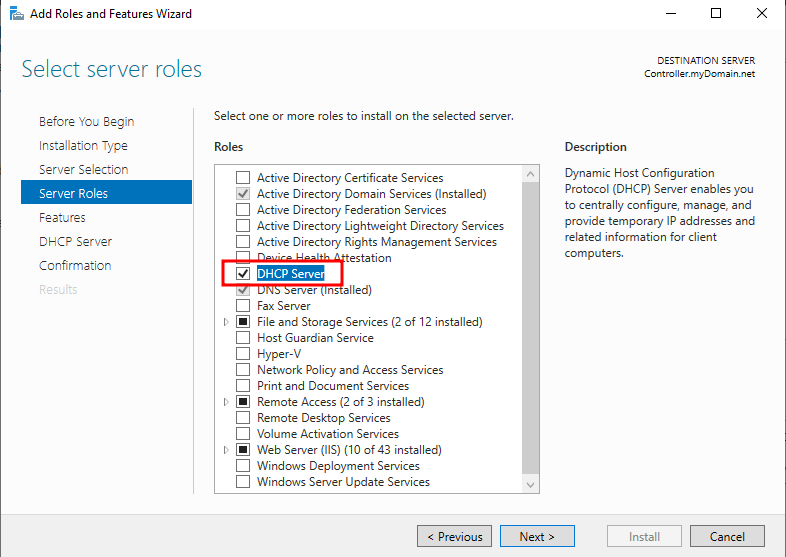
Next I wanted the server to hand out network settings to internal clients. I went back to Add Roles and Features and installed the DHCP Server role.
Step 63
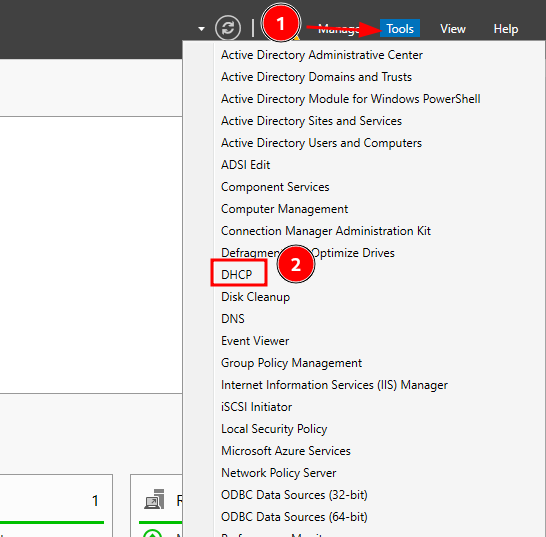
When it finished I opened Tools > DHCP.
Step 64
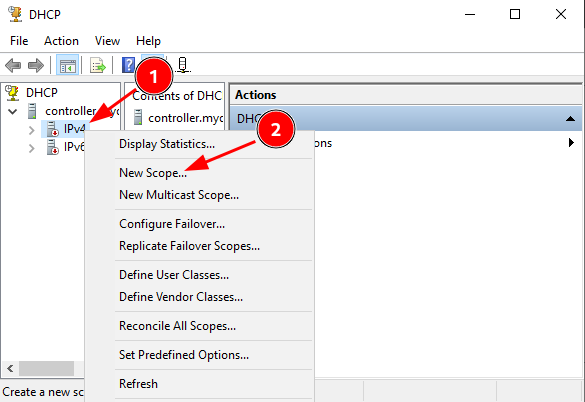
I expanded the server, right-clicked IPv4, and created a New Scope.
Step 65
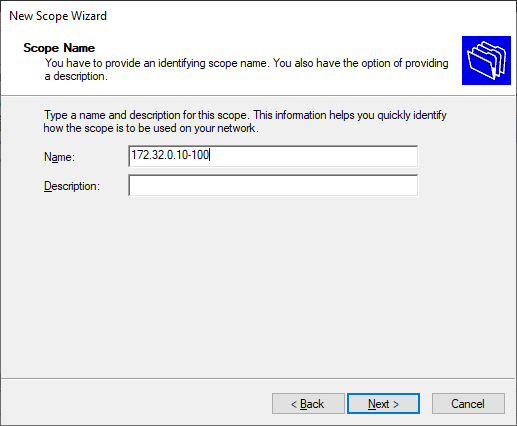
I gave the scope a name based on the subnet so it is easy to spot later.
Step 66
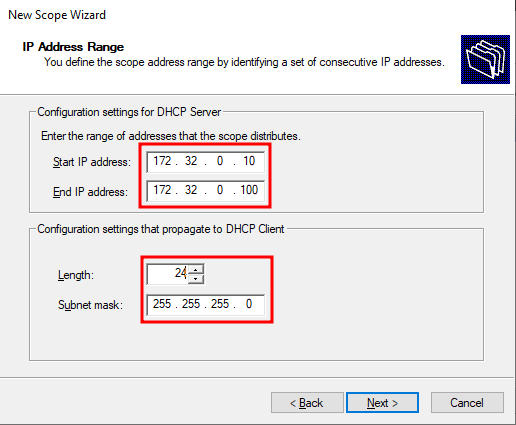
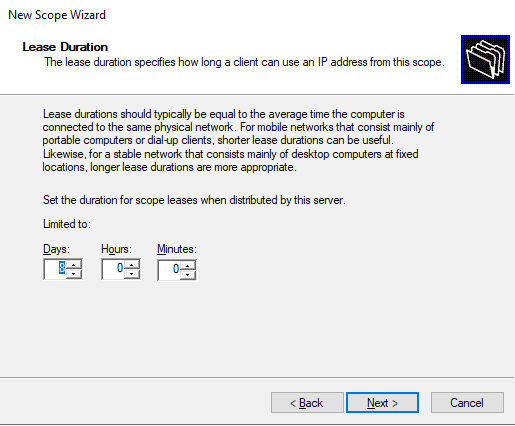
I set the start and end addresses and the subnet mask. The server uses 172.32.0.1. The client later got 172.32.0.10 from this range.
Step 67
I skipped exclusions. I didn’t need to reserve any part of the range.
Step 68
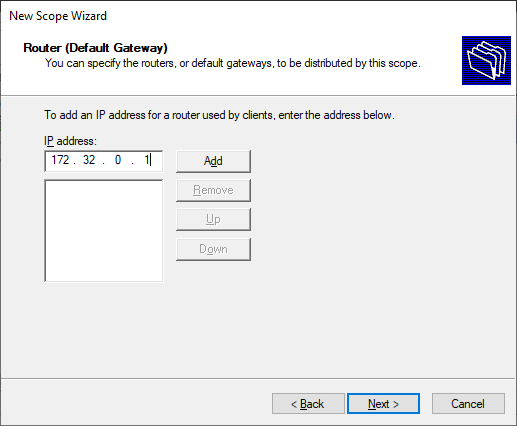
I set 172.32.0.1 as the default gateway. That is the server’s internal adapter, which now routes the client’s traffic. I clicked through the rest of the scope options and finished.
Step 69
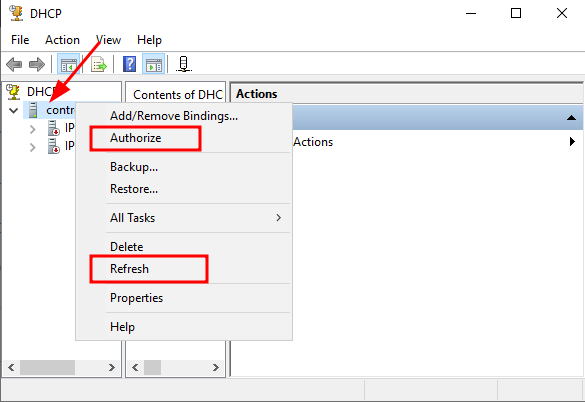
I authorized the DHCP server in Active Directory and refreshed the console. The server can’t serve clients until it is authorized.
Step 70
9. Create users with PowerShell
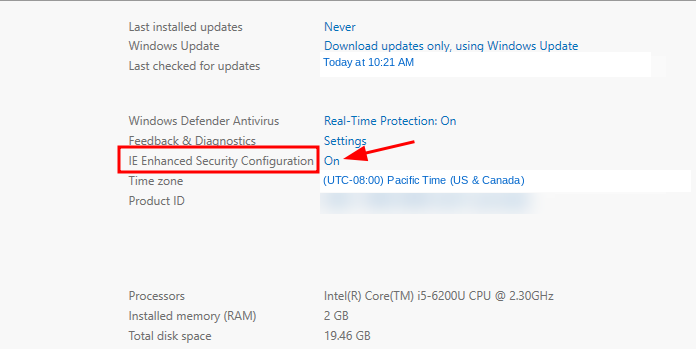
I needed to download my PowerShell project from the server’s browser. So first I turned off Internet Explorer Enhanced Security Configuration in Server Manager.
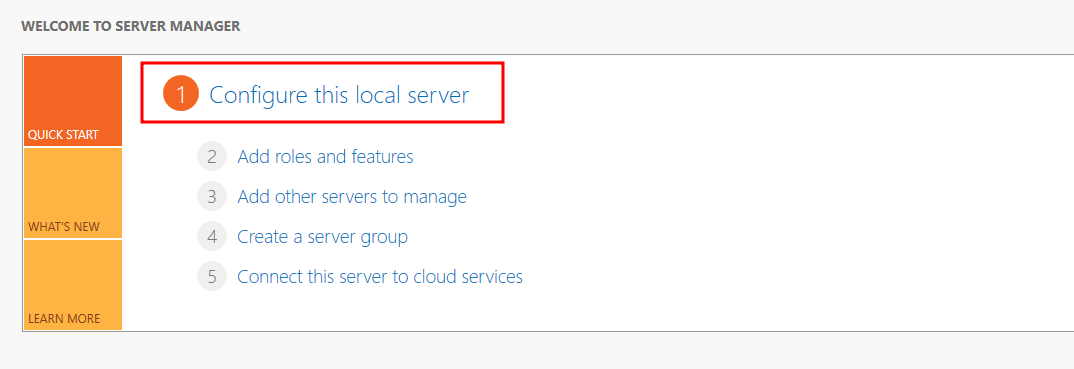
I opened Local Server in Server Manager.
Step 71
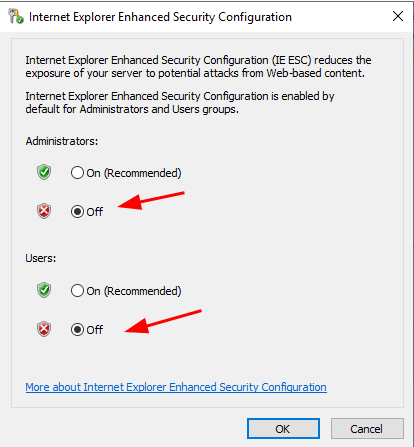
I turned off IE Enhanced Security Configuration for my account. This environment is isolated, so that was fine here.
Step 72
I confirmed the change.
Step 73
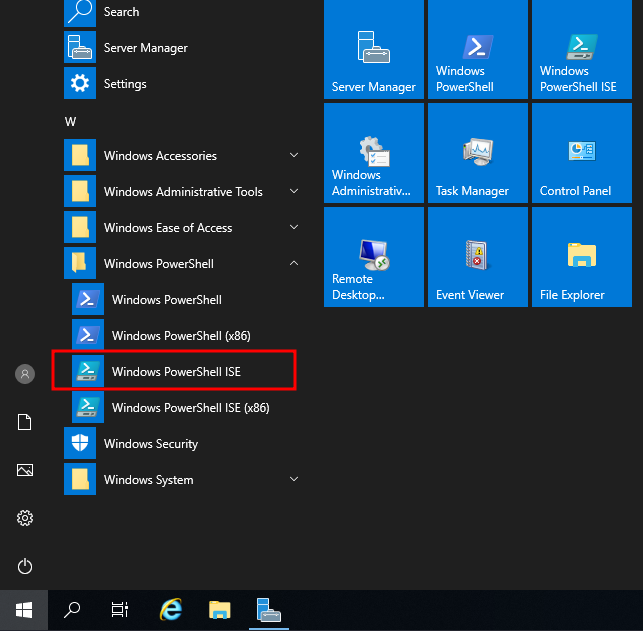
I opened Windows PowerShell ISE as Administrator.
Step 74
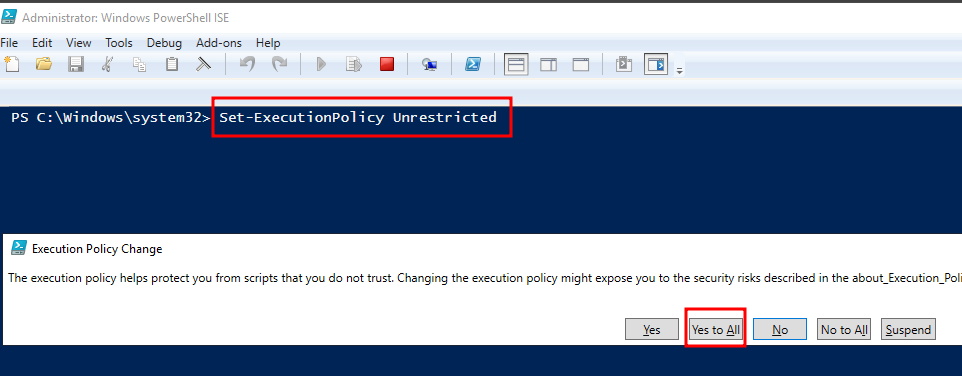
I changed the execution policy:
Set-ExecutionPolicy Unrestricted
I confirmed the prompt. This loosens PowerShell’s script restrictions. Know what a script does before you run it with this setting.
Step 75
I moved into the extracted AD_PS folder. The username in the path
depends on your account. The path looks like this:
cd C:\Users\<your-user-account>\Downloads\AD_PS-master\AD_PS-master

Step 76
The script lives in my dcepeda31415/AD_PS
repo. I downloaded and extracted it. It has the PowerShell script and
the names.txt file. The script reads each name from that file and
creates an Active Directory account in an OU.
Before running it, open 1_CREATE_USERS.ps1 and replace
CHANGE_ME_BEFORE_RUNNING with the password you want for the users. I
used Pass0worD locally. Don’t commit your real password back to a
public repo.
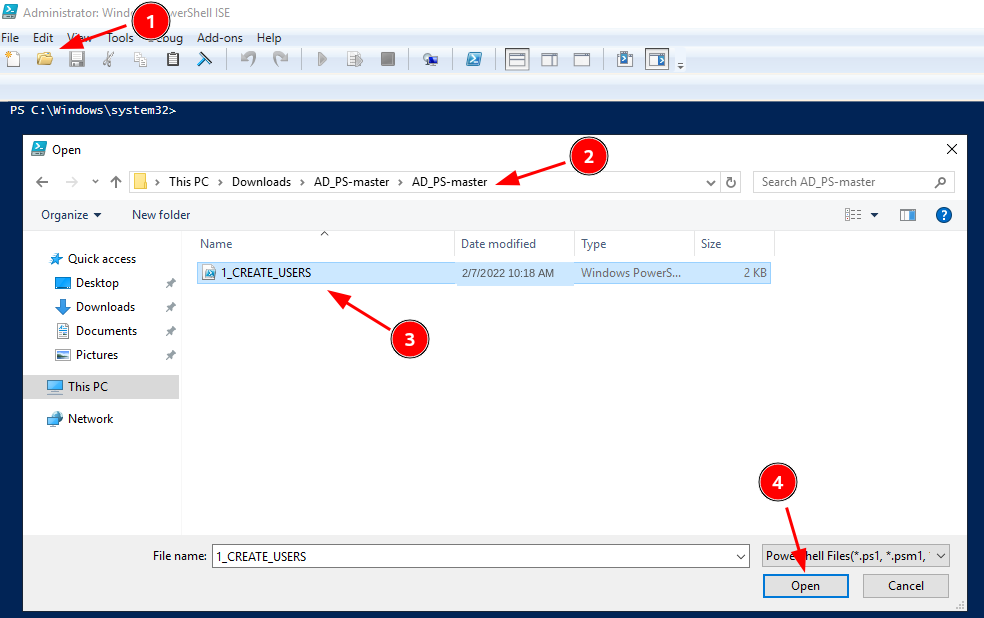
I opened the script in ISE and ran it.
Step 77
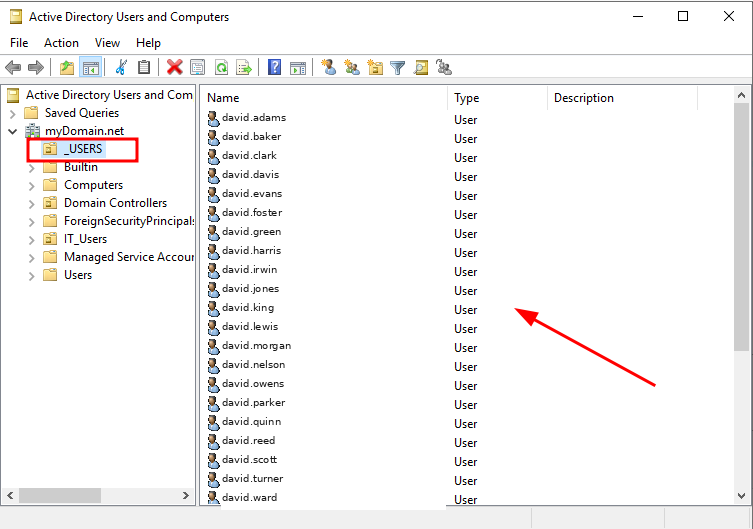
Back in Active Directory Users and Computers, the OU now had all the
imported accounts. Usernames like david.adams, david.baker, david.clark, and
the rest in the screenshots came from this script.
Step 78
10. Build the Windows 10 client
I created a second VM for Windows 10. The steps match the server VM. I set the RAM and disk size and turned on the same convenience options.
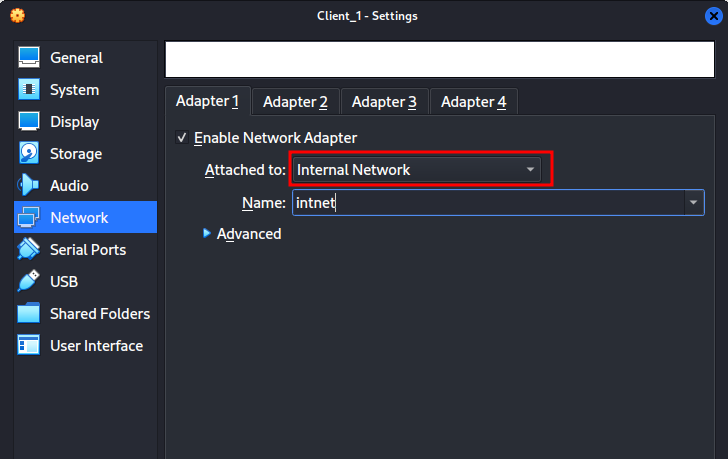
The key difference is networking. The client connects only to the Internal Network, not to VirtualBox NAT. That forces it to rely on the server for DHCP and routing.
Step 79
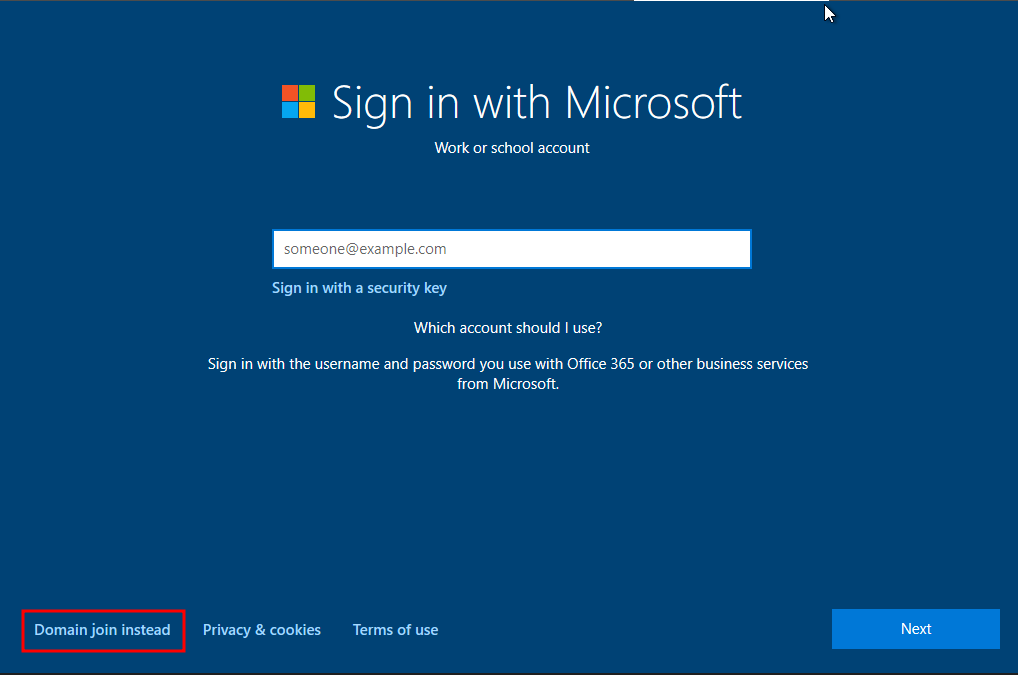
I started the VM and attached the Windows 10 ISO when asked. I installed Windows normally and picked my region and keyboard. I skipped the second keyboard. When setup asked about the account type, I chose Domain join instead.
Step 80
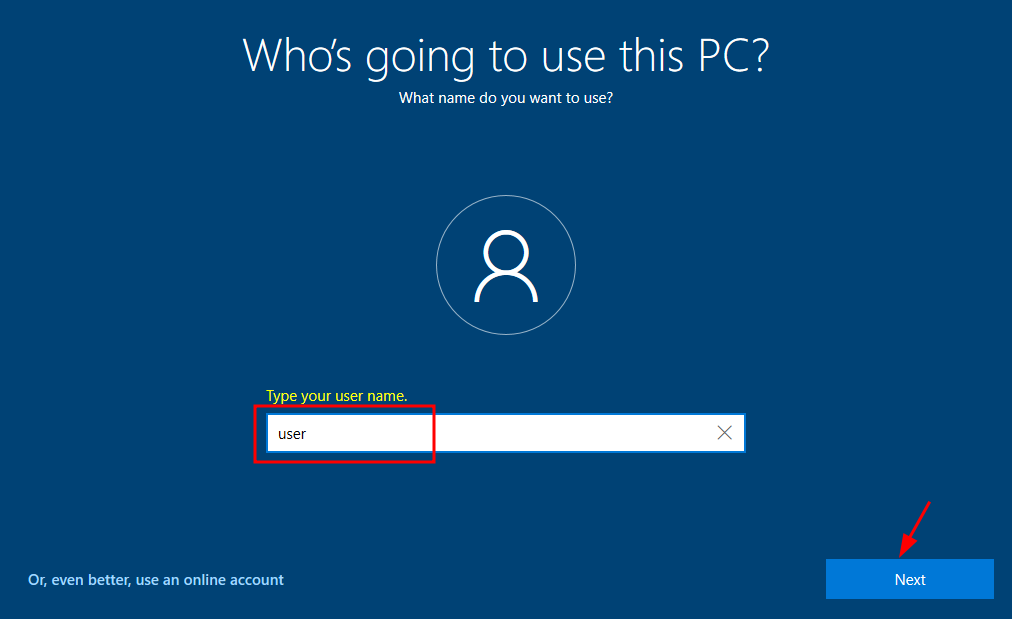
I entered a temporary local username. I left the password blank. This account only exists to finish setup before the domain join.
Step 81
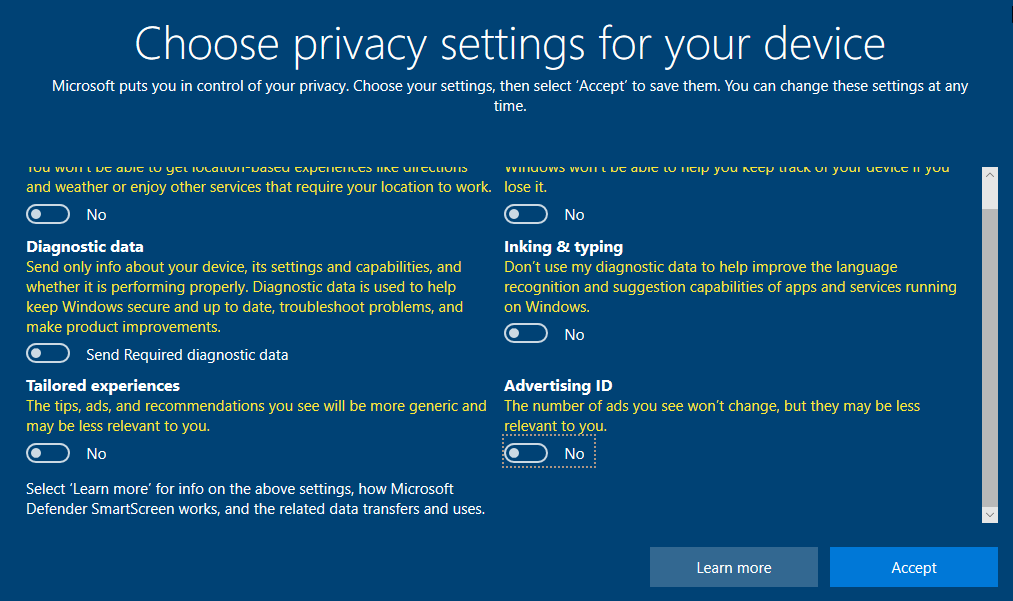
I turned off the optional privacy features and clicked through the rest. I chose Not now for Cortana.
Step 82
11. Check DHCP and internet access
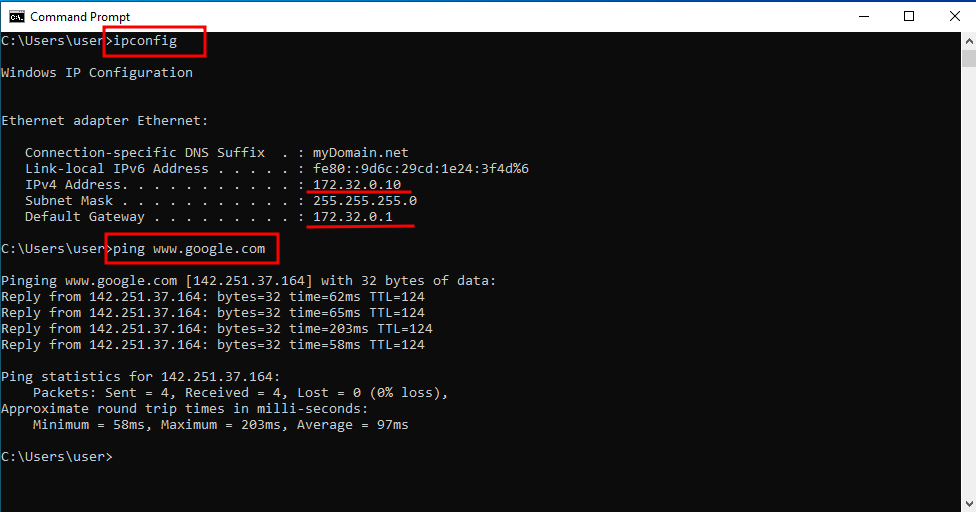
Once Windows 10 hit the desktop, I opened Command Prompt and checked the network config. The client got 172.32.0.10 from the server. The server’s internal address is 172.32.0.1.
I tested connectivity too. DHCP gave the client its address. The server’s NAT gave it a route out.
Step 83
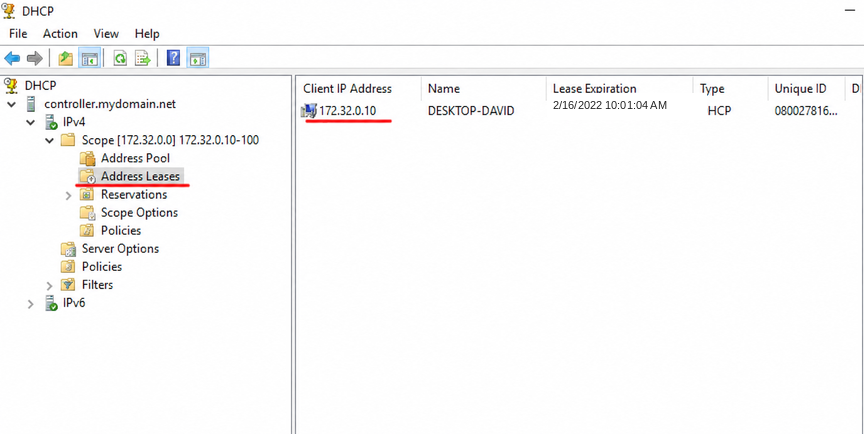
On the server I opened DHCP > IPv4 > Scope > Address Leases. The client’s lease was there. So the address really came from my DHCP service.
Step 84
12. Join the client to the domain
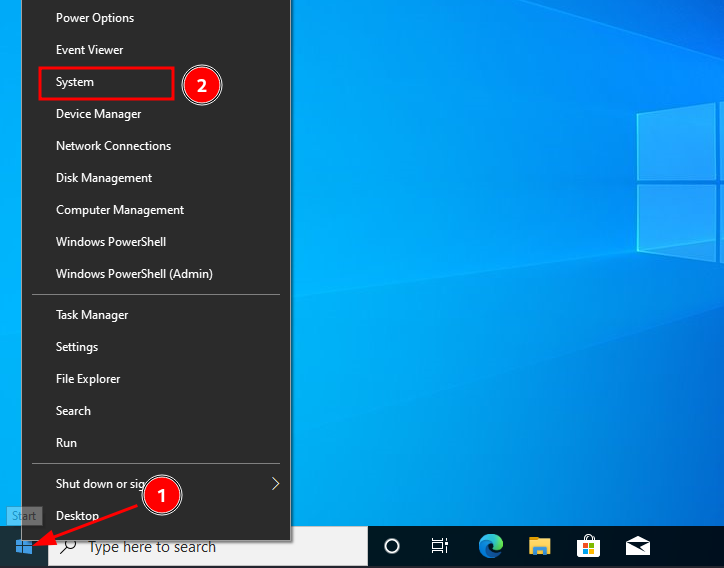
The client was on the right network, but it was still a standalone PC. I opened System from the Start menu to join it to the domain.
Step 85
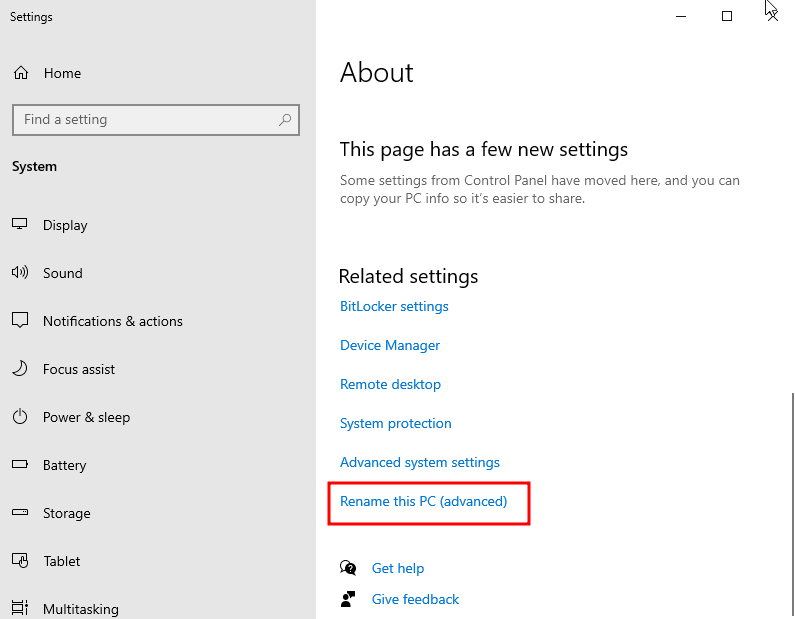
I opened Rename this PC (advanced) to get to the name and domain settings.
Step 86
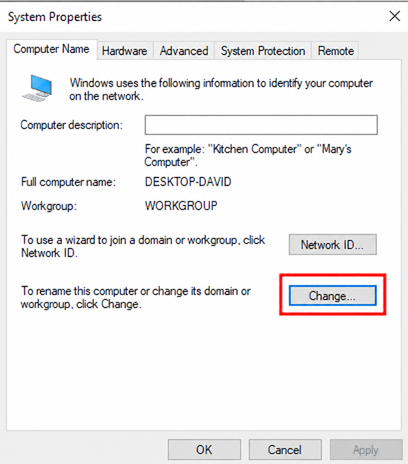
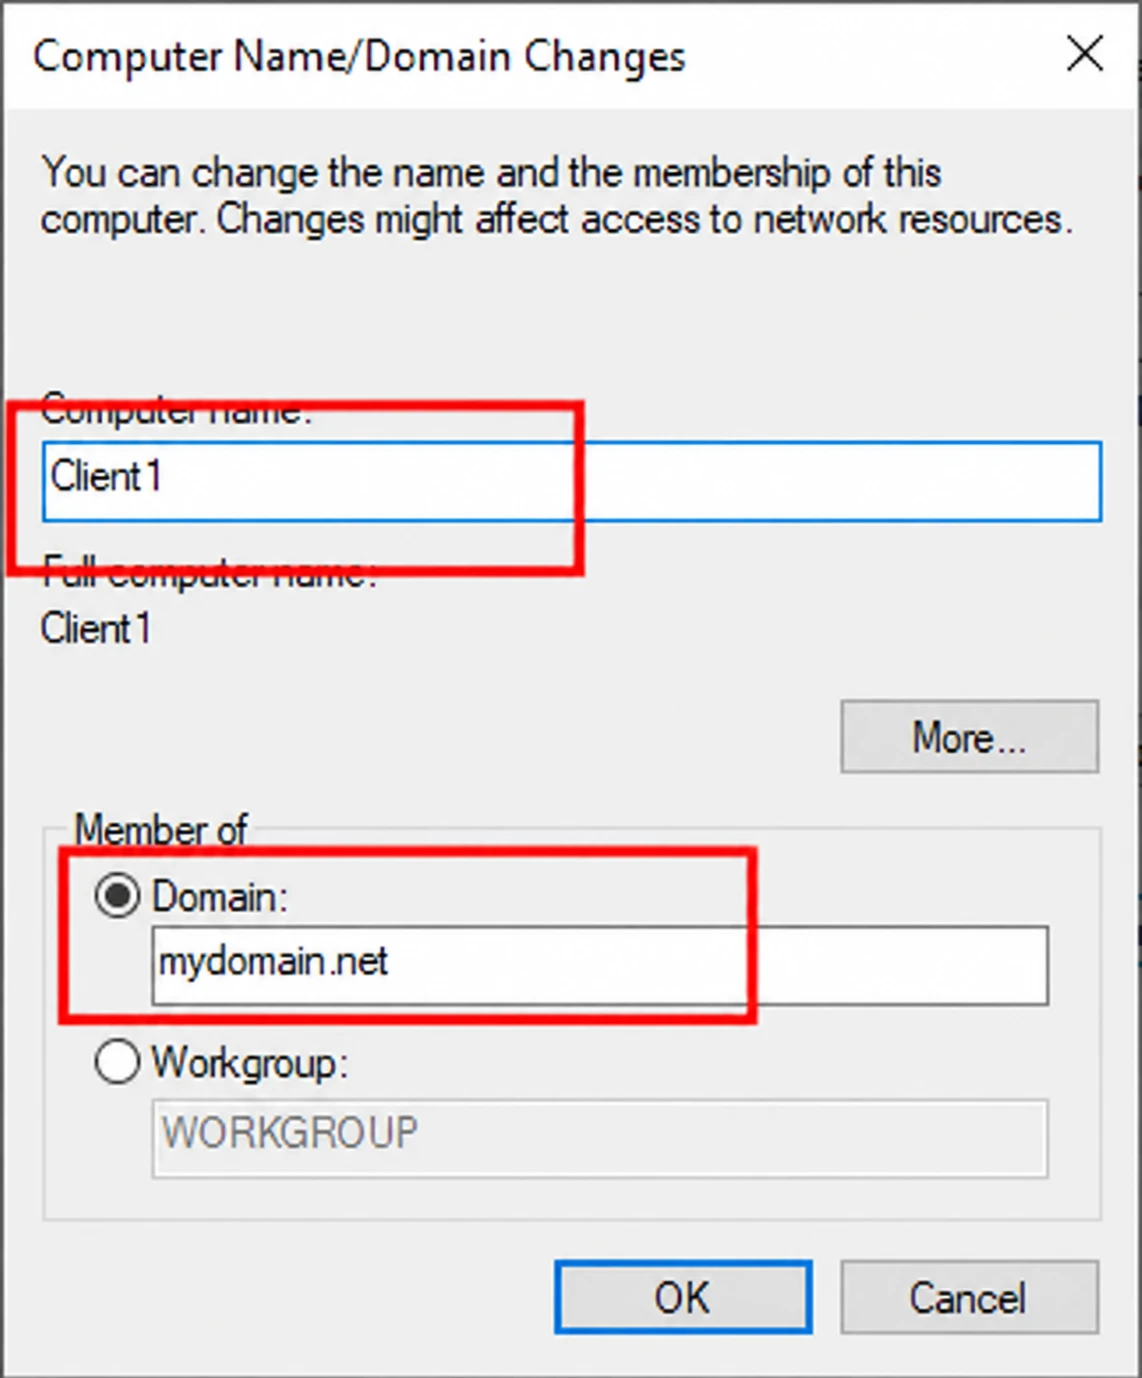
I clicked Change and set a computer name. I selected Domain and entered mydomain.net.
Step 87
I confirmed the domain info.
Step 88
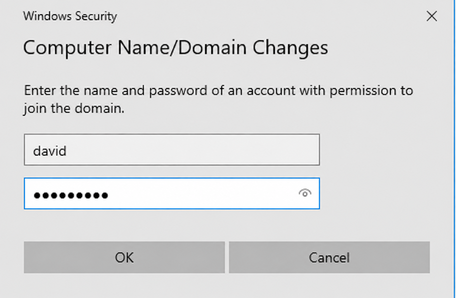
Windows asked for an account that can join computers to the domain. I entered my domain credentials.
Step 89
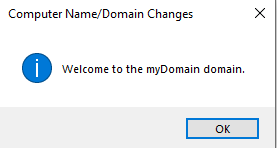
The credentials and DNS were right, so Windows confirmed the join.
Step 90
I restarted the client to finish the join.
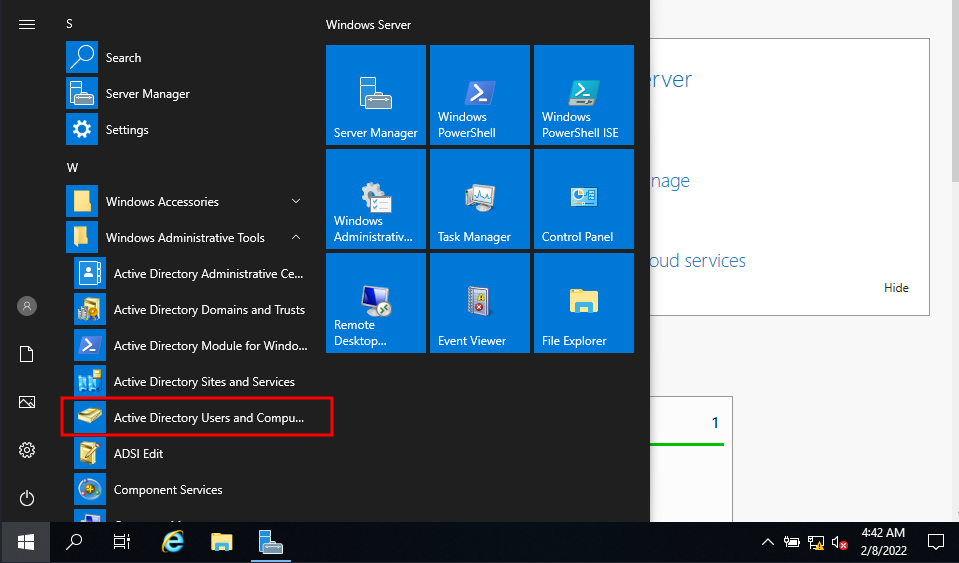
Then I went back to the server and opened Active Directory Users and Computers.
Step 91
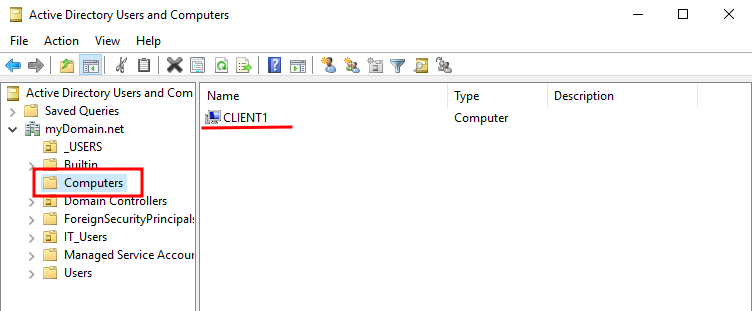
In the Computers container, the Windows 10 machine showed up as a computer object. The join worked.
Step 92
13. Sign in as a domain user
On the Windows 10 sign-in screen I chose Other user. This time I signed in with one of my Active Directory accounts instead of the local one.
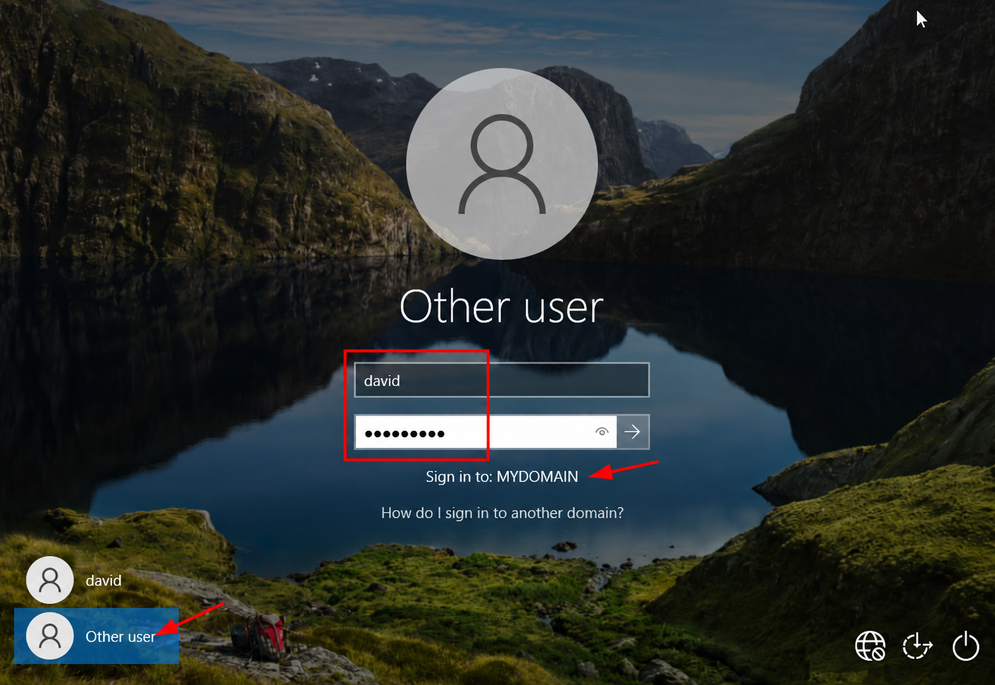
Step 93
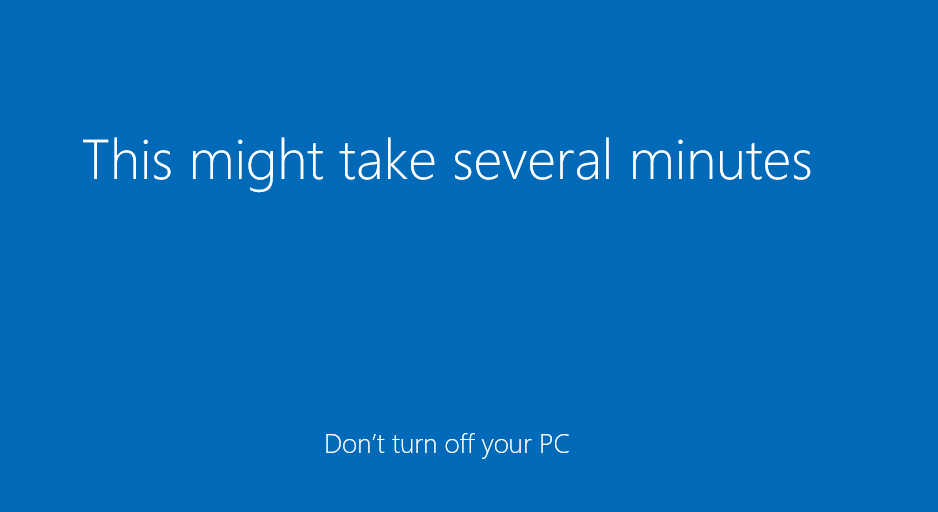
The first domain sign-in on a machine takes longer. Windows has to build the user’s local profile and desktop folders.
Step 94
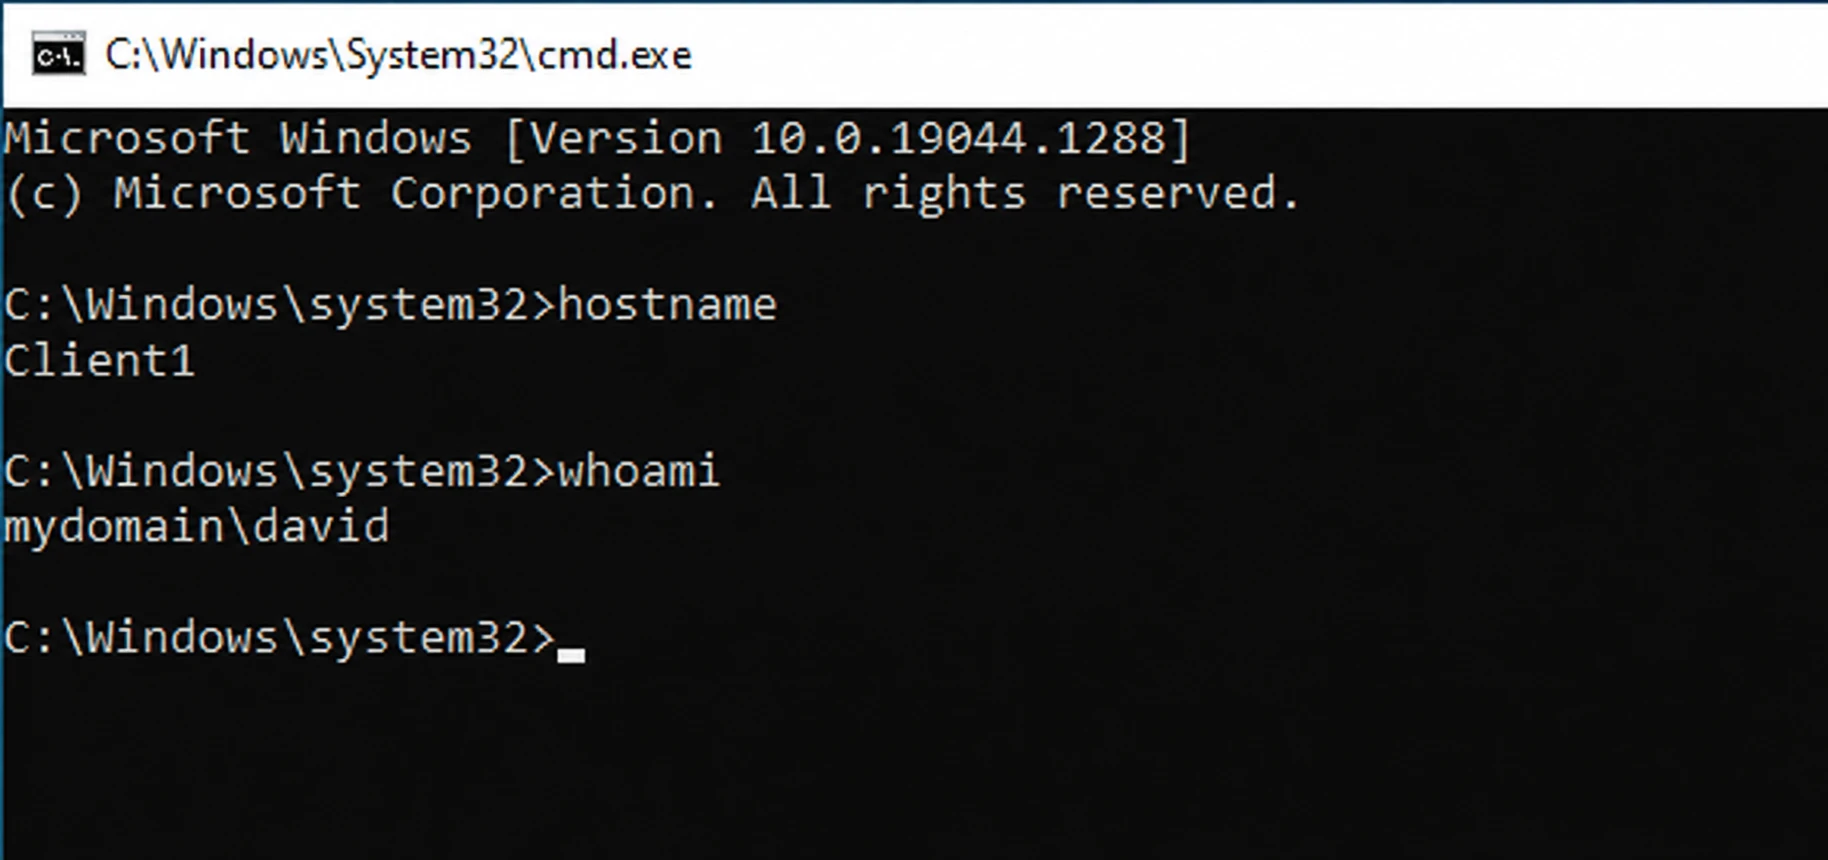
When the desktop loaded, I opened Command Prompt and ran:
whoami
It showed the domain and username, like this:
mydomain\david
So the session was running as an Active Directory identity, not the local account.
Step 95
Where it ended up
The domain was up and working. The server ran as the domain controller
for myDomain.net. Active Directory had my manual user and all the
script-created users. DHCP handed out internal addresses. Routing and
Remote Access gave the Windows 10 client NAT.
The client was registered in Active Directory and could authenticate domain users. Now I have a working setup to practice real admin work. I can use it for users and groups, Group Policy, permissions, DNS, DHCP, workstation management, and login troubleshooting.